WPF 3D:简单的Point3D和Vector3D动画创造一个旋转的正方体

news/2024/7/24 2:21:58
WPF 3D:简单的Point3D和Vector3D动画创造一个旋转的正方体
原文: WPF 3D:简单的Point3D和Vector3D动画创造一个旋转的正方体

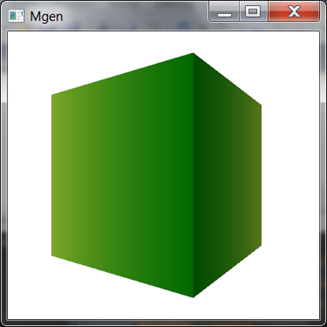
运行结果:

image


事实上很简单,定义好一个正方体,处理好纹理。关于MeshGeometry3D的正确定义和纹理这里就不多讲了,可以参考我以前写过的一些文章:

WPF 3D: MeshGeometry3D纹理坐标的正确定义

WPF 3D:MeshGeometry3D的定义和光照


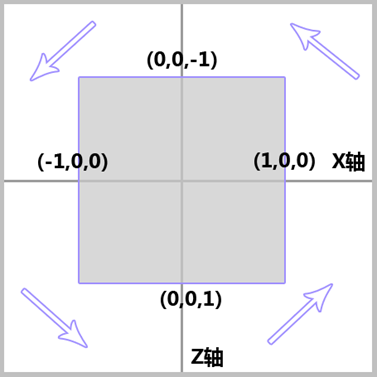
接下来就是怎样让它动起来。我们通过3D点动画来改变照相机(Camera类型)的位置(Position属性)从而使正方体动起来(这样的话实际上正方体没动,而是照相机在动)。由于正方体是水平旋转的,那么Y轴可以忽略,参考下面整个3D图形的俯视图,动画是这样进行的:
image


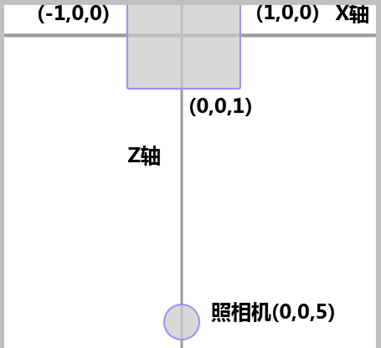
我们的照相机初始时放置在Z轴(0,0,5)的位置,如下图:

image


所以旋转照相机只需要把Position属性调整到相应的点就可以,分别是0,0,5 5,0,0 0,0,-5 –5,0,0 ,如下代码:

<Point3DAnimationUsingKeyFrames Storyboard.TargetProperty="Position"

                               Storyboard.TargetName="camera">

    <LinearPoint3DKeyFrame KeyTime="0:0:1" Value="5 0 0"/>

    <LinearPoint3DKeyFrame KeyTime="0:0:2" Value="0 0 -5"/>

    <LinearPoint3DKeyFrame KeyTime="0:0:3" Value="-5 0 0"/>

    <LinearPoint3DKeyFrame KeyTime="0:0:4" Value="0 0 5"/>

</Point3DAnimationUsingKeyFrames>


注意上面使用的是Point3DAnimation类型。接下来需要注意的,我们还需要调整照相机的方向(Camera类型的LookDirection属性),否则照相机还会保持原方向。这个属性类型是3D向量,所以需要用Vector3DAnimation类型,调整向量也很简单,只需要根据照相机的移动点把方向调整到中心点。

如下代码:

<Vector3DAnimationUsingKeyFrames Storyboard.TargetProperty="LookDirection"

                                Storyboard.TargetName="camera">

    <LinearVector3DKeyFrame KeyTime="0:0:1" Value="-1 0 0"/>

    <LinearVector3DKeyFrame KeyTime="0:0:2" Value="0 0 1"/>

    <LinearVector3DKeyFrame KeyTime="0:0:3" Value="1 0 0"/>

    <LinearVector3DKeyFrame KeyTime="0:0:4" Value="0 0 -1"/>

</Vector3DAnimationUsingKeyFrames>


当运行动画时,你会发现等方块背面转过来后,它还保持这暗色,原因是整个光照没有被旋转。因此最好把光照再旋转一下就趋近完美了,在动画中再调节DirectionalLight的Direction属性就可以了,这个也是Vector3D类型。


下面是完整的XAML代码:

<Viewport3D>

    <Viewport3D.Triggers>

        <EventTrigger RoutedEvent="Loaded">

            <BeginStoryboard>

                <Storyboard RepeatBehavior="Forever">

                    <Point3DAnimationUsingKeyFrames Storyboard.TargetProperty="Position"

                                                   Storyboard.TargetName="camera">

                        <LinearPoint3DKeyFrame KeyTime="0:0:1" Value="5 0 0"/>

                        <LinearPoint3DKeyFrame KeyTime="0:0:2" Value="0 0 -5"/>

                        <LinearPoint3DKeyFrame KeyTime="0:0:3" Value="-5 0 0"/>

                        <LinearPoint3DKeyFrame KeyTime="0:0:4" Value="0 0 5"/>

                    </Point3DAnimationUsingKeyFrames>

                    <Vector3DAnimationUsingKeyFrames Storyboard.TargetProperty="LookDirection"

                                                    Storyboard.TargetName="camera">

                        <LinearVector3DKeyFrame KeyTime="0:0:1" Value="-1 0 0"/>

                        <LinearVector3DKeyFrame KeyTime="0:0:2" Value="0 0 1"/>

                        <LinearVector3DKeyFrame KeyTime="0:0:3" Value="1 0 0"/>

                        <LinearVector3DKeyFrame KeyTime="0:0:4" Value="0 0 -1"/>

                    </Vector3DAnimationUsingKeyFrames>

                    <Vector3DAnimationUsingKeyFrames Storyboard.TargetProperty="Direction"

                                                    Storyboard.TargetName="light">

                        <LinearVector3DKeyFrame KeyTime="0:0:1" Value="-1 0 0"/>

                        <LinearVector3DKeyFrame KeyTime="0:0:2" Value="0 0 1"/>

                        <LinearVector3DKeyFrame KeyTime="0:0:3" Value="1 0 0"/>

                        <LinearVector3DKeyFrame KeyTime="0:0:4" Value="0 0 -1"/>

                    </Vector3DAnimationUsingKeyFrames>

                </Storyboard>

            </BeginStoryboard>

        </EventTrigger>

    </Viewport3D.Triggers>

    <Viewport3D.Camera>

        <PerspectiveCamera x:Name="camera" Position="0 0 5" LookDirection="0 0 -1"FieldOfView="60"/>

    </Viewport3D.Camera>

    <ModelVisual3D>

        <ModelVisual3D.Content>

            <Model3DGroup>

                <DirectionalLight Direction="0 0 -1"

                                 x:Name="light"

                                 Color="White"/>

                <GeometryModel3D>

                    <GeometryModel3D.Geometry>

                        <MeshGeometry3D Positions="-1 1 1, 1 1 1, -1 -1 1, 1 -1 1, -1 1 -1, 1 1 -1, -1 -1 -1, 1 -1 -1

                                                    1 1 1, 1 1 -1, 1 -1 1, 1 -1 -1, -1 1 1, -1 1 -1, -1 -1 1, -1 -1 -1

                                                   -1 1 1, -1 1 -1, 1 1 1, 1 1 -1, -1 -1 1, -1 -1 -1, 1 -1 1, 1 -1 -1"

                                       TriangleIndices="0 2 1, 1 2 3, 5 6 4, 5 7 6

                                                         8 10 9, 9 10 11, 13 14 12, 13 15 14

                                                         16 18 17, 17 18 19, 22 21 20, 22 23 21"

                                       TextureCoordinates="0 0, 1 0, 0 1, 1 1,

                                                            0 0, 1 0, 0 1, 1 1,

                                                            0 0, 1 0, 0 1, 1 1,

                                                            0 0, 1 0, 0 1, 1 1,

                                                            0 0, 1 0, 0 1, 1 1,

                                                            0 0, 1 0, 0 1, 1 1" />


                    </GeometryModel3D.Geometry>

                    <GeometryModel3D.Material>

                        <DiffuseMaterial>

                            <DiffuseMaterial.Brush>

                                <LinearGradientBrush StartPoint="0,0" EndPoint="1,0">

                                    <GradientStop Color="YellowGreen" Offset="0"/>

                                    <GradientStop Color="Green" Offset="1"/>

                                </LinearGradientBrush>

                            </DiffuseMaterial.Brush>

                        </DiffuseMaterial>

                    </GeometryModel3D.Material>

                </GeometryModel3D>

            </Model3DGroup>

        </ModelVisual3D.Content>

    </ModelVisual3D>

</Viewport3D>

posted on 2015-04-22 01:36 NET未来之路 阅读( ...) 评论( ...) 编辑 收藏

转载于:https://www.cnblogs.com/lonelyxmas/p/4446114.html


http://www.niftyadmin.cn/n/984673.html

相关文章

STM32定时器时间计算

STM32定时器可以使用内部时钟或外部时钟来进行时间计算。可以使用不同的计数模式(如自动重装计数器、预装载寄存器等)来满足不同的需求。STM32还提供了多种中断源&#xff0c;可以在计数器溢出或比较匹配时触发中断&#xff0c;从而实现计时和计数功能。

如何用springboot和RabbitMQ实现发送通知给用户的功能,可以给出示例代码吗

首先&#xff0c;你需要在 Spring Boot 项目中添加 RabbitMQ 的依赖。在 pom.xml 文件中添加如下依赖: <dependency><groupId>org.springframework.amqp</groupId><artifactId>spring-rabbit</artifactId><version>2.2.2.RELEASE</vers…

(010)XHTML文档之pre标签

XHTML文档之pre标签 在浏览器呈现文档的时候&#xff0c;其中的空白会发生“缩合”&#xff0c;连续的多个空格会被缩减为1个&#xff0c;回车会被忽略。但是&#xff0c;你可以用pre元素定义一段预先格式化过的文本&#xff0c;使其中的空白和换行得以按其在标记代码中的原样保…

python 方差分析_使用Python的重复测量方差分析

python 方差分析A common method in experimental psychology is within-subjects designs. One way to analysis the data collected using within-subjects designs are using repeated measures ANOVA. I recently wrote a post on how to conduct a repeated measures ANOV…

Caused by: java.lang.NoSuchMethodException:

2019独角兽企业重金招聘Python工程师标准>>> 10-26 16:13:34.047 27343-27343/com.zaizai.safty E/AndroidRuntime: FATAL EXCEPTION: main 10-26 16:13:34.047 27343-27343/com.zaizai.safty E/AndroidRuntime: Process: com.zaizai.safty, PID: 27343 10-26 16:13…

pyinstaller -F yourfile.py

"pyinstaller -F yourfile.py" 意思是使用 PyInstaller 库将 Python 文件 "yourfile.py" 打包为一个独立的可执行文件&#xff0c;"-F" 选项表示打包成一个单独的文件。

vue动态设置国际化_Dynaconf –让您的设置动态化

vue动态设置国际化Dynaconf (Dynaconf) dynaconf – The dynamic configurator for your Python Project dynaconf – Python项目的dyna麦克风配置器 dynaconf is an OSM (Object Settings Mapper) it can read settings variables from a set of different data stores such a…

SqlServer禁用启用触发器、外键约束

--启用or禁用指定表所有外键约束 alter table tbname NOCHECK constraint all alter table tbname CHECK constraint all --查看约束select name , is_disabled from sys.foreign_keys order by name --禁用ALTER TABLE tbname DISABLE TRIGGER trigname --恢复ALTER TABLE tbn…