Graphviz安装及简单使用

news/2024/7/24 5:29:03 标签: python

转载自:https://www.cnblogs.com/shuodehaoa/p/8667045.html

Graphviz Windows环境安装:

        1.官网下载

           官网下载地址     


       2.创建桌面快捷方式:


                安装目录\bin文件夹\:找到gvedit.exe文件右键 发送到桌面快捷方式,如下图:


        3.配置环境变量:


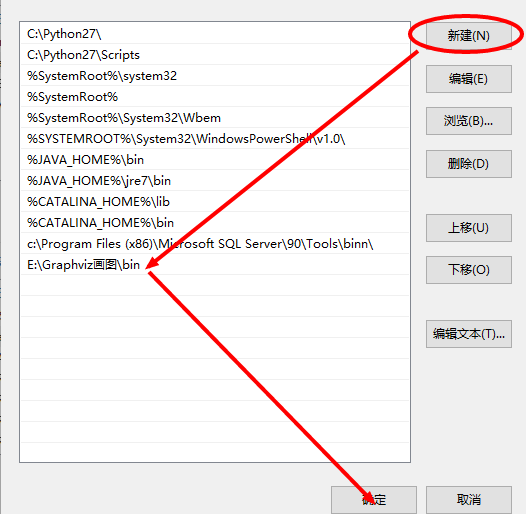
                将graphviz安装目录下的bin文件夹添加到Path环境变量中:

1352885-20180328231830594-1060145485.pnguploading.4e448015.gif正在上传…重新上传取消


        4.验证是否安装并配置成功:

               进入windows命令行界面,输入dot -version,然后按回车,如果显示graphviz的相关版本信息,则安装配置成功。如图:


        5.python环境中安装:(pycharm中)


                然后输入Graphivz安装


        6.在pycharm中运行


# coding:utf-8
from graphviz import Digraph

dot = Digraph(comment='The Round Table')

# 添加圆点 A, A的标签是 King Arthur
dot.node('A', 'king')
dot.view()  #后面这句就注释了,也可以使用这个命令查看效果

# 添加圆点 B, B的标签是 Sir Bedevere the Wise
dot.node('B', 'Sir Bedevere the Wise')
#dot.view()

# 添加圆点 L, L的标签是 Sir Lancelot the Brave
dot.node('L', 'Sir Lancelot the Brave')
#dot.view()

#创建一堆边,即连接AB的边,连接AL的边。
dot.edges(['AB', 'AL'])
#dot.view()

# 在创建两圆点之间创建一条边
dot.edge('B', 'L', constraint='false')
#dot.view()

# 获取DOT source源码的字符串形式
print(dot.source)

# 保存source到文件,并提供Graphviz引擎
dot.render('test-output/round-table.gv', view=True)


x

30


1

# coding:utf-8

2

from graphviz import Digraph

3


4

dot = Digraph(comment='The Round Table')

5


6

# 添加圆点 A, A的标签是 King Arthur

7

dot.node('A', 'king')

8

dot.view()  #后面这句就注释了,也可以使用这个命令查看效果

9


10

# 添加圆点 B, B的标签是 Sir Bedevere the Wise

11

dot.node('B', 'Sir Bedevere the Wise')

12

#dot.view()

13


14

# 添加圆点 L, L的标签是 Sir Lancelot the Brave

15

dot.node('L', 'Sir Lancelot the Brave')

16

#dot.view()

17


18

#创建一堆边,即连接AB的边,连接AL的边。

19

dot.edges(['AB', 'AL'])

20

#dot.view()

21


22

# 在创建两圆点之间创建一条边

23

dot.edge('B', 'L', constraint='false')

24

#dot.view()

25


26

# 获取DOT source源码的字符串形式

27

print(dot.source)

28


29

# 保存source到文件,并提供Graphviz引擎

30

dot.render('test-output/round-table.gv', view=True)

结果:

        7.中文乱码问题:

      • 在安装目录找到如下文件用记事本打开:


      • 将对应位置代码修改为如下:


      • 代码中加如下语句:


       8.标签中有空格画出图出错的情况:

                   将对应标签放在英文双引号内


       9.dot语言基本格式:

      • dot input.dot -T png -o output.txt

            cmd:


                    -o    指定存储档案的档名


      • 有向图:diagraph申明,结点关系为"->",可以//注释
      • 无向图:graph 申明 结点关系"--"
      • 子图    :subgraph声明    父图是无向图他本身也得是无向图    父图是有向图本身也得是有向图

        10.示例:

 
digraph G{
{ a b c} -> { d e f }
}


1

digraph G{

2

{ a b c} -> { d e f }

3

}


http://www.niftyadmin.cn/n/957508.html

相关文章

点击按钮出来三行词的代码

自己写的&#xff0c;错误多多。 <!DOCTYPE html> <div id"messageHome"><button click"showMessage">posts</button><ul><li>{{ yourvar }}</li></ul><p>Click on a blog title to the left to v…

PYTORCH 网络结构可视化方法汇总(三种实现方法详解)

转载自&#xff1a;http://www.freesion.com/article/340667237/ 前言&#xff1a;在深度学习的时候&#xff0c;能够很好的绘制出整个网络的模型图&#xff0c;这是非常方便的&#xff0c;当前流行的tensorflow和pytorch都有很多种方法可以绘制模型结构图&#xff0c;特在此总…

Yolov3.weights文件百度网盘下载

Yolov3.weight文件下载 链接: https://pan.baidu.com/s/1CozJCAhwGatG8-3MhOMoFQ 密码: 0p2n

template的用法,适用场合,为什么会出bug,怎么改

<template id"tem"><div id"div1">我是template</div><div>我是template</div> </template> <script type"text/javascript"></script> <script>let o document.getElementById("t…

Python reversed()函数

描述&#xff1a; reversed()函数是python中极其常用的函数&#xff08;我上回面试还被问到了&#xff09;。reversed()函数的作用是返回一个反转的迭代器&#xff08;元组、列表、字符串、range&#xff09;。 语法&#xff1a; reversed(seq) 参数介绍&#xff1a; seq…

return的值到底是一个什么值?是事先的值,还是等于算出来的结果的值,这里算出来的是优秀还是不及格,但返回的值却是分数

<div id"app"><span v-if"score>85">优秀</span><span v-else-if"score>75">良好</span><span v-else-if"score>60">及格</span><span v-else>不及格</span> </di…

Pytorch probability distributions

1.OneHotCategorical torch.distributions.one_hot_categorical.OneHotCategorical(probsNone, logitsNone, validate_argsNone) 根据给定的概率probs, 创建一个 one-hot 的类别分布. m OneHotCategorical(torch.tensor([ 0.1, 0.0, 0.9, 0.0 ])) m.sample() # equal proba…

@Autowired自动注入为null的原因

原因 在多线程时使用Autowired总是获取不到bean 原因是&#xff1a;new thread不在spring容器中&#xff0c;也就无法获得spring中的bean对象。 解决 代码实现&#xff1a; package com.test.configs;import org.springframework.beans.BeansException; import org.springf…