maven_2">一、maven几种打包插件介绍
共5种:
- spring-boot-maven-plugin
- maven-shade-plugin
- maven-assembly-plugin
- maven-jar-plugin
- maven-dependency-plugin
- maven-resources-plugin
- maven-compiler-plugin
二、插件用法详细介绍
mavenplugin_15">1.spring-boot-maven-plugin
介绍
spring-boot-maven-plugin:springboot项目默认的打包工具,默认情况下只会将项目源码编译生成的class文件和资源文件依赖jar包都打进来,
即打包自己项目的class文件+环境变量+静态资源文件+依赖jar(不会把依赖jar反编译为class文件打入)。
使用2.2.1.RELEASE版本需要maven版本在2.0及以上,JDK在1.8及以上。
官网文档:Spring Boot Maven Plugin
使用
<build>
    <plugins>
        <plugin>
            <groupId>org.springframework.boot</groupId>
            <artifactId>spring-boot-maven-plugin</artifactId>
        </plugin>
    </plugins>
</build>
mavenshadeplugin_38">2.maven-shade-plugin
介绍
它很聪明地将依赖的JAR文件全部解压后,再将得到的.class文件连同当前项目的.class文件一起合并到最终的CLI包(可以直接运行的jar包)中,这样,在执行CLI JAR文件的时候,所有需要的类就都在Classpath中了。
插件:使用maven-shade-plugin插件
maven-shade-plugin提供了两大基本功能:
将依赖的jar包打包到当前jar包(常规打包是不会将所依赖jar包打进来的);
对依赖的jar包进行重命名(用于类的隔离);
使用
<plugin>
    <groupId>org.apache.maven.plugins</groupId>
    <artifactId>maven-shade-plugin</artifactId>
    <version>3.2.4</version>
    <configuration>
        <!-- put your configurations here -->
    </configuration>
    <executions>
        <execution>
            <phase>package</phase>
            <goals>
                <goal>shade</goal>
            </goals>
        </execution>
    </executions>
</plugin>
mavenassemblyplugin_70">3.maven-assembly-plugin
介绍
功能非常强大,是maven中针对打包任务而提供的标准插件。
它是Maven最强大的打包插件,它支持各种打包文件格式,包括zip、tar.gz、tar.bz2等等,通过一个打包描述文件设置(src/main/assembly.xml),它能够帮助用户选择具体打包哪些资源文件集合、依赖、模块,甚至本地仓库文件,每个项的具体打包路径用户也能自由控制。
它不是把依赖的jar直接打进去,而是把依赖的jar编译成class文件打入jar中目录
使用
<plugin>
     <artifactId>maven-assembly-plugin</artifactId>
     <configuration>
         <archive>
             <manifest>
                 <mainClass>com.example.demo.DemoApplication</mainClass>
             </manifest>
         </archive>
         <descriptorRefs>
             <descriptorRef>jar-with-dependencies</descriptorRef>
         </descriptorRefs>
     </configuration>
     <!--下面是为了使用 mvn package命令,如果不加则使用mvn assembly-->
     <executions>
         <execution>
             <id>make-assemble</id>
             <!-- 绑定到package生命周期 -->
             <phase>package</phase>
             <goals>
                 <!-- 只运行一次 -->
                 <goal>single</goal>
             </goals>
         </execution>
     </executions>
 </plugin>
mavenjarplugin_107">4.maven-jar-plugin
介绍
插件:使用maven-jar-plugi插件
默认的打包方式,用来打普通的project JAR包
使用
<plugin>
    <groupId>org.apache.maven.plugins</groupId>
    <artifactId>maven-jar-plugin</artifactId>
    <version>3.2.2</version>
    <configuration>
        <!--要使用的打包配置.-->
        <archive>
            <!-- 创建的归档文件是否包含以下pom.xml 和pom.properties Maven 文件,默认是true -->
            <addMavenDescriptor>true</addMavenDescriptor>
            <!-- 生成MANIFEST.MF的设置 -->
            <manifest>
                <!-- 为依赖包添加路径, 这些路径会写在MANIFEST文件的Class-Path下 -->
                <addClasspath>true</addClasspath>
                <!-- 这个jar所依赖的jar包添加classPath的时候的前缀,如果这个jar本身和依赖包在同一级目录,则不需要添加 -->
                <classpathPrefix>lib/</classpathPrefix>
                <!-- jar启动入口类 -->
                <mainClass>com.example.demo.DemoApplication</mainClass>
            </manifest>
            <manifestEntries>
                <!-- 在Class-Path下添加配置文件的路径 -->
                <!--<Class-Path>../config/</Class-Path>-->
            </manifestEntries>
        </archive>
        <!-- jar包的位置,其中${project.build.directory}默认为 target/ -->
        <outputDirectory>${project.build.directory}</outputDirectory>
        <!--过滤掉不希望包含在jar中的文件-->
        <excludes>
            <exclude>${project.basedir}/xml/*</exclude>
        </excludes>
        <!--要包含的文件列表-->
        <includes>
            <!-- 打jar包时,打包class文件和config目录下面的 properties文件 -->
            <!-- 有时候可能需要一些其他文件,这边可以配置,包括剔除的文件等等 -->
            <include>**/*.class</include>
            <include>**/*.properties</include>
        </includes>
    </configuration>
</plugin>
mavendependencyplugin_155">5.maven-dependency-plugin
介绍
maven-dependency-plugin是处理与依赖相关的插件。它有很多可用的goal,大部分是和依赖构建、分析和解决相关的goal,这部分goal可以直接用maven的命令操作,
例如:mvn dependency:tree、mvn dependency:analyze
但是我们最常用到的是dependency:copydependency:copy-dependencies、dependency:unpack、dependency:unpack-dependencies这四个。
maven-dependency-plugin最大的用途是帮助分析项目依赖,dependency:list能够列出项目最终解析到的依赖列表,dependency:tree能进一步的描绘项目依赖树,dependency:analyze可以告诉你项目依赖潜在的问题,如果你有直接使用到的却未声明的依赖,该目标就会发出警告。
maven-dependency-plugin还有很多目标帮助你操作依赖文件,例如dependency:copy-dependencies能将项目依赖从本地Maven仓库复制到某个特定的文件夹下面。
详情请看下方别人的文章使用说明:
1)Maven学习笔记(十三)-maven-dependency-plugin插件
2)maven-dependency-plugin插件
3)Maven依赖插件之maven-dependency-plugin
官网地址:Apache Maven Dependency Plugin
使用
<!--在打包阶段将依赖的jar包导出到lib目录下-->
<plugin>
   <groupId>org.apache.maven.plugins</groupId>
   <artifactId>maven-dependency-plugin</artifactId>
   <executions>
       <execution>
           <id>copy-dependencies</id>
           <phase>package</phase>
           <goals>
               <goal>copy-dependencies</goal>
           </goals>
           <configuration>
               <type>jar</type>
               <includeTypes>jar</includeTypes>
               <!--项目构件输出目录,其中${project.build.directory}默认为 target/-->
               <outputDirectory>${project.build.directory}/lib</outputDirectory>
               <overWriteReleases>false</overWriteReleases>
               <overWriteSnapshots>false</overWriteSnapshots>
               <overWriteIfNewer>true</overWriteIfNewer>
           </configuration>
       </execution>
   </executions>
</plugin>
mavenresourcesplugin_199">6.maven-resources-plugin
介绍
为了使项目结构更为清晰,Maven区别对待Java代码文件和资源文件,maven-compiler-plugin用来编译Java代码,maven-resources-plugin则用来处理资源文件。
默认的主资源文件目录是src/main/resources,很多用户会需要添加额外的资源文件目录,这个时候就可以通过配置maven-resources-plugin来实现。
此外,资源文件过滤也是Maven的一大特性,你可以在资源文件中使用_${propertyName}_形式的Maven属性,然后配置maven-resources-plugin开启对资源文件的过滤,之后就可以针对不同环境通过命令行或者Profile传入属性的值,以实现更为灵活的构建。
官方文档:Apache Maven Resources Plugin
详情请看下方别人的文章使用说明:
1)maven,maven-resources-plugin根据不同环境覆盖配置文件
2)springboot中maven文件pom.xml的<resource>下的<includes>和<excludes>
3)Maven学习(四) - 插件maven-resources-plugin
使用
<plugin>
   <groupId>org.apache.maven.plugins</groupId>
   <artifactId>maven-resources-plugin</artifactId>
   <version>3.2.0</version>
   <executions>
       <execution>
           <id>copy-resources</id>
           <!--绑定到package生命周期-->
           <phase>package</phase>
           <goals>
               <goal>copy-resources</goal>
           </goals>
           <configuration>
               <outputDirectory>target/conf</outputDirectory>
               <useDefaultDelimiters>false</useDefaultDelimiters>
               <includeEmptyDirs>true</includeEmptyDirs>
               <!--设置自定义分隔符-->
               <delimiters>
                   <delimiter>#</delimiter>
               </delimiters>
               <resources>
                   <resource>
                       <!--从此目录下读取全部以.properties和.xml开头的文件-->
                       <directory>src/main/resources/</directory>
                       <!--用来指定需要打入哪些后缀类型的文件-->
                       <!--<includes>
                           <include>**/*.properties</include>
                           <include>**/*.xml</include>
                       </includes>-->
                   </resource>
               </resources>
               <!-- 过滤后缀为crt和jks的文件 -->
               <nonFilteredFileExtensions>
                   <nonFilteredFileExtension>crt</nonFilteredFileExtension>
                   <nonFilteredFileExtension>jks</nonFilteredFileExtension>
               </nonFilteredFileExtensions>
           </configuration>
       </execution>
   </executions>
</plugin>
mavencompilerplugin_258">7.maven-compiler-plugin
介绍
作用: 1. 指示maven用什么版本的jdk编译; 2. 指示IntelliJ IDEA把项目识别成什么jdk
maven 是个管理工具,如果我们不告诉它我们的代码要使用什么样的 jdk 版本编译的话,它就会用 maven-compiler-plugin 默认的 jdk 版本来进行处理,这样就容易出现版本不匹配,以至于可能导致编译不通过的问题。
maven-compiler-plugin插件是一个Maven插件,用来编译项目代码;自从3.0开始默认的编译器是javax.tools.JavaCompiler,用来编译Java源码;如果你想强制插件使用javac编译器,你必须配置插件的属性forceJavacCompilerUse;还要注意,当前默认源(source)设置为1.6,默认目标(target)设置为1.6。独立运行Maven和JDK,可以通过source和target选项更改他们的默认值;
详情请看下方别人的文章使用说明:
1)maven-compiler-plugin插件参数配置详解
2)Maven 教程(21)— maven-compiler-plugin 插件详解
3)maven-compiler-plugin 插件详解
使用
<build>
  <plugins>
    <plugin>
        <groupId>org.apache.maven.plugins</groupId>
        <artifactId>maven-compiler-plugin</artifactId>
        <version>3.8.0</version>
        <configuration>
            <source>1.8</source>
            <target>1.8</target>
            <encoding>UTF-8</encoding>
        </configuration>
    </plugin>
  </plugins>
</build>
三、案例
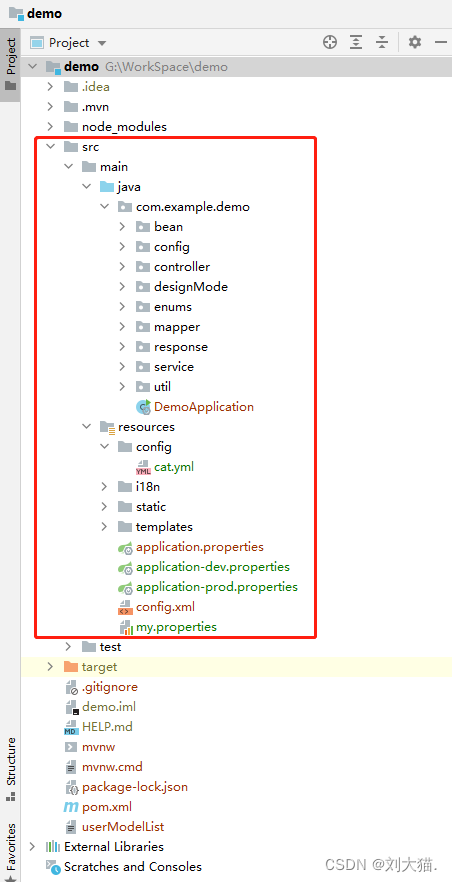
准备工作,项目完整路径
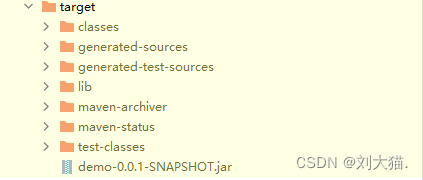
mavenjarpluginmavendependencyplugin__jar_292">案例3.1:maven-jar-plugin和maven-dependency-plugin -> 打无依赖jar包
pom依赖
<plugins>
    <!--要求:1、导出单独的项目jar包(精简,不包含依赖jar)、2、项目依赖的所有jar包导出到lib目录下-->
    <plugin>
        <groupId>org.apache.maven.plugins</groupId>
        <artifactId>maven-jar-plugin</artifactId>
        <version>3.2.2</version>
        <configuration>
            <!--要使用的打包配置.-->
            <archive>
                <!-- 创建的归档文件是否包含以下pom.xml 和pom.properties Maven 文件,默认是true -->
                <addMavenDescriptor>true</addMavenDescriptor>
                <!-- 生成MANIFEST.MF的设置 -->
                <manifest>
                    <!-- 为依赖包添加路径, 这些路径会写在MANIFEST文件的Class-Path下 -->
                    <addClasspath>true</addClasspath>
                    <!-- 这个jar所依赖的jar包添加classPath的时候的前缀,如果这个jar本身和依赖包在同一级目录,则不需要添加 -->
                    <classpathPrefix>lib/</classpathPrefix>
                    <!-- jar启动入口类 -->
                    <mainClass>com.example.demo.DemoApplication</mainClass>
                </manifest>
                <manifestEntries>
                    <!-- 在Class-Path下添加配置文件的路径 -->
                    <!--<Class-Path>../config/</Class-Path>-->
                </manifestEntries>
            </archive>
            <!-- jar包的位置,其中${project.build.directory}默认为 target/ -->
            <outputDirectory>${project.build.directory}</outputDirectory>
            <!--过滤掉不希望包含在jar中的文件-->
            <excludes>
                <exclude>${project.basedir}/xml/*</exclude>
            </excludes>
            <!--要包含的文件列表-->
            <includes>
                <!-- 打jar包时,打包class文件和config目录下面的 properties文件 -->
                <!-- 有时候可能需要一些其他文件,这边可以配置,包括剔除的文件等等 -->
                <include>**/*.class</include>
                <include>**/*.properties</include>
            </includes>
        </configuration>
    </plugin>

    <!--在打包阶段将依赖的jar包导出到lib目录下-->
    <plugin>
        <groupId>org.apache.maven.plugins</groupId>
        <artifactId>maven-dependency-plugin</artifactId>
        <executions>
            <execution>
                <id>copy-dependencies</id>
                <phase>package</phase>
                <goals>
                    <goal>copy-dependencies</goal>
                </goals>
                <configuration>
                    <type>jar</type>
                    <includeTypes>jar</includeTypes>
                    <!--项目构件输出目录,其中${project.build.directory}默认为 target/-->
                    <outputDirectory>${project.build.directory}/lib</outputDirectory>
                    <overWriteReleases>false</overWriteReleases>
                    <overWriteSnapshots>false</overWriteSnapshots>
                    <overWriteIfNewer>true</overWriteIfNewer>
                </configuration>
            </execution>
        </executions>
    </plugin>
</plugins>
打包目录结果展示
注意点说明:
注意点1:
maven官网针对maven-jar-plugin的标签有详细的说明,这里只使用部分的标签,案例用到的请看代码中文介绍,所有标签使用详情请看下方官网链接 ↓。
官网地址:maven 仓库的插件介绍地址

注意点2:
代码中提到的${project.build.directory}使用说明,请看下方链接 ↓

注意点3:
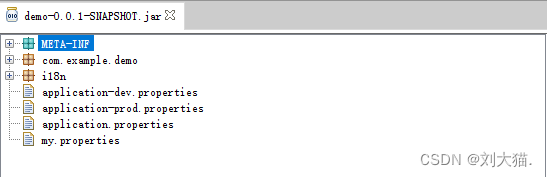
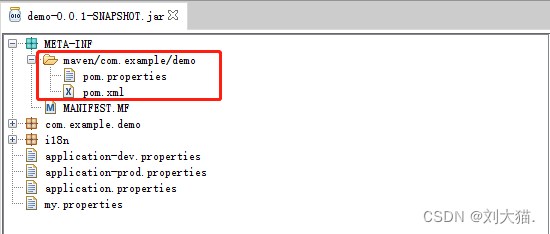
针对标签<addMavenDescriptor>设置【true/false】不同结果展示
设置true
设置false
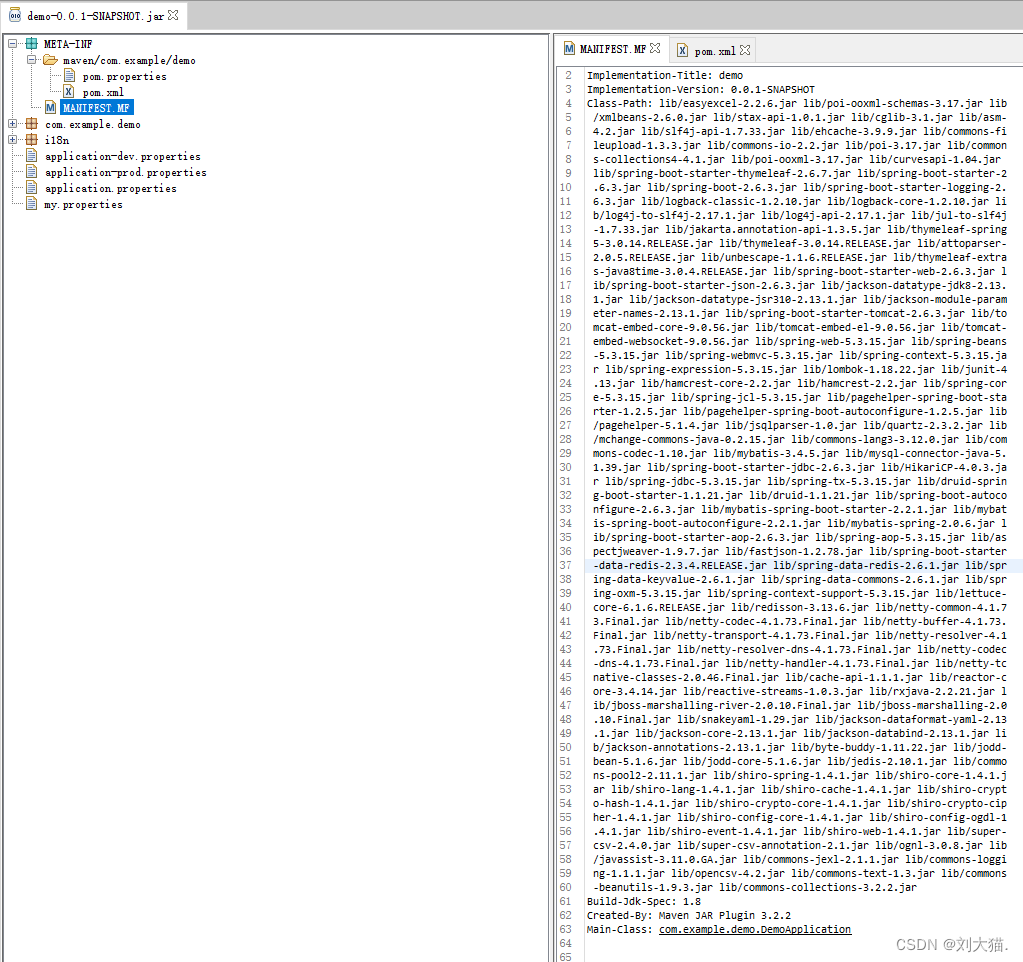
注意点4:
使用<manifest>标签就是为了生成MANIFEST.MF的设置
<!-- 生成MANIFEST.MF的设置 -->
<manifest>
    <!-- 为依赖包添加路径, 这些路径会写在MANIFEST文件的Class-Path下 -->
    <addClasspath>true</addClasspath>
    <!-- 这个jar所依赖的jar包添加classPath的时候的前缀,如果这个jar本身和依赖包在同一级目录,则不需要添加 -->
    <classpathPrefix>lib/</classpathPrefix>
    <!-- jar启动入口类 -->
    <mainClass>com.example.demo.DemoApplication</mainClass>
</manifest>
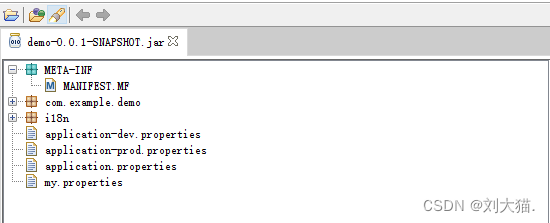
注意点5:
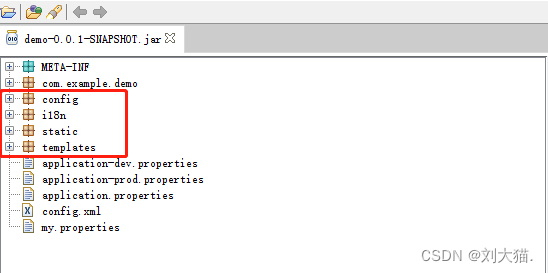
说明:i18n文件夹是国际化词条文件,全是.properties格式文件,static文件夹下是静态资源,包括css,js,image等等,template文件夹是.html格式页面,config文件下是一个自定义配置文件cat.yml
使用<includes>标签设置要包含的文件列表,比如我只配置打入.class和.properties文件,那么resources下的config文件、static文件夹、template文件夹内容都不会打入jar包中。
<!--要包含的文件列表-->
<includes>
    <!-- 打jar包时,打包class文件和config目录下面的 properties文件 -->
    <!-- 有时候可能需要一些其他文件,这边可以配置,包括剔除的文件等等 -->
    <include>**/*.class</include>
    <include>**/*.properties</include>
</includes>
设置<includes>标签
不设置<includes>标签
注意点6:
<manifestEntries>
    <!-- 在Class-Path下添加配置文件的路径 -->
    <!--<Class-Path>../config/</Class-Path>-->
</manifestEntries>
这个<Class-Path>标签暂时没找到相关文章说明它的用法,我自己是没弄明白,有懂的可以评论交流学习下
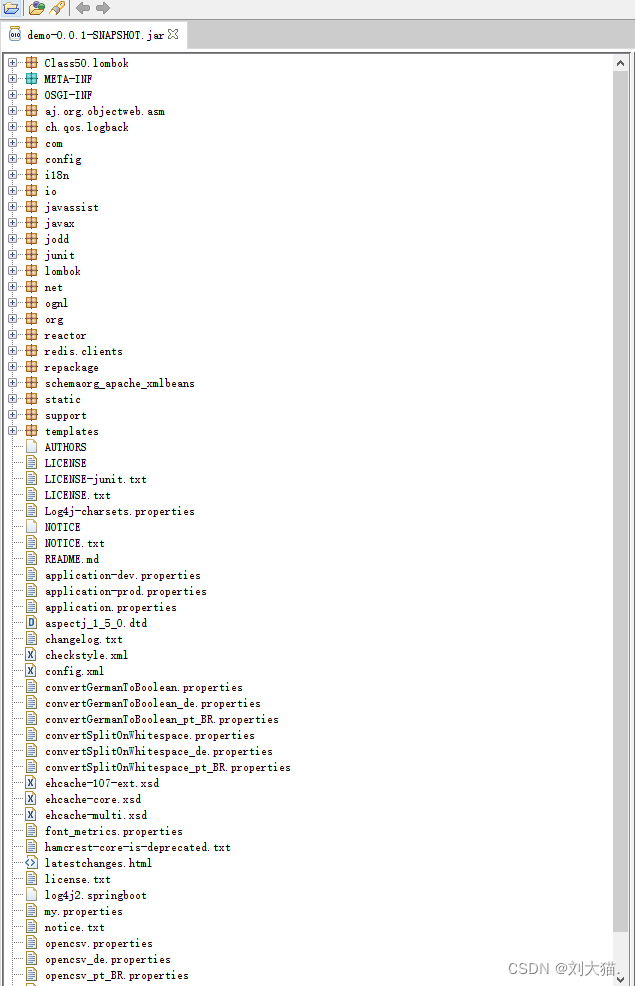
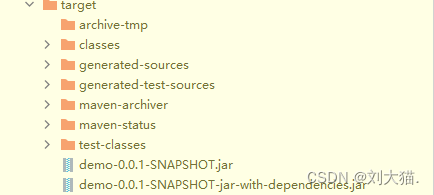
mavenassemblyplugin_jar_440">案例3.2:maven-assembly-plugin ->打有依赖jar包
pom依赖
<!--需求2:使用maven-assembly-plugin打有依赖的jar包-->
<plugin>
     <artifactId>maven-assembly-plugin</artifactId>
     <configuration>
         <archive>
             <manifest>
                 <mainClass>com.example.demo.DemoApplication</mainClass>
             </manifest>
         </archive>
         <descriptorRefs>
             <descriptorRef>jar-with-dependencies</descriptorRef>
         </descriptorRefs>
     </configuration>
     <!--下面是为了使用 mvn package命令,如果不加则使用mvn assembly-->
     <executions>
         <execution>
             <id>make-assemble</id>
             <!-- 绑定到package生命周期 -->
             <phase>package</phase>
             <goals>
                 <!-- 只运行一次 -->
                 <goal>single</goal>
             </goals>
         </execution>
     </executions>
 </plugin>
打包目录结果打印
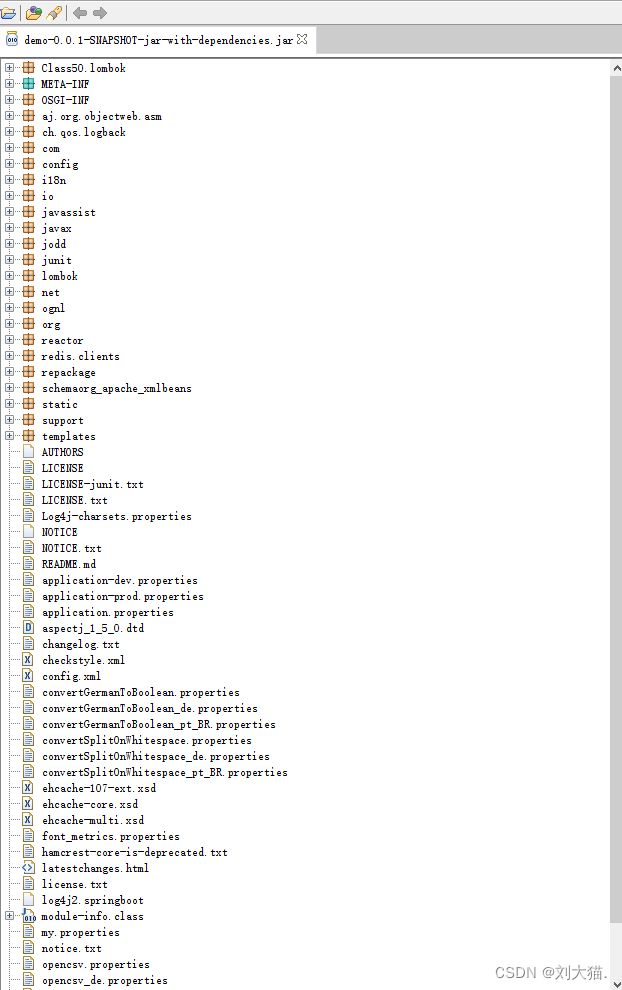
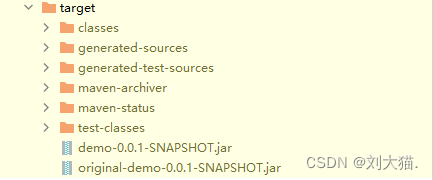
mavenshadeplugin_jar_477">案例3.3:maven-shade-plugin ->打有依赖jar包
pom依赖
<plugin>
    <groupId>org.apache.maven.plugins</groupId>
    <artifactId>maven-shade-plugin</artifactId>
    <version>3.2.4</version>
    <configuration>
        <!-- put your configurations here -->
    </configuration>
    <executions>
        <execution>
            <phase>package</phase>
            <goals>
                <goal>shade</goal>
            </goals>
        </execution>
    </executions>
</plugin>
打包目录结果打印
mavenplugin___504">案例3.4:使用spring-boot-maven-plugin插件 -> 打有依赖包
pom依赖
<!--需求4:使用spring-boot-maven-plugin插件打包-->
<plugin>
    <groupId>org.springframework.boot</groupId>
    <artifactId>spring-boot-maven-plugin</artifactId>
</plugin>
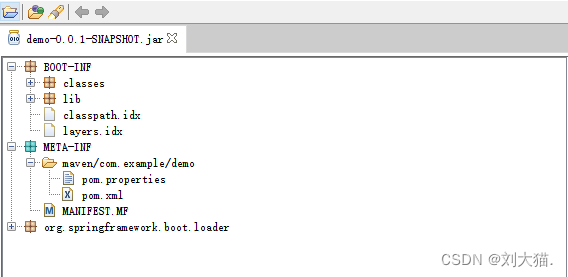
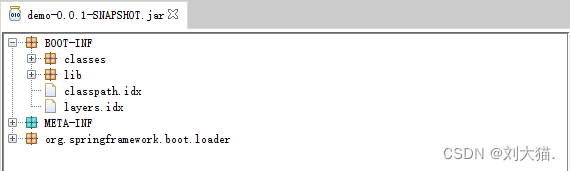
打包结果打印
注意点说明:
注意点1:
spring-boot-maven-plugin插件它会把完整的jar直接打到如BOOT-INF目录下的lib目录下,而不是像maven-assembly-plugin插件和maven-shade-plugin插件把jar编译成class文件,而代码class文件全部放在了BOOT-INF目录下的classes文件夹下。
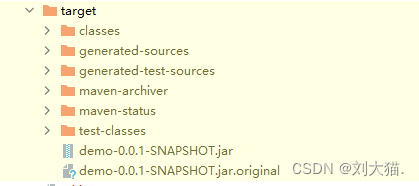
mavenresourcespluginspringbootmavenplugin___523">案例3.5:使用maven-resources-plugin和spring-boot-maven-plugin -> 打包
pom依赖
<!--需求5:使用spring-boot-maven-plugin和插件打包-->
<plugin>
    <groupId>org.springframework.boot</groupId>
    <artifactId>spring-boot-maven-plugin</artifactId>
</plugin>

<plugin>
    <groupId>org.apache.maven.plugins</groupId>
    <artifactId>maven-resources-plugin</artifactId>
    <version>3.2.0</version>
    <executions>
        <execution>
            <id>copy-resources</id>
            <!--绑定到package生命周期-->
            <phase>package</phase>
            <goals>
                <goal>copy-resources</goal>
            </goals>
            <configuration>
                <outputDirectory>target/conf</outputDirectory>
                <useDefaultDelimiters>false</useDefaultDelimiters>
                <includeEmptyDirs>true</includeEmptyDirs>
                <!--设置自定义分隔符-->
                <delimiters>
                    <delimiter>#</delimiter>
                </delimiters>
                <resources>
                    <resource>
                        <!--从此目录下读取全部以.properties和.xml开头的文件-->
                        <directory>src/main/resources/</directory>
                        <!--用来指定需要打入哪些后缀类型的文件-->
                        <!--<includes>
                            <include>**/*.properties</include>
                            <include>**/*.xml</include>
                        </includes>-->
                    </resource>
                </resources>
                <!-- 过滤后缀为crt和jks的文件 -->
                <nonFilteredFileExtensions>
                    <nonFilteredFileExtension>crt</nonFilteredFileExtension>
                    <nonFilteredFileExtension>jks</nonFilteredFileExtension>
                </nonFilteredFileExtensions>
            </configuration>
        </execution>
    </executions>
</plugin>
打包目录结果打印
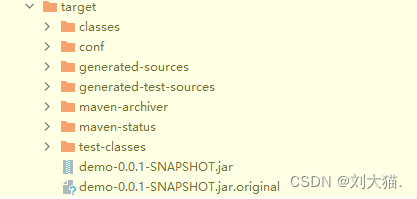
注意点说明
注意点1:.jar.original包指代上一次打包的备份文件
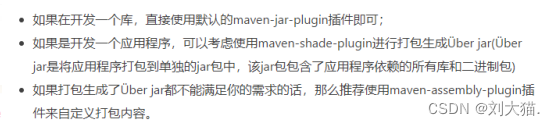
四、如何选择几种打包插件