Vue 源码解析: 生命周期钩子全面剖析
文章目录
- Vue 源码解析: 生命周期钩子全面剖析
- 前言:长文慎入!
- 正文
- 生命周期钩子总览
- 官方例图
- 生命周期钩子含义 & 各属性状态
- 0. 源码包结构
- 1. 初始化阶段(Initialize)
- 1.1 Vue 实例定义核心入口
- 1.2 XxxMixin(Vue) 原型方法混入
- 1.2.1 initMixin
- 1.2.2 stateMixin
- 1.2.3 eventsMixin
- 1.2.4 lifecycleMixin
- 1.2.5 renderMixin
- 1.3 创建 Vue 实例
- 1.3.1 _init 初始化Vue实例
- 1.3.2 callHook 调用生命周期钩子
- 1.3.3 beforeCreate 钩子
- 1.3.3.1 initLifecycle 初始化生命周期标志
- 1.3.3.2 initEvents 初始化事件队列
- 1.3.3.3 beforeCreate 调用
- 1.3.4 created 钩子
- 1.3.4.1 initState 初始化对象状态
- 1.3.4.2 initProps
- 1.3.4.3 initMethods
- 1.3.4.4 initData
- 1.3.4.5 initComputed
- 1.3.4.6 initWatch
- 1.3.4.7 created 调用
- 1.4 初始化阶段总结
- 2. 编译 & 挂载阶段(Compile & Mount)
- 2.1 $mount 挂载 Vue 实例
- 2.2 模版编译阶段
- 2.3 mountComponent 挂载实例
- 2.3.1 beforeMount 钩子
- 2.3.2 Watcher 渲染观察者创建
- 2.3.2.1 _render 函数首次渲染
- 2.3.2.2 _update 更新模版
- 2.3.3 mounted 钩子
- 2.4 编译 & 挂载阶段总结
- 3. 更新阶段(Update)
- 3.1 setter 方法拦截对象属性修改行为
- 3.2 Watcher.update + run 进行数据 & 模版更新
- 3.3 Scheduler 观察者批量更新
- 3.4 更新阶段总结
- 4. 销毁阶段(Destroy)
- 4.1 $destroy 方法
- 4.2 销毁阶段总结
- 结语
- 其他资源
- 参考连接
- 阅读笔记参考
前言:长文慎入!
今天来谈谈 Vue 框架之中相当重要的一环:生命周期钩子。所谓的生命周期钩子其实是在 Vue 的框架中对于 Vue 实例从初始化、挂载、更新到销毁的一个完整的生命周期中,允许开发者在不同的时机插入方法钩子进行调用的实现。
由于 Vue 框架在运行时的背后做了许多工作,所以本篇除了介绍各个生命周期钩子所代表的意义,以及不同时机点对于不同属性的可见性之外,还会同时参考 Vue 的源码更直接的体会到底这些属性都是在什么时候改变的。
正文
生命周期钩子总览
在开始具体的源码解析之前,我们先来看看在 Vue 的框架底下到底有哪些生命周期钩子
官方例图
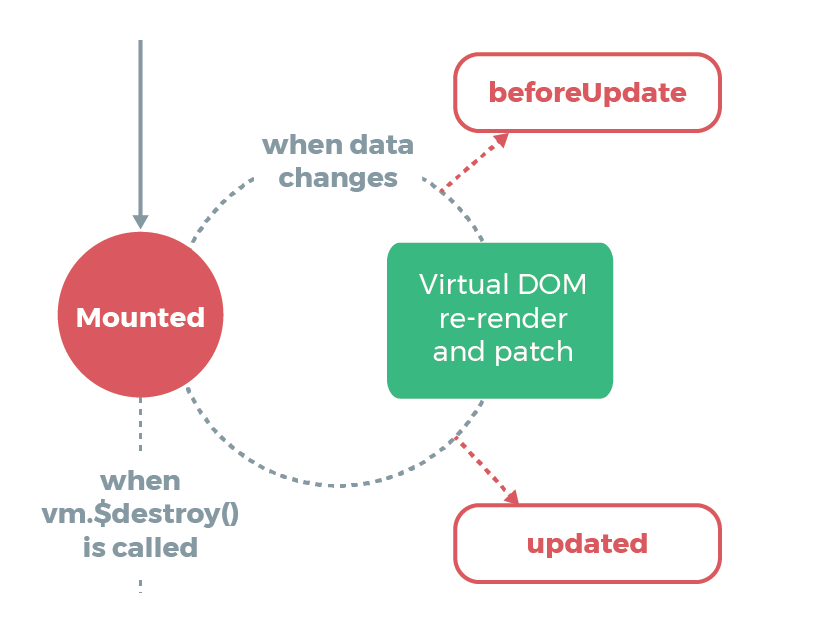
首先我们先来看看官方给出的例图
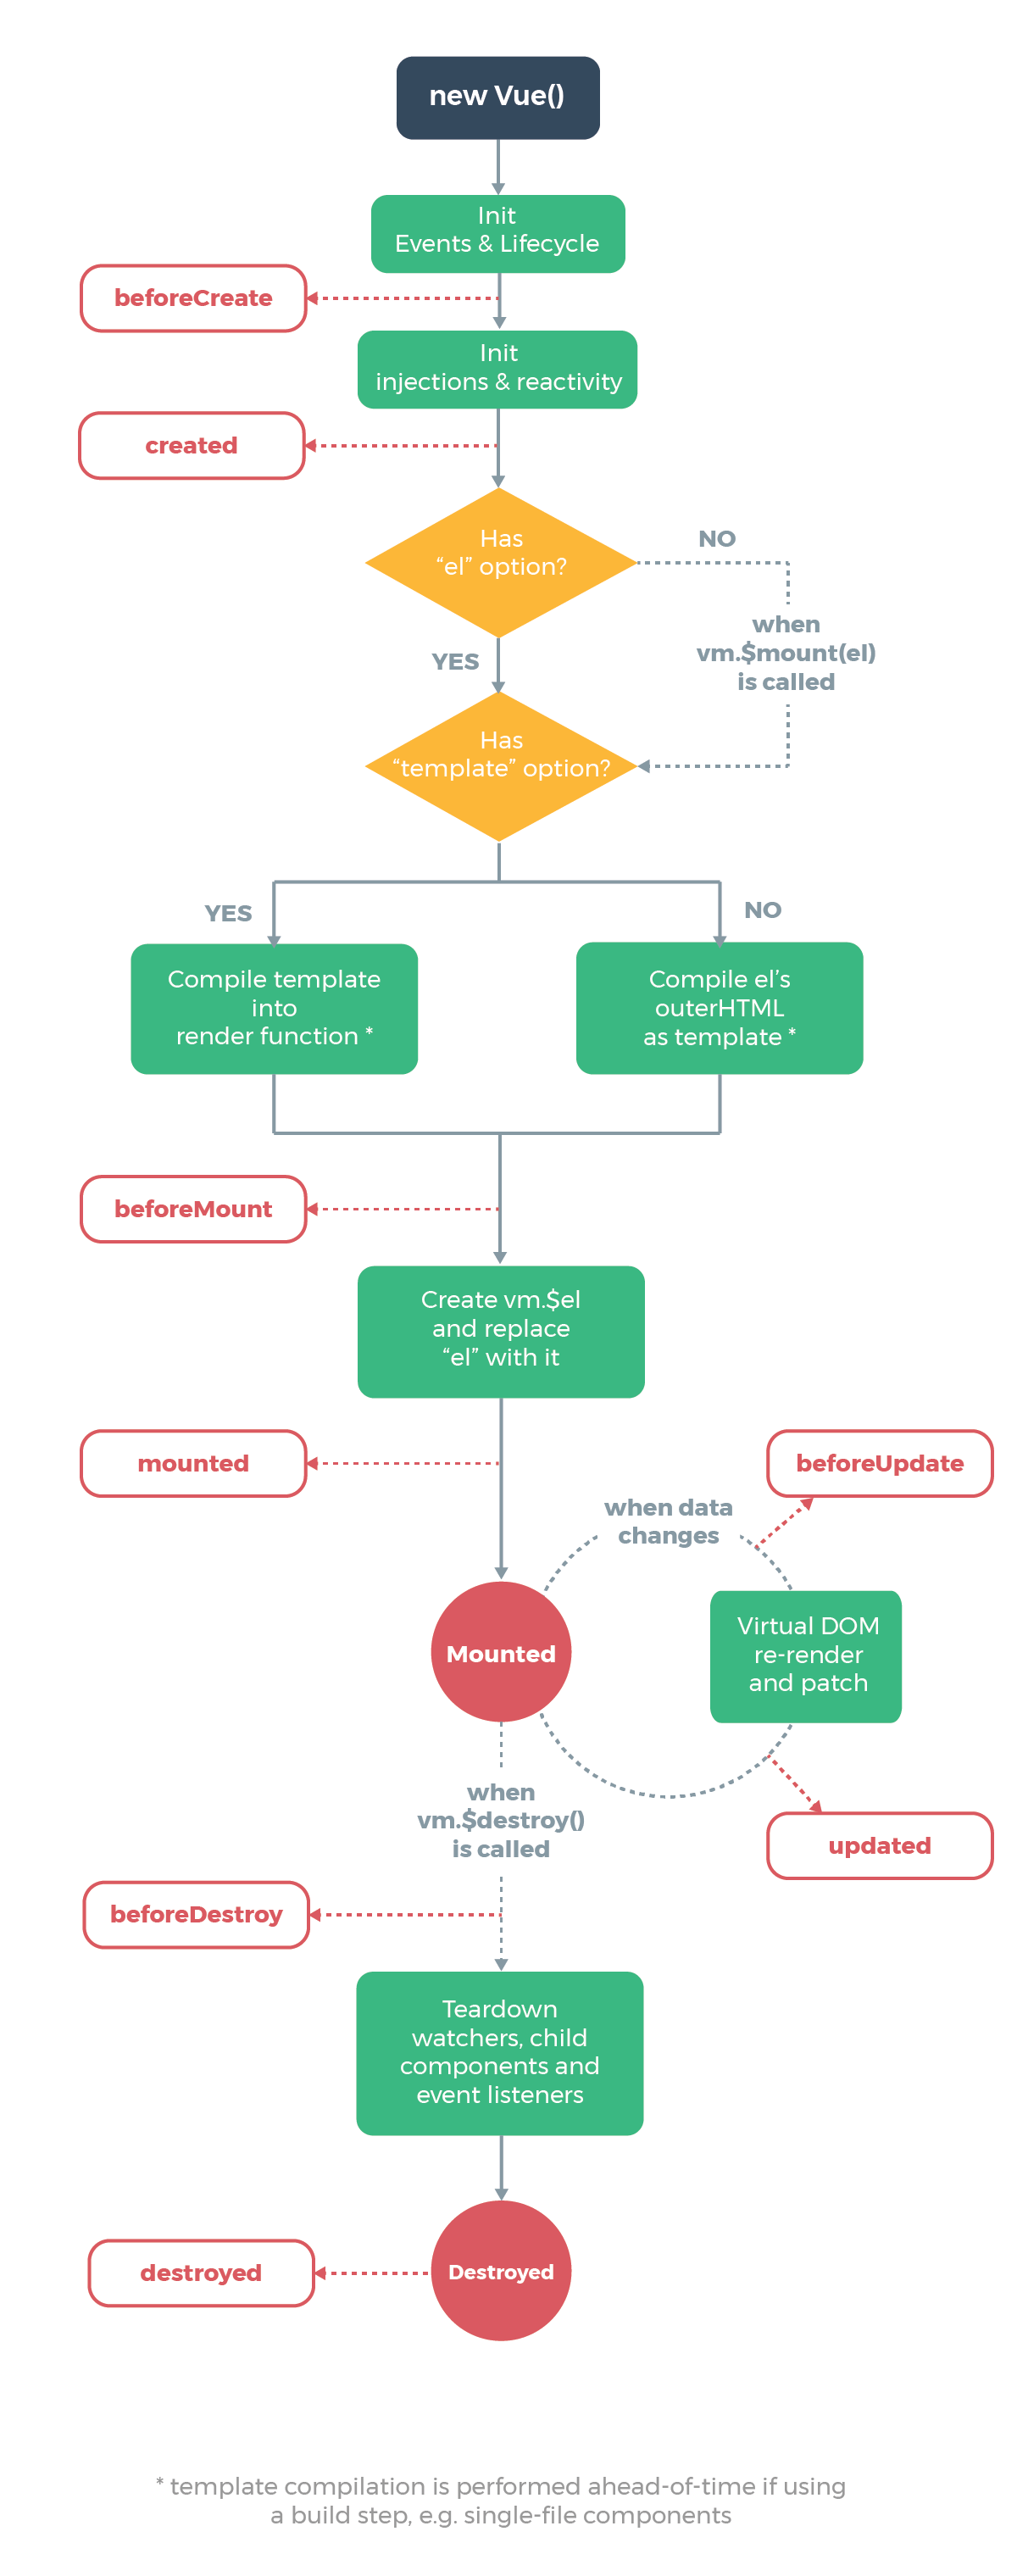
我们可以看到整个 Vue 实例的完整生命周期,绿色的框表示几个重要的状态节点,而红色边框的就是今天的主角 生命周期钩子。我们可以看到其实真正重要的并不是生命周期钩子本身的逻辑,而是:
- 在每个钩子执行之前 Vue 到底完成了哪些工作
- 具体哪些行为应该在哪个钩子执行才恰当
- 对于不同钩子 Vue 实例的属性处于什么样的状态
才是我们关注的点
生命周期钩子含义 & 各属性状态
根据上图我们可以列出所有的生命周期钩子(包括图中未提及的钩子),以及各个钩子所能见到的 Vue 实例中各个属性的状态
| 顺序 | 钩子 | 含义 | $el | $data | property(组件实例属性) |
|---|---|---|---|---|---|
| 1 | beforeCreate | 创建之前 | × \times × | × \times × | × \times × |
| 2 | created | 创建之后 | × \times × | √ \surd √ | √ \surd √ |
| 3 | beforeMount | 挂载之前 | √ \surd √(原始模版) | √ \surd √ | √ \surd √ |
| 4 | mounted | 挂载之后 | √ \surd √(数据绑定) | √ \surd √ | √ \surd √ |
| 5 | beforeUpdate | 更新之前 | √ \surd √(旧数据) | √ \surd √(新数据) | √ \surd √ |
| 6 | activated | 激活之后(for keep-alive) | √ \surd √(新数据) | √ \surd √ | √ \surd √ |
| 7 | deactivated | 失活之后(for keep-alive) | |||
| 8 | updated | 更新之后 | √ \surd √ | √ \surd √ | √ \surd √ |
| 9 | beforeDestroy | 销毁之前 | √ \surd √ | √ \surd √ | √ \surd √ |
| 10 | destroyed | 销毁之后 | × \times × | × \times × | × \times × |
| x | errorCaptured | 错误捕获时 | |||
| x | serverPrefetch | 服务端渲染预加载 |
在初步了解各个生命周期钩子的含义之后,下面我们将整个 Vue 实例的生命周期划分为四个阶段:
- 初始化阶段(Initialize)
- 编译 & 挂载阶段(Compile & Mount)
- 更新阶段(Update)
- 销毁阶段(Destroy)
下面我们将搭配源码把整个流程过一遍
0. 源码包结构
/src源码根目录
/src
├── compiler    # 编译器相关
├── core        # 源码核心
├── platforms   # 运行平台相关
├── server      #
├── sfc
└── shared      # 共享代码
/src/core
/src/core
├── config.js   # 配置选项
├── index.js    # Vue 实例导出入口
├── components  # keep alive 组件
├── global-api  # 全局 API
├── instance    # Vue 实例
├── observer    # 观察者相关
├── util        # 工具函数
└── vdom        # 虚拟 dom 相关
/src/core/instance
/src/core/instance
├── events.js       # 事件相关方法
├── index.js        # Vue 实例入口
├── init.js         # 初始化相关方法
├── inject.js       # 注入相关方法
├── lifecycle.js    # 生命周期相关方法
├── proxy.js        # 渲染代理相关方法
├── render.js       # 渲染相关方法
├── state.js        # 状态相关方法
└── render-helpers  # 渲染辅助函数
这边几个是与 Vue 实例定义相关最重要的几个包,下面将在各个阶段阅读并说明相关方法的调用。由于本篇的重点放在生命周期钩子上,所以不会对响应式原理、模版渲染原理过多深入,后面会再写别篇详细说明。有兴趣在 Vue 的源码阅读中文社区也有很详细的解锁,可以参考参考。
1. 初始化阶段(Initialize)
首先第一个阶段是 初始化阶段(Initialize),这边仅仅只做了一些方法的混入和标志的初始化,涉及的流程如下图
1.1 Vue 实例定义核心入口
首先我们先看到 Vue 实例的核心入口 /src/core/index.js
/src/core/index.js(阅读笔记文件路径:/src/core/index.js)
// 从 /src/instance/index 引入 Vue 类型
import Vue from './instance/index'
import { initGlobalAPI } from './global-api/index'
import { isServerRendering } from 'core/util/env'
import { FunctionalRenderContext } from 'core/vdom/create-functional-component'

/* 初始化全局 API */
initGlobalAPI(Vue)

// 注入 Vue.prototyp.$isServer
Object.defineProperty(Vue.prototype, '$isServer', {
  get: isServerRendering
})

// 注入 Vue.prototyp.$ssrContext
Object.defineProperty(Vue.prototype, '$ssrContext', {
  get () {
    /* istanbul ignore next */
    return this.$vnode && this.$vnode.ssrContext
  }
})

// 注入 Vue.prototyp.FunctionalRenderContext
Object.defineProperty(Vue, 'FunctionalRenderContext', {
  value: FunctionalRenderContext
})

// 初始化静态变量 Vue.version
Vue.version = '__VERSION__'

export default Vue
执行步骤为:
- 从
/src/core/instance/index.js获取 Vue 类型 - 调用
initGloablAPI混入全局方法 - 注入
Vue.prototyp.{$isServer, $ssrContext, FunctionalRenderContext},和初始化Vue.version
看起来没有做太多工作,再向下钻一层
/src/core/instance/index.js(阅读笔记文件路径:/src/core/instance/index.js)
import { initMixin } from './init'
import { stateMixin } from './state'
import { renderMixin } from './render'
import { eventsMixin } from './events'
import { lifecycleMixin } from './lifecycle'
import { warn } from '../util/index'

function Vue (options) {
  /* 创建实例环境检查 */
  if (process.env.NODE_ENV !== 'production' &&
    !(this instanceof Vue)
  ) {
    warn('Vue is a constructor and should be called with the `new` keyword')
  }

  /* 实例初始化 */
  this._init(options)
}

initMixin(Vue)       // 注入 Vue.prototype._init
stateMixin(Vue)      // 注入 Vue.prototype.{$data, $props, $set, $delete, $watch}
eventsMixin(Vue)     // 注入 Vue.prototype.{$on, $once, $off, $emit}
lifecycleMixin(Vue)  // 注入 Vue.prototype.{_update, $forceUpdate, $destroy}
renderMixin(Vue)     // 注入 Vue.prototype.{$nextTick, _render}

export default Vue
这边我们终于看到 Vue 实例类型的本体了,使用了 function 定义的构造函数,new Vue 创建实例的时候唯一调用的方法就是 Vue.prototype._init 来进行初始化。其他附加在 Vue.prototype 上的辅助方法是透过所谓的 Mixin(混入) 的设计模式来进行 Vue 原型对象的扩展
1.2 XxxMixin(Vue) 原型方法混入
接下来我们简单过一下 /src/core/instance/index.js 中
initMixinstateMixineventsMixinlifecycleMixinrenderMixin
这些 Mixin 究竟向 Vue.prototype 混入了哪些方法
1.2.1 initMixin
/src/core/instance/init.js(阅读笔记文件路径:/src/core/instance/init/initMixin.flat2.js)
// 注入
//   Vue.prototype._init

export function initMixin (Vue: Class<Component>) {
  Vue.prototype._init = function (options?: Object) {/* ... */}
}
initMixin 方法很单纯,就是引入 Vue.prototype._init,后面调用的时候我们会再深入看到
1.2.2 stateMixin
/src/core/instance/state.js(阅读笔记文件路径:/src/core/instance/state/stateMixin.flat1.js)
// 注入
//   Vue.prototype.$data  -> dataDef  -> this._data
//   Vue.prototype.$props -> propsDef -> this._props
//   Vue.prototype.$set
//   Vue.prototype.$delete
//   Vue.prototype.$watch

export function stateMixin (Vue: Class<Component>) {
  const dataDef = {}
  dataDef.get = function () { return this._data }
  const propsDef = {}
  propsDef.get = function () { return this._props }
  if (process.env.NODE_ENV !== 'production') {
    dataDef.set = function () {
      // direct set root $data warning ...
    }
    propsDef.set = function () {
      // set $props warning
    }
  }

  Object.defineProperty(Vue.prototype, '$data', dataDef)
  Object.defineProperty(Vue.prototype, '$props', propsDef)

  Vue.prototype.$set = set
  Vue.prototype.$delete = del

  Vue.prototype.$watch = function (
    expOrFn: string | Function,
    cb: any,
    options?: Object
  ): Function {/* ... */}
}
这边可以看到 stateMixin 主要混入了 Vue.prototpye.{$data, $props, $set, $delete, $watch} 这几个属性;然而 $data, $props 是一个对于 this._data, _props 的代理,然而必须等到实例上的 _data, _props 属性被赋值才能正确访问到数据对象
1.2.3 eventsMixin
/src/core/instance/events.js(阅读笔记文件路径:/src/core/instance/events/eventsMixin.flat1.js)
// 注入
//   Vue.prototype.$on
//   Vue.prototype.$once
//   Vue.prototype.$off
//   Vue.prototype.$emit

export function eventsMixin (Vue: Class<Component>) {
  const hookRE = /^hook:/
  Vue.prototype.$on = function (event: string | Array<string>, fn: Function): Component {/* ... */}

  Vue.prototype.$once = function (event: string, fn: Function): Component {/* ... */}

  Vue.prototype.$off = function (event?: string | Array<string>, fn?: Function): Component {/* ... */}

  Vue.prototype.$emit = function (event: string): Component {/* ... */}
}
eventsMixin 则是引入了 $on, $once, $off, $emit 的事件处理相关的方法,在对象运行时内部和外部都能够引用
lifecycleMixin_286">1.2.4 lifecycleMixin
// 注入
//   Vue.prototype._update
//   Vue.prototype.$forceUpdate
//   Vue.prototype.$destroy

export function lifecycleMixin (Vue: Class<Component>) {
  Vue.prototype._update = function (vnode: VNode, hydrating?: boolean) {/* ... */}

  Vue.prototype.$forceUpdate = function () {/* ... */}

  Vue.prototype.$destroy = function () {/* ... */}
}
lifecycleMixin 则是注入了 _update, $forceUpdate, $destroy,在运行时对外提供 $forceUpdate 的方法来允许强制更新组件,并定义了组件更新的 _update 私有方法
1.2.5 renderMixin
/src/core/instance/render.js(阅读笔记文件路径:/src/core/instance/render/renderMixin.flat1.js)
// 注入
//   Vue.prototype.$nextTick
//   Vue.prototype._render

export function renderMixin (Vue: Class<Component>) {
  /* 注入 render helpers */
  installRenderHelpers(Vue.prototype)

  Vue.prototype.$nextTick = function (fn: Function) {/* ... */}

  Vue.prototype._render = function (): VNode {/* ... */}
}
最后一个 renderMixin 引入了 $nextTick 原型函数,允许程序员将函数逻辑放到下一次更新之后,并定义用于渲染的 _render 私有方法
1.3 创建 Vue 实例
看完了一大堆 Mixin 之后,让我们再重新回到 /src/core/instance/index.js 阅读实例入口
/src/core/instance/index.js(阅读笔记文件路径:/src/core/instance/index.js)
import { initMixin } from './init'
import { stateMixin } from './state'
import { renderMixin } from './render'
import { eventsMixin } from './events'
import { lifecycleMixin } from './lifecycle'
import { warn } from '../util/index'

function Vue (options) {
  /* 创建实例环境检查 */
  if (process.env.NODE_ENV !== 'production' &&
    !(this instanceof Vue)
  ) {
    warn('Vue is a constructor and should be called with the `new` keyword')
  }

  /* 实例初始化 */
  this._init(options)
}

initMixin(Vue)       // 注入 Vue.prototype._init
stateMixin(Vue)      // 注入 Vue.prototype.{$data, $props, $set, $delete, $watch}
eventsMixin(Vue)     // 注入 Vue.prototype.{$on, $once, $off, $emit}
lifecycleMixin(Vue)  // 注入 Vue.prototype.{_update, $forceUpdate, $destroy}
renderMixin(Vue)     // 注入 Vue.prototype.{$nextTick, _render}

export default Vue
现在我们已经知道下面那一堆 Mixin 大概是在干嘛了,但是内部的具体行为还没进行拆解。不过这不要紧,我们接下来就从执行 new Vue 之后调用了 this._init 开始一步步看下去,跟着实例更新的脚步继续向下探,马上就会看到混入的这些方法具体干啥了。
1.3.1 _init 初始化Vue实例
new Vue 语句执行之后会根据 Vue 方法进行对象创建,构造函数中唯一调用的就是 Vue.prototype._init 方法,这时候我们就要再回到 initMixin 的时候看看到底混入的 Vue.prototype._init 方法做了哪些事情
/src/core/instance/index.js(阅读笔记文件路径:/src/core/instance/index.js)
// 注入
//   Vue.prototype._init

export function initMixin (Vue: Class<Component>) {
  Vue.prototype._init = function (options?: Object) {
    const vm: Component = this
    // a uid  (唯一标识号
    vm._uid = uid++
    // startTag, endTag ...  (实例创建记录
    // a flag to avoid this being observed
    vm._isVue = true  // (Vue 实例打上标志
    // merge options ...  (合并/初始化启动参数
    // _renderProxy ... (渲染代理

    // 暴露 vm 实例本身,透过 _self
    vm._self = vm
    initLifecycle(vm)  // 初始化生命周期标志
    initEvents(vm)     // 初始化事件队列
    initRender(vm)     // 添加组件创建辅助函数
    callHook(vm, 'beforeCreate')  // beforeCreate 生命周期钩子
    initInjections(vm) // 初始化 inject
    initState(vm)      // 初始化状态:props、methods、data、computed、watch
    initProvide(vm)    // 初始化 provide
    callHook(vm, 'created')       // created 生命周期钩子

    // resolve component name (处理组件名称

    // 有 el 则挂载到 vm.$options.el
    // 没有则返回后实例(等待 $mount 方法调用
    if (vm.$options.el) {
      vm.$mount(vm.$options.el)
    }
  }
}
这边我们可以很清楚地看到,_init 方法在做了一些实例标志的初始化之后,调用了一系列的 initXxx 方法,另外在其中穿插了 callHook 来调用生命周期钩子;最后调用了 $mount 方法进行挂载
1.3.2 callHook 调用生命周期钩子
看到这里我们先停一下,先来看看我们最关注的生命周期钩子是如何被调用的(深入 callHook 方法)
// 调用生命周期钩子

export function callHook (vm: Component, hook: string) {
  // #7573 disable dep collection when invoking lifecycle hooks
  pushTarget()
  const handlers = vm.$options[hook]
  const info = `${hook} hook`
  if (handlers) {
    for (let i = 0, j = handlers.length; i < j; i++) {
      invokeWithErrorHandling(handlers[i], vm, null, vm, info)
    }
  }
  if (vm._hasHookEvent) {
    vm.$emit('hook:' + hook)
  }
  popTarget()
}
其实 callHook 就是直接从 vm.$options[hook] 直接抽取出生命周期钩子并调用(invokeWithErrorHandling 包装错误提示)
1.3.3 beforeCreate 钩子
回到 _init 方法中,终于要开始我们的对象初始化了。首先第一个钩子是 beforeCreate 钩子
initLifecycle(vm)  // 初始化生命周期标志
initEvents(vm)     // 初始化事件队列
initRender(vm)     // 添加组件创建辅助函数
callHook(vm, 'beforeCreate')  // beforeCreate 生命周期钩子
在 beforeCreate 钩子调用之前,先对 vm 实例调用了 initLifecycle、initEvents 两个方法
1.3.3.1 initLifecycle 初始化生命周期标志
// 初始化实例生命周期

export function initLifecycle (vm: Component) {
  const options = vm.$options

  // 找到第一个非虚父组件
  let parent = options.parent
  if (parent && !options.abstract) {
    while (parent.$options.abstract && parent.$parent) {
      parent = parent.$parent
    }
    parent.$children.push(vm)
  }

  // 初始化实例属性
  vm.$parent = parent
  vm.$root = parent ? parent.$root : vm

  vm.$children = []
  vm.$refs = {}

  // 初始化实例生命周期标识
  vm._watcher = null
  vm._inactive = null
  vm._directInactive = false
  vm._isMounted = false
  vm._isDestroyed = false
  vm._isBeingDestroyed = false
}
我们可以看到 initLifecycle 主要就是将几个主要属性($parent, $root, $children, $refs)以及生命周期标志(_watcher, _inactive, _directInactive, _isMounted, _isDestroyed, _isBeingDestroyed)进行初始化
1.3.3.2 initEvents 初始化事件队列
/src/core/instance/events.js(阅读笔记文件路径:/src/core/instance/events/initEvent.flat2.js)
// 初始化实例事件队列

export function initEvents (vm: Component) {
  vm._events = Object.create(null)
  vm._hasHookEvent = false

  // 更新父组件监听函数
  const listeners = vm.$options._parentListeners
  if (listeners) {
    updateComponentListeners(vm, listeners)
  }
}
initEvents 就更简单了,初始化 _events, _hasHookEvent 对象之后就是更新父组件的监听函数。
1.3.3.3 beforeCreate 调用
这下就已经可以调用 beforeCreate 钩子了。到此我们就可以看到,对于 beforeCreate 的生命周期钩子来说,关于组件内容的东西都还没进行使用,仅仅只是对 Vue 实例需要的一些属性和标志进行初始化。
1.3.4 created 钩子
而接下来在 created 钩子被调用之前则调用了三个方法
initInjections(vm) // 初始化 inject
initState(vm)      // 初始化状态:props、methods、data、computed、watch
initProvide(vm)    // 初始化 provide
callHook(vm, 'created')       // created 生命周期钩子
由于 inject 与 provide 是与高阶组件相关的实践才会用到的,然而在 Vue 的基础运用当中还是比较少见,所以这边只针对 initState 方法进行展开
1.3.4.1 initState 初始化对象状态
与 React 不同的是,Vue 中的状态被显式的分散到 data、methods、computed、watch 中,同时还有父组件传递下来的 props,所以可以看到 initState 方法内部:
/src/core/instance/state.js(阅读笔记文件路径:/src/core/instance/state/initState.js)
// 初始化状态:props、methods、data、computed、watch

export function initState (vm: Component) {
  vm._watchers = []
  const opts = vm.$options

  /* 初始化 props */
  if (opts.props) initProps(vm, opts.props)
  /* 初始化 methods */
  if (opts.methods) initMethods(vm, opts.methods)
  /* 初始化 data */
  if (opts.data) {
    initData(vm)
  } else {
    observe(vm._data = {}, true /* asRootData */)
  }
  /* 初始化 computed */
  if (opts.computed) initComputed(vm, opts.computed)
  /* 初始化 watch */
  if (opts.watch && opts.watch !== nativeWatch) {
    initWatch(vm, opts.watch)
  }
}
可以看到 initState 就是按照 props、methods、data、computed、watch 的顺序一一调用 initXxx 方法
1.3.4.2 initProps
/src/core/instance/state.js(阅读笔记文件路径:/src/core/instance/state/initState.js)
function initProps (vm: Component, propsOptions: Object) {
  /* props 遍历对象 */
  const propsData = vm.$options.propsData || {}
  const props = vm._props = {}
  const keys = vm.$options._propKeys = []
  const isRoot = !vm.$parent
  // root instance props should be converted
  if (!isRoot) {
    toggleObserving(false)
  }
  for (const key in propsOptions) {
    keys.push(key)
    const value = validateProp(key, propsOptions, propsData, vm)
    if (process.env.NODE_ENV !== 'production') {
      const hyphenatedKey = hyphenate(key)
      // reserved props name warning ...

      /*** 将 props 的每个属性设置为响应式 ***/
      defineReactive(props, key, value, /* setting props warning ... */)
    } else {
      /*** 将 props 的每个属性设置为响应式 ***/
      defineReactive(props, key, value)
    }
    // proxy instantiation props ...
  }
  toggleObserving(true)
}
最核心的一句话就是 defineReactive(props, key, value) 将每一个 prop 转化为响应式
1.3.4.3 initMethods
/src/core/instance/state.js(阅读笔记文件路径:/src/core/instance/state/initState.js)
function initMethods (vm: Component, methods: Object) {
  const props = vm.$options.props
  for (const key in methods) {
    if (process.env.NODE_ENV !== 'production') {
      // not function methods warning ...
      // already defined warning ...
      // conflict with instance method warning ...
    }
    /* 将方法绑定到实例对象上 */
    vm[key] = typeof methods[key] !== 'function' ? noop : bind(methods[key], vm)
  }
}
methods 仅仅是一些实例方法,倒是不需要转成响应式,而是绑定到 Vue 实例上就行了 bind(methods[key], vm)
1.3.4.4 initData
/src/core/instance/state.js(阅读笔记文件路径:/src/core/instance/state/initState.js)
function initData (vm: Component) {
  let data = vm.$options.data
  data = vm._data = typeof data === 'function'
    ? getData(data, vm)
    : data || {}
  // non-object data warning ...
  // proxy data on instance
  const keys = Object.keys(data)
  const props = vm.$options.props
  const methods = vm.$options.methods
  let i = keys.length
  while (i--) {
    const key = keys[i]
    // conflict with methods warning ...
    if (props && hasOwn(props, key)) {
      // conflict with props warning ...
    } else if (!isReserved(key)) {
      /* 对每个属性建立 vm._data.key 的代理 */
      proxy(vm, `_data`, key)
    }
  }
  /* 转变为响应式数据 */
  observe(data, true /* asRootData */)
}
data 的处理方式与 props 相似,不同的是 data 返回的是单一的一个对象,所以用的是调用一次 observe 方法会自动进行深度观察
1.3.4.5 initComputed
/src/core/instance/state.js(阅读笔记文件路径:/src/core/instance/state/initState.js)
function initComputed (vm: Component, computed: Object) {
  const watchers = vm._computedWatchers = Object.create(null)
  const isSSR = isServerRendering()

  for (const key in computed) {
    const userDef = computed[key]
    const getter = typeof userDef === 'function' ? userDef : userDef.get
    // missing getter warning ...

    if (!isSSR) {
      // create internal watcher for the computed property.
      watchers[key] = new Watcher(
        vm,
        getter || noop,
        noop,
        computedWatcherOptions
      )
    }

    /* 创建响应式 getter */
    if (!(key in vm)) {
      defineComputed(vm, key, userDef)
    } else if (process.env.NODE_ENV !== 'production') {
      // conflict with data warning ...
      // conflict with prop warning ...
    }
  }
}
computed 计算属性跟 data 不一样,需要根据依赖进行实时更新,所以可以看到中间建立了一个 Watcher,并使用特别的 defineComputed 来处理响应式数据
1.3.4.6 initWatch
/src/core/instance/state.js(阅读笔记文件路径:/src/core/instance/state/initState.js)
function initWatch (vm: Component, watch: Object) {
  for (const key in watch) {
    const handler = watch[key]
    /* 为每一个观察属性创建一个观察者 */
    if (Array.isArray(handler)) {
      for (let i = 0; i < handler.length; i++) {
        createWatcher(vm, key, handler[i])
      }
    } else {
      createWatcher(vm, key, handler)
    }
  }
}
最后一种的 watch 并不需要绑定到 Vue 实例上,所以创建观察者在数据更新时执行回调(handler)就可以了
1.3.4.7 created 调用
经过上面的 initState 对实例状态进行初始化后,我们可以看到其实所有在 export default {} 中定义的数据、方法对象都已经绑定到实例上了。所以在 created 钩子里面,我们其实已经可以开始访问和使用 Vue 实例上的数据和方法了;不过与模版(template)和挂载元素(el)有关的操作还找不到真实的 html 元素节点。
1.4 初始化阶段总结
到此我们已经完成 Vue 实例创建的初始化阶段,调用的核心方法如下图所示。
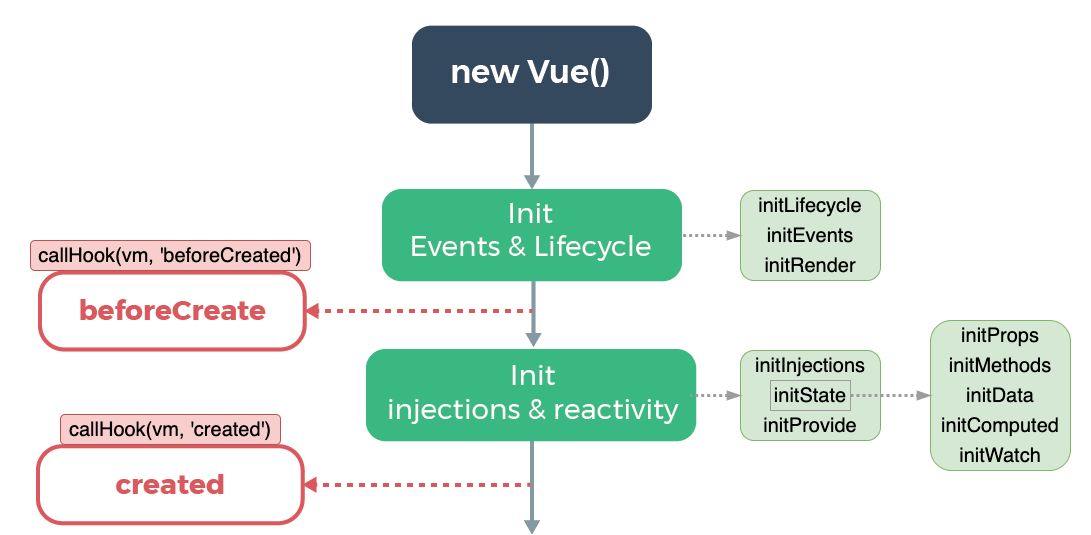
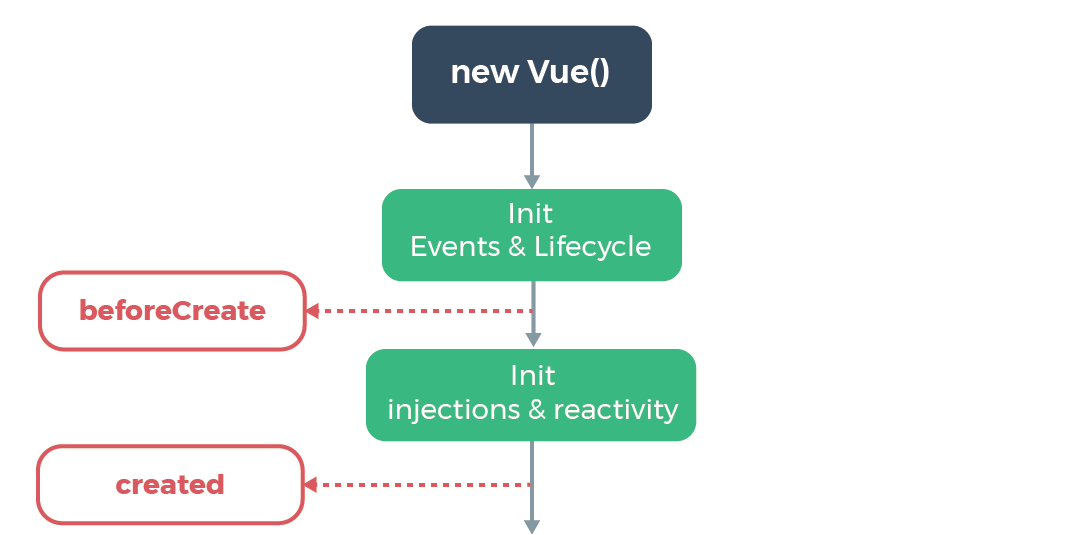
- 在 beforeCreate 钩子前:进行生命周期标志、事件队列初始化
- 在 created 钩子前:inject、props、methods、data、computed、watch、provide 的挂载;这时候 已经可以访问实例上的数据对象和方法了
2. 编译 & 挂载阶段(Compile & Mount)
接下来进入第二个 编译 & 挂载阶段(Compile & Mount),流程图如下

2.1 $mount 挂载 Vue 实例
那么编译和挂载阶段从哪里开始呢?还记得 _init 方法中的末尾有这么一句话:
/src/core/instance/init.js(阅读笔记文件路径:/src/core/instance/init/initMixin.flat2.js)
// 注入
//   Vue.prototype._init

export function initMixin (Vue: Class<Component>) {
  Vue.prototype._init = function (options?: Object) {
    // ...

    // 有 el 则挂载到 vm.$options.el
    // 没有则返回后实例(等待 $mount 方法调用
    if (vm.$options.el) {
      vm.$mount(vm.$options.el)
    }
  }
}
通常创建一个 Vue 实例时有下面两种写法:
- 使用 el 属性
new Vue({
    el: '#app',
    render: h => h(App)
})
- 使用 $mount 方法
new Vue({
    render: h => h(App)
}).$mount('#app')
其实两种都是调用 vm.$mount 方法进行对象的编译和挂载。
这边 $mount 方法的混入根据运行环境和编译方式的不同(原始 Vue 直接编译、纯运行时、编译后运行、使用 vue-lodaer 编译并打包)存在不同的实现,所以在这边我们选用一个包含 完整版本(编译 + 运行时) 的方法来看
// 完整版本的 $mount 方法

// #lineno-9039
Vue.prototype.$mount = function (
  el,
  hydrating
) {
  el = el && inBrowser ? query(el) : undefined;
  return mountComponent(this, el, hydrating)
};

// #lineno-11877
var mount = Vue.prototype.$mount;
Vue.prototype.$mount = function (
  el,
  hydrating
) {
  el = el && query(el);

  // mount on <html> or <body> warning

  var options = this.$options;
  // resolve template/el and convert to render function
  if (!options.render) {
    var template = options.template;
    if (template) {
      /* 按 template 获取模版 */
      if (typeof template === 'string') {
        if (template.charAt(0) === '#') {
          template = idToTemplate(template);
          // template not found warning ...
        }
      } else if (template.nodeType) {
        template = template.innerHTML;
      } else {
        // unknown template option warning ...
        return this
      }
    } else if (el) {
      /* 按 el 获取模版 */
      template = getOuterHTML(el);
    }
    if (template) {
      // mark compile ...

      // 编译方法挂载
      var ref = compileToFunctions(template, {
        outputSourceRange: "development" !== 'production',
        shouldDecodeNewlines: shouldDecodeNewlines,
        shouldDecodeNewlinesForHref: shouldDecodeNewlinesForHref,
        delimiters: options.delimiters,
        comments: options.comments
      }, this);
      var render = ref.render;
      var staticRenderFns = ref.staticRenderFns;
      options.render = render;
      options.staticRenderFns = staticRenderFns;

      // mark compile end ...
    }
  }
  return mount.call(this, el, hydrating)
};
我们可以看到这边定义了两次 $mount 方法的实现,第一次在第二次的末尾进行调用,也就是我们可以这样说
- 在 9039 行定义的
$mount方法才是真正运行时调用的挂载组件方法,其核心方法就是调用mountComponent将实例挂载到el指向的元素上 - 11877 行定义的版本则是先从原始的
template或el属性进行 模版(template) 获取
2.2 模版编译阶段
按完整版的流程来看,我们先从编译阶段开始:
- 首先根据 el 获取挂载目标 html 节点
el = el && query(el);
- 接下来根据 template 或 el 属性获取组件模版
if (template) {
  /* 按 template 获取模版 */
  if (typeof template === 'string') {
    if (template.charAt(0) === '#') {
      template = idToTemplate(template);
      // template not found warning ...
    }
  } else if (template.nodeType) {
    template = template.innerHTML;
  } else {
    // unknown template option warning ...
    return this
  }
} else if (el) {
  /* 按 el 获取模版 */
  template = getOuterHTML(el);
}
- 如果存在 template 则使用
idToTemplate或template.innerHTML获取原始模版 - 否则根据 el 使用
getOuterHTML来获取模版
- 最后是挂载编译方法
if (template) {
  // mark compile ...

  // 编译方法挂载
  var ref = compileToFunctions(template, {
    outputSourceRange: "development" !== 'production',
    shouldDecodeNewlines: shouldDecodeNewlines,
    shouldDecodeNewlinesForHref: shouldDecodeNewlinesForHref,
    delimiters: options.delimiters,
    comments: options.comments
  }, this);
  var render = ref.render;
  var staticRenderFns = ref.staticRenderFns;
  options.render = render;
  options.staticRenderFns = staticRenderFns;

  // mark compile end ...
}
如果成功获取模版,再附加两个渲染用的方法上去
- 调用运行时的原始
$mount方法
// #lineno-9039 version
Vue.prototype.$mount = function (
  el,
  hydrating
) {
  el = el && inBrowser ? query(el) : undefined;
  return mountComponent(this, el, hydrating)
};

// #lineno-11877 version
var mount = Vue.prototype.$mount;
return mount.call(this, el, hydrating)
这时候的 el 还是原始的模版内容,还没进行任何的数据绑定和替换,需要注意,下面我们看看具体 mountComponent 具体做了什么
2.3 mountComponent 挂载实例
下面 mountComponent 就是真正将 Vue 实例挂载到 DOM 上并绑定相关数据驱动了
// 挂载实例

export function mountComponent (
  vm: Component,
  el: ?Element,
  hydrating?: boolean
): Component {
  vm.$el = el
  if (!vm.$options.render) {
    vm.$options.render = createEmptyVNode
    // missing template or render warning ...
  }
  callHook(vm, 'beforeMount')

  let updateComponent
  if (process.env.NODE_ENV !== 'production' && config.performance && mark) {
    // production.version update ...
  } else {
    updateComponent = () => {
      vm._update(vm._render(), hydrating)
    }
  }

  // 创建观察者并挂载到 vm._watcher 上
  new Watcher(vm, updateComponent, noop, {
    before () {
      if (vm._isMounted && !vm._isDestroyed) {
        callHook(vm, 'beforeUpdate')
      }
    }
  }, true /* isRenderWatcher */)
  hydrating = false

  // manually mounted instance, call mounted on self
  // mounted is called for render-created child components in its inserted hook
  if (vm.$vnode == null) {
    vm._isMounted = true
    callHook(vm, 'mounted')
  }
  return vm
}
按表面的代码顺序是:
- 初始化
$el属性 - 调用
beforeMount钩子 - 创建
updateComponent函数并创建Watcher观察者 - 调用
mounted钩子
下面我们一步步来看
2.3.1 beforeMount 钩子
从前面一段代码我们可以看到
vm.$el = el
if (!vm.$options.render) {
  vm.$options.render = createEmptyVNode
  // missing template or render warning ...
}
callHook(vm, 'beforeMount')
从 created 钩子到 beforeMount 钩子之间,就只是把编译好的原始模版挂载到 $el 属性上。而通常实际业务中我们也不太需要直接去操作实际模版(这时候是原始模版),也比较少直接运用 $el 属性,所以写在 beforeMount 里的逻辑通常也可以写在 created 钩子里面。
2.3.2 Watcher 渲染观察者创建
接下来是 mountComponent 中间段落的代码
let updateComponent
if (process.env.NODE_ENV !== 'production' && config.performance && mark) {
  // production.version update ...
} else {
  updateComponent = () => {
    vm._update(vm._render(), hydrating)
  }
}

// 创建观察者并挂载到 vm._watcher 上
new Watcher(vm, updateComponent, noop, {
  before () {
    if (vm._isMounted && !vm._isDestroyed) {
      callHook(vm, 'beforeUpdate')
    }
  }
}, true /* isRenderWatcher */)
hydrating = false
主要是先定义一个组件更新函数 updateComponent,其具体行为其实就是先 _render 再 _update 我们后面会看到
接下来就是创建一个观察者对象,这边先看构造函数 constructor 和 get 方法就好
/src/core/observer/watcher.js(阅读笔记文件路径:/src/core/observer/watcher/constructor_get.js)
/* @flow */

import {
  warn,
  remove,
  isObject,
  parsePath,
  _Set as Set,
  handleError,
  noop
} from '../util/index'

import { traverse } from './traverse'
import { queueWatcher } from './scheduler'
import Dep, { pushTarget, popTarget } from './dep'

import type { SimpleSet } from '../util/index'

let uid = 0

/* 观察者对象 */
export default class Watcher {
  vm: Component;
  expression: string;
  cb: Function;
  id: number;
  deep: boolean;
  user: boolean;
  lazy: boolean;
  sync: boolean;
  dirty: boolean;
  active: boolean;
  deps: Array<Dep>;
  newDeps: Array<Dep>;
  depIds: SimpleSet;
  newDepIds: SimpleSet;
  before: ?Function;
  getter: Function;
  value: any;

  constructor (
    vm: Component,
    expOrFn: string | Function,
    cb: Function,
    options?: ?Object,
    isRenderWatcher?: boolean
  ) {
    /**
     * 实例属性初始化:
     * vm 观察目标Vue实例
     * options: deep, lazy, sync, before
     */
    this.vm = vm
    if (isRenderWatcher) {
      vm._watcher = this
    }
    vm._watchers.push(this)
    // options
    if (options) {
      this.deep = !!options.deep
      this.user = !!options.user
      this.lazy = !!options.lazy
      this.sync = !!options.sync
      this.before = options.before
    } else {
      this.deep = this.user = this.lazy = this.sync = false
    }
    /**
     * cb, id, active, dirty,
     * deps, newDpes, depIds, newDepIds,
     * expression
     */
    this.cb = cb
    this.id = ++uid // uid for batching
    this.active = true
    this.dirty = this.lazy // for lazy watchers
    this.deps = []
    this.newDeps = []
    this.depIds = new Set()
    this.newDepIds = new Set()
    this.expression = process.env.NODE_ENV !== 'production'
      ? expOrFn.toString()
      : ''
    /**
     * getter
     */
    if (typeof expOrFn === 'function') {
      this.getter = expOrFn
    } else {
      this.getter = parsePath(expOrFn)
      if (!this.getter) {
        this.getter = noop
        process.env.NODE_ENV !== 'production' && warn(
          `Failed watching path: "${expOrFn}" ` +
          'Watcher only accepts simple dot-delimited paths. ' +
          'For full control, use a function instead.',
          vm
        )
      }
    }
    /**
     * invoke getter
     */
    this.value = this.lazy
      ? undefined
      : this.get()
  }

  /**
   * 取值:
   *   调用 getter
   *   traverse 递归遍历
   */
  get () {
    pushTarget(this)
    let value
    const vm = this.vm
    try {
      value = this.getter.call(vm, vm)
    } catch (e) {
      if (this.user) {
        handleError(e, vm, `getter for watcher "${this.expression}"`)
      } else {
        throw e
      }
    } finally {
      // "touch" every property so they are all tracked as
      // dependencies for deep watching
      if (this.deep) {
        traverse(value)
      }
      popTarget()
      this.cleanupDeps()
    }
    return value
  }

}
这边代码看起来很长,其实说白了就是几个步骤:
- 初始化
options选项(实例标志)、实例属性、getters方法(这边值得注意的是,这里的getter其实就是我们刚刚看到的updateComponent方法,后面会用到) - 最后调用
this.get()进行首次观察值的获取 get方法核心就是value = this.getter.call(vm, vm)调用 getter,也就是updateComponent获取观察值,并返回
2.3.2.1 _render 函数首次渲染
前面创建 Watcher 对象的时候,经历了 constructor -> get -> getter = updateComponent = _render + _update。接下来我们先来看看 _render(还记得 _render 方法是在 Vue 方法外面透过 renderMixin 混入的
/src/core/instance/render.js(阅读笔记文件路径:/src/core/instance/render/renderMixin.flat2._render.js)
// Vue.prototype._render 渲染细节

export function renderMixin (Vue: Class<Component>) {
  /* 注入 render helpers */
  installRenderHelpers(Vue.prototype)

  Vue.prototype.$nextTick = function (fn: Function) {
    return nextTick(fn, this)
  }

  Vue.prototype._render = function (): VNode {
    const vm: Component = this
    const { render, _parentVnode } = vm.$options

    if (_parentVnode) {
      vm.$scopedSlots = normalizeScopedSlots(
        _parentVnode.data.scopedSlots,
        vm.$slots,
        vm.$scopedSlots
      )
    }

    // 保留父节点接入点
    vm.$vnode = _parentVnode
    // render self
    let vnode
    try {
      /* 递归创建 VNode */
      currentRenderingInstance = vm
      vnode = render.call(vm._renderProxy, vm.$createElement)
    } catch (e) {
      // render exception handling ...
      // ensure vnode exists
      vnode = vm._vnode
    } finally {
      currentRenderingInstance = null
    }
    // 接受包含唯一一个 VNode 的数组
    if (Array.isArray(vnode) && vnode.length === 1) {
      vnode = vnode[0]
    }
    // 保证 vnoe 存在
    if (!(vnode instanceof VNode)) {
      // multiple root node warning ...
      vnode = createEmptyVNode()
    }
    // set parent
    vnode.parent = _parentVnode
    return vnode
  }
}
我们可以看到整个 _render 方法的核心在于 vnode = render.call(vm._renderProxy, vm.$createElement) 也就是传入 vm.$createElement 方法并调用构造函数选项里面的 render 方法,如下
new Vue({
    el: '#app',
    render: h => h(App)
})
这里的 h 其实就是 vm.$createElement。内部创建虚拟节点以及详细的模版渲染过程就不展开解说了,我们到目前为止就知道整个 _render 方法就是透过 $createElement 创建并范围虚拟 dom 的根阶段 vnode
2.3.2.2 _update 更新模版
从 _render 方法中拿到 vnode 之后,updateComponent 将其传入 _update 来更新模版(再次回忆一下:_update 方法是在 Vue 实例外部透过 lifecycleMixin 混入的方法)
/src/core/instance/lifecycle.js(阅读笔记文件路径:/src/core/instance/lifecycle/lifecycleMixin.flat2._update.js)
// Vue.prototype._update 更新 vdom 方法

export function lifecycleMixin (Vue: Class<Component>) {
  Vue.prototype._update = function (vnode: VNode, hydrating?: boolean) {
    const vm: Component = this
    const prevEl = vm.$el
    const prevVnode = vm._vnode
    const restoreActiveInstance = setActiveInstance(vm)
    vm._vnode = vnode

    /* __patch__ 方法比较并更新渲染树 */
    if (!prevVnode) {
      // 首次渲染
      vm.$el = vm.__patch__(vm.$el, vnode, hydrating, false /* removeOnly */)
    } else {
      // 后续更新
      vm.$el = vm.__patch__(prevVnode, vnode)
    }
    restoreActiveInstance()
    /* 更新 __vue__ 标志 */
    if (prevEl) {
      prevEl.__vue__ = null
    }
    if (vm.$el) {
      vm.$el.__vue__ = vm
    }
    /* 更新高阶组件 */
    if (vm.$vnode && vm.$parent && vm.$vnode === vm.$parent._vnode) {
      vm.$parent.$el = vm.$el
    }
    /* call updated hook by scheduler */
  }

  Vue.prototype.$forceUpdate = function () {
    const vm: Component = this
    if (vm._watcher) {
      vm._watcher.update()
    }
  }

  Vue.prototype.$destroy = function () {/* ... */}
}
在 _update 方法当中,根据 prevVnode 存在与否来判定是不是首次渲染,并透过调用一个 __patch__ 方法来进行模版更新(这里的 __patch__ 方法其实就是对虚拟 dom 树进行比较并返回更新的 dom 节点),最后将更新后(这边为第一次更新,也就是将初始的绑定后的虚拟 dom)绑定到 vm.$el 上
而供外部使用的 Vue.prototype.$forceUpdate 其实相当于 _update 的代理,检查观察者(renderWatcher)存在后直接调用 _update 更新
2.3.3 mounted 钩子
看到这边相信大家已经有点晕了,再给大家重申一遍。挂载方法($mount)调用后:
- 编译模版(
idToTemplate for template或getOuterHTML for el) - 原始模版挂载到
$el后,调用beforeMount钩子 - 调用
mountComponent进行第一次挂载并渲染组件- 调用
_render方法创建 vnode 虚拟节点 - 接受 vnode 并调用
_update方法更新vm.$eldom 元素
- 调用
- 调用
mounted钩子
也就是说在 mounted 钩子中,整个 Vue 实例已经处于一个完全初始化好的状态,相比于 created 钩子之后,就是所有数据都绑定到 dom 元素节点并启用观察者模式等待数据变化后重新渲染,也就是所谓的 $el 属性已经完全可访问了
2.4 编译 & 挂载阶段总结
最后一样总结一下在编译 & 挂载阶段调用的核心方法

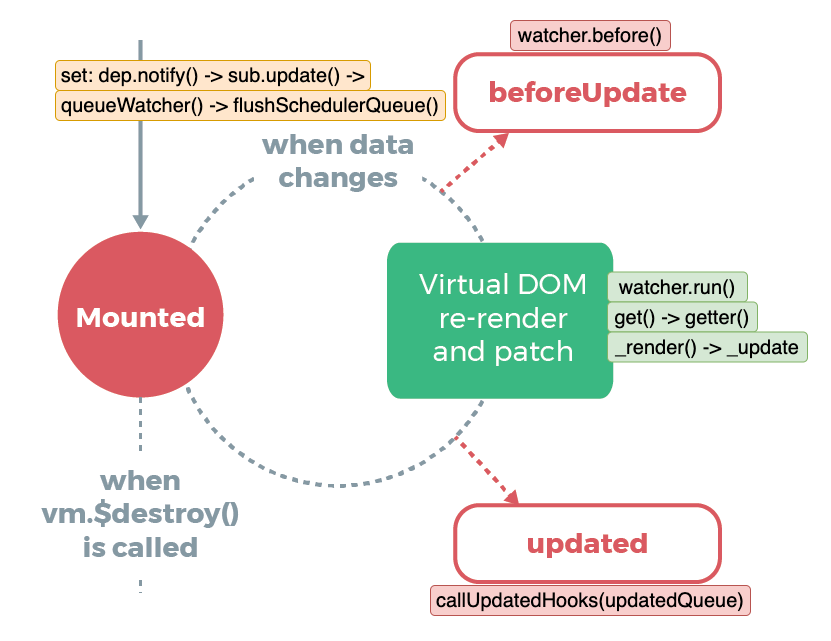
3. 更新阶段(Update)
第三个 更新阶段(Update) 指的是,当我们的 Vue 实例完全加载好之后进入 Mounted 状态时,一旦有被监听的数据变化了,那所有依赖于它的观察者都必须进行相应的更新(计算属性)以及重新渲染(模版绑定)
3.1 setter 方法拦截对象属性修改行为
由于本篇侧重在跟踪生命周期钩子的执行和 Vue 实例的生存周期,所以不对响应式原理做过多的阐述。
我们知道 Vue2 的响应式原理是借由 Object.defineProperty 的 API 来实现,所以第三个 更新阶段(Update) 我们就从 defineReactive 方法开始说起
/src/core/observer/index.js(阅读笔记文件路径:/src/core/observer/index/defineReactive.flat1.js)
// 定义响应式数据

export function defineReactive (
  obj: Object,
  key: string,
  val: any,
  customSetter?: ?Function,
  shallow?: boolean
) {
  /* 创建依赖管理对象(转发 Watcher 更新) */
  const dep = new Dep()

  // ensure prop configurable & value ...

  // 创建 Observer
  let childOb = !shallow && observe(val)
  Object.defineProperty(obj, key, {
    enumerable: true,
    configurable: true,
    /* 定义 reactive getter */
    get: function reactiveGetter () {
      const value = getter ? getter.call(obj) : val
      if (Dep.target) {
        dep.depend()
        if (childOb) {
          childOb.dep.depend()
          if (Array.isArray(value)) {
            dependArray(value)
          }
        }
      }
      return value
    },
    /* 定义 reactive setter */
    set: function reactiveSetter (newVal) {
      const value = getter ? getter.call(obj) : val
      // 检查新旧值差异
      if (newVal === value || (newVal !== newVal && value !== value)) {
        return
      }

      // check customSetter ...

      // #7981: for accessor properties without setter
      if (getter && !setter) return
      if (setter) {
        setter.call(obj, newVal)
      } else {
        val = newVal
      }
      // 更新 Observer
      childOb = !shallow && observe(newVal)
      /* 由 dep 通知观察者进行更新 */
      dep.notify()
    }
  })
}
defineReactive 是 Vue2 实现响应式原理的核心方法,透过封装 Object.defineProperty 的 getter/setter 行为拦截观察者访问/修改数据的行为。
每一个被观察的数据对象都会创建独立的 Dep 对象封装在闭包里面,并在 get 访问器里面对依赖于该属性的对象进行拦截并记录,在 set 方法修改对象之后进行更新。
在更新阶段的出发点要从 set 访问器说起:
getter.call(obj)获取修改后的新值setter.call(obj, newVal)对象数据dep.notify()通知依赖观察者进行更新
这边我们不关心 getter 和 setter 的具体实现,而是关注在 dep.notify() 方法是如何通知依赖的观察者进行更新
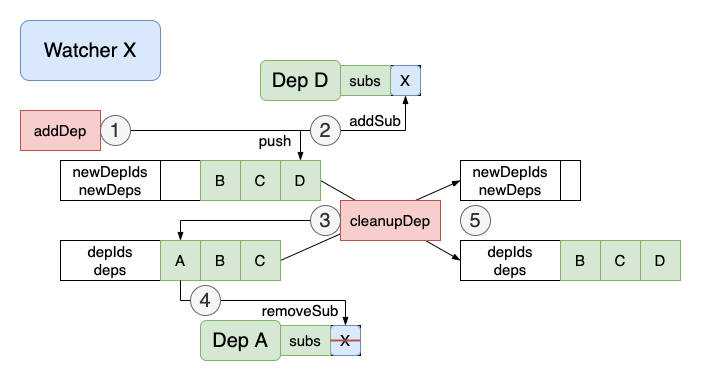
3.2 Watcher.update + run 进行数据 & 模版更新
首先我们先看到 dep.notify 方法的定义
/src/core/observer/dep.js(阅读笔记文件路径:/src/core/observer/dep/Dep.flat2.js)
export default class Dep {
  static target: ?Watcher;
  id: number;
  subs: Array<Watcher>;

  constructor () {
    /* 初始化 uid & 观察者列表 */
    this.id = uid++
    this.subs = []
  }

  // ...

  // 通知观察者更新
  notify () {
    const subs = this.subs.slice()
    if (process.env.NODE_ENV !== 'production' && !config.async) {
      // async mode sorting
      subs.sort((a, b) => a.id - b.id)
    }
    for (let i = 0, l = subs.length; i < l; i++) {
      /* 逐一通知更新 */
      subs[i].update()
    }
  }
}
我们可以看到 dep.notify 就是先对 subs 按 id 进行排序后依序调用 watcher.update() 通知更新,接下来看到 Watcher 类
/src/core/observer/watcher.js(阅读笔记文件路径:/src/core/observer/watcher/update_run.js)
export default class Watcher {

  // instance props ...

  /* 通知观察者(模版依赖)更新 */
  update () {
    if (this.lazy) {  // lazy 模式下仅改变脏值
      this.dirty = true
    } else if (this.sync) {  // 同步模式下直接 run
      this.run()
    } else {  // 否则更新队列
      queueWatcher(this)
    }
  }

  /* 具体进行依赖更新 */
  run () {
    if (this.active) {
      // 重新 get 新的值
      const value = this.get()
      if (
        value !== this.value ||
        isObject(value) ||
        this.deep
      ) {
        // 值更新:值改变、数组/对象、深度遍历
        const oldValue = this.value  // set new value
        this.value = value
        if (this.user) {
          try {
            this.cb.call(this.vm, value, oldValue)
          } catch (e) {
            handleError(e, this.vm, `callback for watcher "${this.expression}"`)
          }
        } else {
          this.cb.call(this.vm, value, oldValue)
        }
      }
    }
  }
}
我们看到 update 方法中并不一定直接进行数据更新,而是会调用 queueWatcher 对数据更新进行搜集,在下个 tick 时合并一起更新。
而 run 方法就是 Watcher 对象具体进行更新的方法,其核心就是调用 this.get() 获取新的数据值并更新观察者对象保存的值 this.value = value。
这边我们再回顾一下,上面提过 get 方法将会调用 getter 方法也就是 updateComponent 也就是 _update(_render()),如下
// ...

if (process.env.NODE_ENV !== 'production' && config.performance && mark) {
  // production.version update ...
} else {
  updateComponent = () => {
    vm._update(vm._render(), hydrating)
  }
}

// ...

// 创建观察者并挂载到 vm._watcher 上
new Watcher(vm, updateComponent, noop, {
  before () {
    if (vm._isMounted && !vm._isDestroyed) {
      callHook(vm, 'beforeUpdate')
    }
  }
}, true /* isRenderWatcher */)

// ...
/src/core/observer/watcher.js(阅读笔记文件路径:/src/core/observer/watcher/constructor_get.js)
// ...

this.getter = expOrFn // expOrFn -> updateComponent

// ...

get () {
  pushTarget(this)
  let value
  const vm = this.vm
  try {
    value = this.getter.call(vm, vm)

  // ...
}
好我们已经了解了 defineReactive.setter -> dep.notify -> watcher.update -> watcher.run -> watcher.get -> watcher.getter -> vm._render + vm._update 的数据更新后通知观察者和模版进行更新的整套流程,但是每次数据一更新都走一次流程更新一次模版未免太没效率,所以 Vue 还用了一个 queueWatcher 创建观察者队列进行批量更新
3.3 Scheduler 观察者批量更新
鉴于批量更新的需求,我们接下来看到 queueWatcher 方法的实现
/src/core/observer/scheduler.js(阅读笔记文件路径:/src/core/observer/scheduler/queueWatcher.js)
// 维护更新队列并排程

export function queueWatcher (watcher: Watcher) {
  const id = watcher.id
  if (has[id] == null) {  // 重复 id 被忽略
    has[id] = true
    // 插入队列
    if (!flushing) {
      queue.push(watcher)
    } else {
      // if already flushing, splice the watcher based on its id
      // if already past its id, it will be run next immediately.
      let i = queue.length - 1
      while (i > index && queue[i].id > watcher.id) {
        i--
      }
      queue.splice(i + 1, 0, watcher)
    }
    // 缓冲队列
    if (!waiting) {
      waiting = true

      if (process.env.NODE_ENV !== 'production' && !config.async) {
        flushSchedulerQueue()
        return
      }
      // 在下一个 tick 刷新队列
      nextTick(flushSchedulerQueue)
    }
  }
}
queueWatcher 的核心逻辑就是将新来的 watcher 排入队列,并在下一个 tick(异步模式下)的时候调用 flushSchedulerQueue
/src/core/observer/scheduler.js(阅读笔记文件路径:/src/core/observer/scheduler/flushSchedulerQueue.js)
// 刷新更新队列

function flushSchedulerQueue () {
  currentFlushTimestamp = getNow()
  flushing = true
  let watcher, id

  queue.sort((a, b) => a.id - b.id)  // 保证 watcher 执行顺序

  // 三个保证
  // 1. 按父 -> 子的顺序更新
  // 2. user watcher 运行在 render watcher
  // 3. destroy 期间忽略 watcher
  for (index = 0; index < queue.length; index++) {
    watcher = queue[index]
    if (watcher.before) {
      watcher.before()  // 调用 beforeUpdate 钩子
    }
    id = watcher.id
    has[id] = null
    watcher.run()  // 调用 watcher.run 执行实际 watcher 更新

    // infinite update loop warning in development version ...
  }

  // 维护队列副本
  const activatedQueue = activatedChildren.slice()
  const updatedQueue = queue.slice()

  // 更新队列状态
  resetSchedulerState()

  // 调用生命周期钩子
  callActivatedHooks(activatedQueue)  // activated 钩子
  callUpdatedHooks(updatedQueue)  // updated 钩子

  // emit devtools event ...
}
flushSchedulerQueue 首先调用每个观察者的 before 方法,其实就是 beforeUpdate 钩子如下
// 创建观察者并挂载到 vm._watcher 上
new Watcher(vm, updateComponent, noop, {
  before () {
    if (vm._isMounted && !vm._isDestroyed) {
      callHook(vm, 'beforeUpdate')
    }
  }
}, true /* isRenderWatcher */)
接下来就是调用 watcher.run() 进行具体的观察者更新,最后调用 callActivatedHooks 和 callUpdatedHooks 执行生命周期钩子
/src/core/observer/scheduler.js(阅读笔记文件路径:/src/core/observer/scheduler/flushSchedulerQueue.js)
/* updated 钩子 */
function callUpdatedHooks (queue) {
  let i = queue.length
  while (i--) {
    const watcher = queue[i]
    const vm = watcher.vm
    if (vm._watcher === watcher && vm._isMounted && !vm._isDestroyed) {
      callHook(vm, 'updated')
    }
  }
}

/* activated 钩子 */
function callActivatedHooks (queue) {
  for (let i = 0; i < queue.length; i++) {
    queue[i]._inactive = true
    activateChildComponent(queue[i], true /* true */)
  }
}
3.4 更新阶段总结
更新阶段相对比较简单,其实就是复用了挂载阶段用到的 watcher.get -> watcher.update -> updateComponent -> vm._render + vm._update 流程,然后只需要对首次渲染做一些特别处理即可
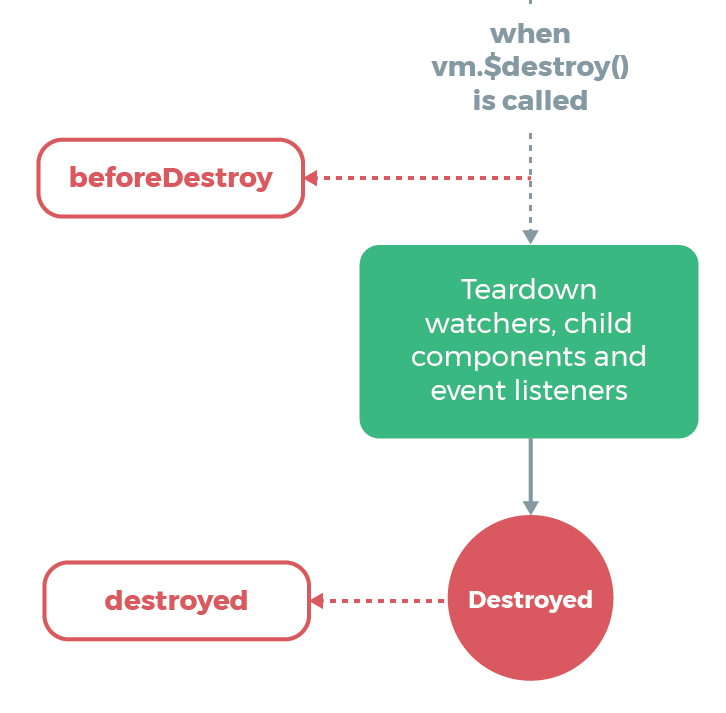
4. 销毁阶段(Destroy)
最后一个 销毁阶段(Destroy) 就是当组件被撤销或是从 DOM 上完全删除的时候,就需要销毁 Vue 实例并释放相关资源(观察者对象)
4.1 $destroy 方法
销毁阶段比较简单,核心就是 Vue.prototype.$destroy 方法,还是比较完整且直接的
/src/core/instance/lifecycle.js(阅读笔记文件路径:/src/core/instance/lifecycle/lifecycleMixin.flat2.$destroy.js)
// Vue.prototype.$destroy 销毁 vdom 方法

export function lifecycleMixin (Vue: Class<Component>) {
  Vue.prototype._update = function (vnode: VNode, hydrating?: boolean) {/* ... */}

  Vue.prototype.$forceUpdate = function () {/* ... */}

  Vue.prototype.$destroy = function () {
    const vm: Component = this
    if (vm._isBeingDestroyed) {  // 避免重复调用
      return
    }
    callHook(vm, 'beforeDestroy')  // beforeDestroy 生命周期钩子

    vm._isBeingDestroyed = true

    // 从父组件移除
    const parent = vm.$parent
    if (parent && !parent._isBeingDestroyed && !vm.$options.abstract) {
      remove(parent.$children, vm)
    }

    // 解除绑定观察者
    if (vm._watcher) {
      vm._watcher.teardown()
    }
    let i = vm._watchers.length
    while (i--) {
      vm._watchers[i].teardown()
    }
    // remove reference from data ob
    // frozen object may not have observer.
    if (vm._data.__ob__) {
      vm._data.__ob__.vmCount--
    }

    // 更新标志
    vm._isDestroyed = true
    /* __patch__ 方法将 vnode 置为 null */
    vm.__patch__(vm._vnode, null)
    callHook(vm, 'destroyed')  // destroyed 生命周期钩子

    /* 关闭实例监听函数 */
    vm.$off()

    // 移除 __vue__ 标志
    if (vm.$el) {
      vm.$el.__vue__ = null
    }
    // 移除父元素引用
    if (vm.$vnode) {
      vm.$vnode.parent = null
    }
  }
}
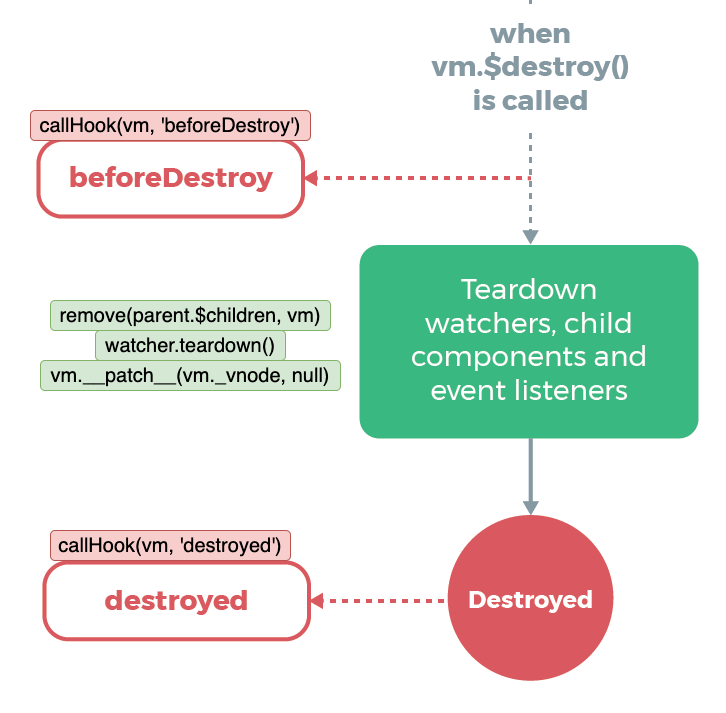
销毁阶段需要做以下几件事:
- 调用
beforeDestroy钩子 - 从父节点的
$children中删除 - 解除
_watcher、_watchers绑定 - 最后调用
__patch__将 vnode 用 null 来替替换 - 关闭实例监听函数
vm.$off
对反正就是一堆资源的释放,问题在于如果你想要清除的资源与实例内容相关的话需要放在 beforeDestroy 钩子里;而在 destroyed 钩子里面 Vue 实例上的资源都释放的差不多了,所以比较适合用于释放其他与实例无关的资源。
4.2 销毁阶段总结
销毁阶段还是比较单纯,最核心的就是释放实例相关的观察者就行了。
结语
本篇尝试从源码的角度解析 Vue 的生命周期钩子,顺便理解 Vue 的源码实现。后面将会接着阅读源码中的响应式原理和模版渲染机制。
其他资源
参考连接
| Vue 官方-实例生命周期钩子 | https://cn.vuejs.org/v2/guide/instance.html#%E5%AE%9E%E4%BE%8B%E7%94%9F%E5%91%BD%E5%91%A8%E6%9C%9F%E9%92%A9%E5%AD%90 |
| Vue源码系列-Vue中文社区 | https://vue-js.com/learn-vue/lifecycle/ |
| vuejs/vue-2.6.12-Github | https://github.com/vuejs/vue/tree/v2.6.12 |
| 關於 Vue 的生命週期與鉤子函數 | https://blog.csdn.net/weixin_46803507/article/details/115107627?spm=1001.2014.3001.5501 |
阅读笔记参考
https://github.com/superfreeeee/Blog-code/tree/main/source_code_research/vue-2.6.12