前端搭建
<template>
  <div id="app">
    <el-container style="height: 500px; border: 1px solid #eee">
      <el-aside width="200px" style="background-color: rgb(238, 241, 246)">
        <el-menu>
          <el-submenu index="1">
            <template slot="title"
              ><i class="el-icon-message"></i>导航一</template
            >
            <el-menu-item-group>
              <!-- <template slot="title">分组一</template> -->
              <el-menu-item index="1-1"
                ><router-link to="/nav1/book"
                  >图书信息</router-link
                ></el-menu-item
              >
              <el-menu-item index="1-2"
                ><router-link to="/nav1/pageOne"
                  >页面1</router-link
                ></el-menu-item
              >
              <el-menu-item index="1-3"
                ><router-link to="/nav1/pageTwo"
                  >页面2</router-link
                ></el-menu-item
              >
            </el-menu-item-group>
          </el-submenu>
        </el-menu>
        <el-menu>
          <el-submenu index="2">
            <template slot="title"><i class="el-icon-menu"></i>导航二</template>
            <el-menu-item-group>
              <!-- <template slot="title">分组一</template> -->
              <el-menu-item index="2-1"
                ><router-link to="/nav2/pageThree"
                  >页面3</router-link
                ></el-menu-item
              >
              <el-menu-item index="2-2"
                ><router-link to="/nav2/pageFour"
                  >页面4</router-link
                ></el-menu-item
              >
            </el-menu-item-group>
          </el-submenu>
        </el-menu>
        <el-menu>
          <el-submenu index="3">
            <template slot="title"
              ><i class="el-icon-setting"></i>导航三</template
            >
            <el-menu-item-group>
              <!-- <template slot="title">分组一</template> -->
              <el-menu-item index="3-1">页面5</el-menu-item>
              <el-menu-item index="3-2">页面6</el-menu-item>
            </el-menu-item-group>
          </el-submenu>
        </el-menu>
      </el-aside>
      <el-container>
        <el-header style="text-align: right; font-size: 12px">
          <el-dropdown>
            <i class="el-icon-setting" style="margin-right: 15px"></i>
            <el-dropdown-menu slot="dropdown">
              <el-dropdown-item>查看</el-dropdown-item>
              <el-dropdown-item>新增</el-dropdown-item>
              <el-dropdown-item>删除</el-dropdown-item>
            </el-dropdown-menu>
          </el-dropdown>
          <span>王小虎</span>
        </el-header>
        <!-- 内容 -->
        <el-main>
          <router-view></router-view>
        </el-main>
      </el-container>
    </el-container>
  </div>
</template>
<style>
.el-header {
  background-color: #b3c0d1;
  color: #333;
  line-height: 60px;
}

.el-aside {
  color: #333;
}
</style>
<script>
export default {
  name: "App",
};
</script>
<template>
  <div>
    <el-table :data="tableData" style="width: 100%" max-height="250">
      <el-table-column fixed prop="bookID" label="id" width="150">
      </el-table-column>
      <el-table-column prop="bookName" label="书名" width="120">
      </el-table-column>
      <el-table-column prop="bookCounts" label="书本数量" width="120">
      </el-table-column>
      <el-table-column prop="detail" label="心灵鸡汤" width="120">
      </el-table-column>

      <el-table-column fixed="right" label="操作" width="120">
        <template slot-scope="scope">
          <el-button
            @click.native.prevent="deleteRow(scope.$index, tableData)"
            type="text"
            size="small"
          >
            移除
          </el-button>
        </template>
      </el-table-column>
    </el-table>

    <!-- <el-pagination
      background
      layout="prev, pager, next"
      page-size="4"
      :total="total"
      @current-change="page"
    >
    </el-pagination> -->
  </div>
</template>

<script>
export default {
  name: "Book",
  data() {
    return {
      tableData: [],
    };
  },
  created() {
    this.findAll();
  },
  methods: {
    findAll() {
      this.axios.get("http://localhost:8081/book/findAll").then((res) => {
        this.tableData = res.data;
        this.bookID = this.tableData.bookID;
        this.bookName = this.tableData.bookName;
        this.bookCounts = this.tableData.bookCounts;
        this.detail = this.tableData.detail;
        console.log(this.tableData);
      });
    },
  },
};
</script>
router/index.js
import Vue from 'vue'
import VueRouter from 'vue-router'
import Book from '../views/Book.vue'
import PageOne from '@/views/PageOne.vue'
import PageTwo from '@/views/PageTwo.vue'
import PageThree from '@/views/PageThree.vue'
import PageFour from '@/views/PageFour.vue'
import Nav from '@/views/Nav.vue'
import APP from '../App'
Vue.use(VueRouter)

const routes = [
  {
    path: "/nav1",
    name: "导航1",
    component: Nav,
    children: [
    {
        path: "/nav1/book",
        name: "Book",
        component: Book
      },
      {
        path: "/nav1/pageOne",
        name: "页面1",
        component: PageOne
      },
      {
        path: "/nav1/pageTwo",
        name: "页面2",
        component: PageTwo
      }
    ]
  },
  {
    path: "/nav2",
    name: "导航2",
    component: Nav,
    children: [
      {
        path: "/nav2/pageThree",
        name: "页面3",
        component: PageThree
      },
      {
        path: "/nav2/pageFour",
        name: "页面4",
        component: PageFour
      }
    ]
  }
]

const router = new VueRouter({
  mode: 'history',
  base: process.env.BASE_URL,
  routes
})

export default router
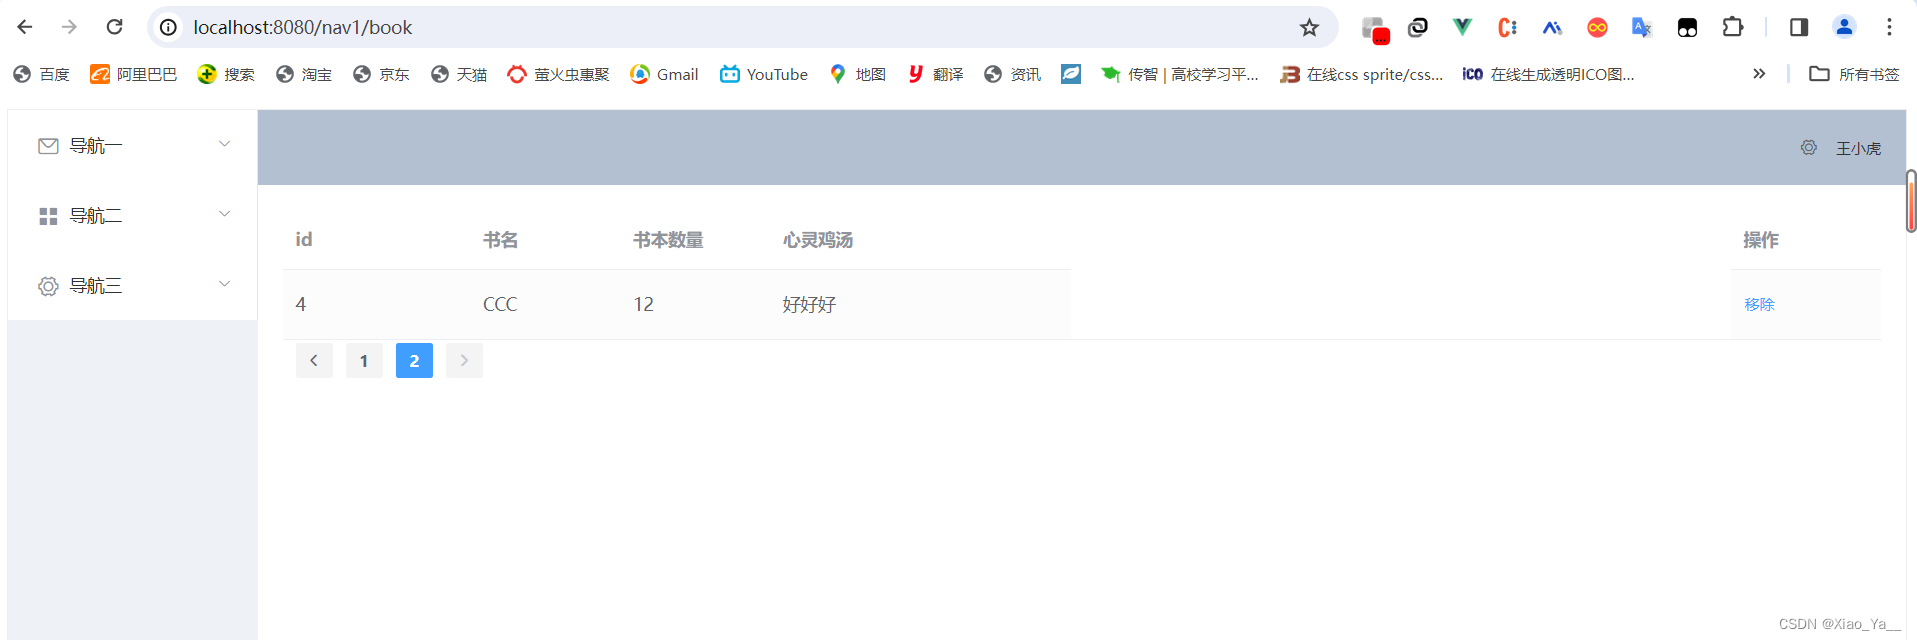
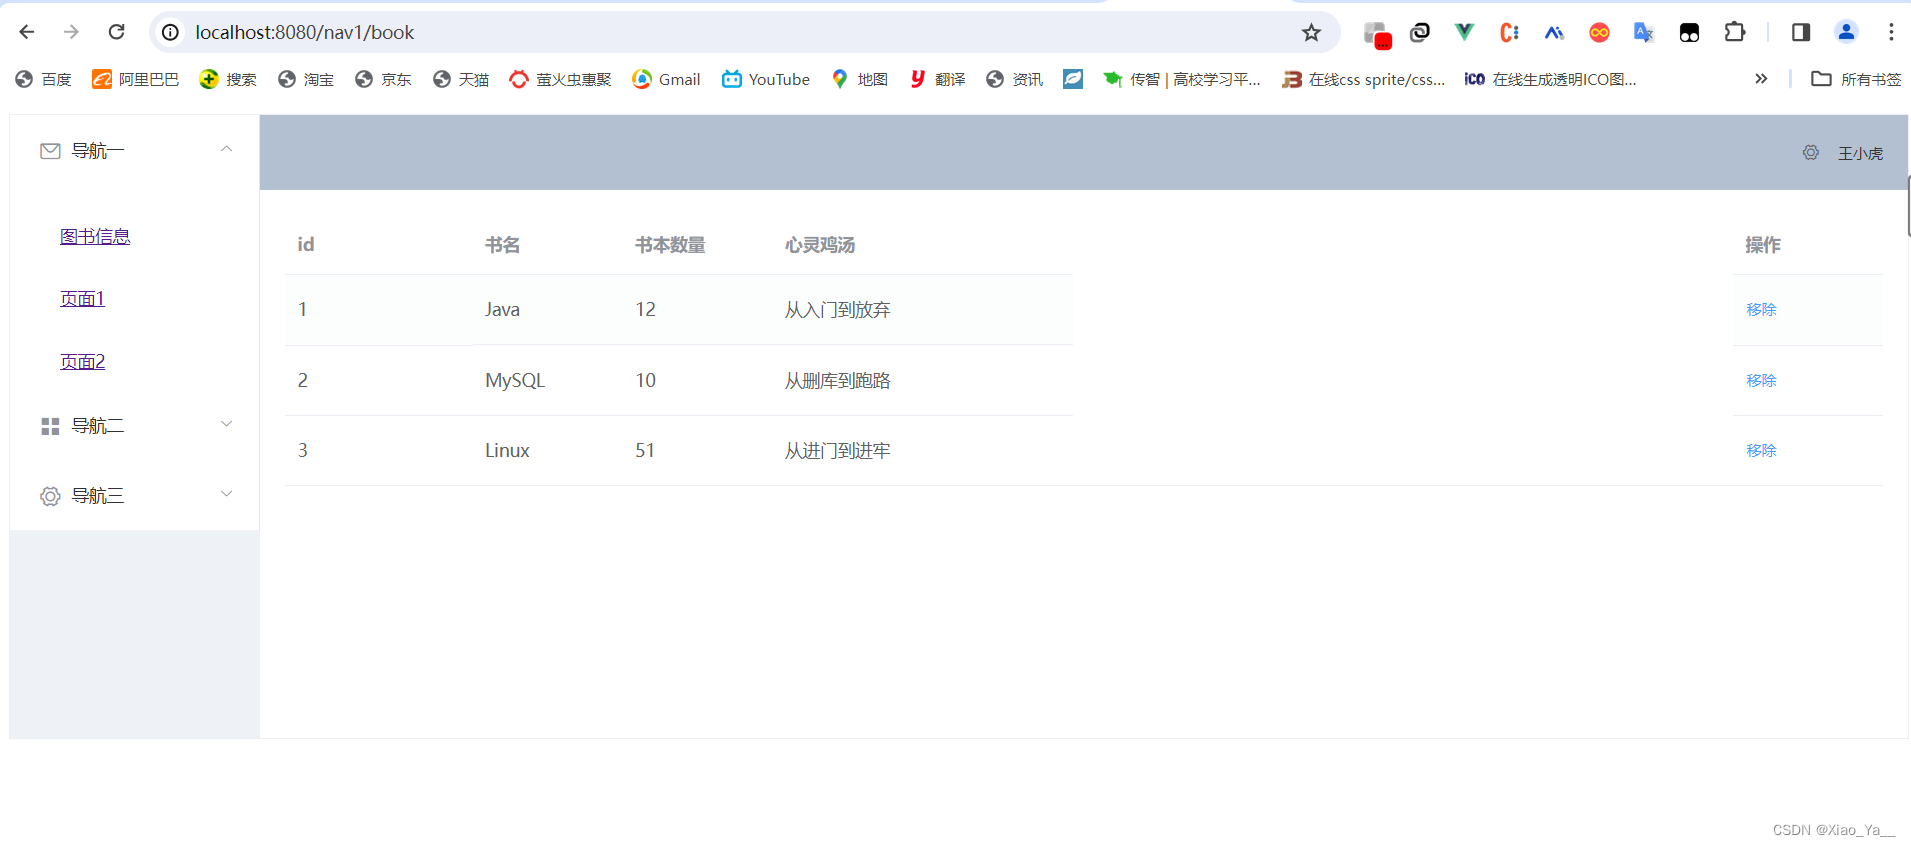
前端页面展示:
增加分页查询
后端使用mybatis插件pagehelper实现分页查询
1.添加pagehelper依赖
<!--mybatis分页插件-->
<dependency>
    <groupId>com.github.pagehelper</groupId>
    <artifactId>pagehelper-spring-boot-starter</artifactId>
    <version>1.3.0</version>
</dependency>
2.对findAll查询方法进行修改
BookMapper
package com.example.springbootvue.mapper;

import com.example.springbootvue.entity.Book;
import com.github.pagehelper.PageInfo;
import org.apache.ibatis.annotations.Mapper;

import java.util.List;
@Mapper
public interface BookMapper {
    List <Book> findAll();
    //分页查询
    //PageInfo<Book> findAll(Integer pageNum, Integer pageSize);
}
修改BookService接口方法
PageInfo<Book> findAll(Integer pageNum,Integer pageSize);
修改BookServiceImpl实现类
@Override
public PageInfo<Book> findAll(Integer pageNum,Integer pageSize) {
    PageHelper.startPage(pageNum,pageSize);
    List<Book> books = bookDao.findAll();
    PageInfo<Book> bookPageInfo = new PageInfo<>(books,pageSize);
    return bookPageInfo;
}
修改BookController方法
@RestController
@RequestMapping("book")
@CrossOrigin //允许跨域
public class BookController {
    @Autowired
    private BookService bookService;

    @GetMapping("findAll/{page}/{limit}")
    public PageInfo<Book> findAll(@PathVariable("page") Integer page,@PathVariable("limit") Integer limit){

        PageInfo<Book> books = bookService.findAll(page, limit);

        return books;
    }
}
修改BookMapper.xml
<?xml version="1.0" encoding="UTF-8" ?>
<!DOCTYPE mapper
        PUBLIC "-//mybatis.org//DTD Mapper 3.0//EN"
        "http://mybatis.org/dtd/mybatis-3-mapper.dtd">
<mapper namespace="com.example.springbootvue.mapper.BookMapper">
    <resultMap id="BaseResultMap" type="com.example.springbootvue.entity.Book">
        <result column="bookID" jdbcType="INTEGER" property="bookID"/>
        <result column="bookName" jdbcType="VARCHAR" property="bookName"/>
        <result column="bookCounts" jdbcType="INTEGER" property="bookCounts"/>
        <result column="detail" jdbcType="VARCHAR" property="detail"/>
    </resultMap>
    <select id="findAll" resultMap="BaseResultMap">
        select * from books
    </select>
    <insert id="save">
        insert into books (bookID,bookName,bookCounts,detail) values (#{bookID},#{bookName},#{bookCounts},#{detail});
    </insert>
</mapper>
application.properties
spring.application.name=springboot-vue
server.port=8081
spring.datasource.url=jdbc:mysql://localhost:3306/test?serverTimezone=Asia/Shanghai&useSSL=false&userUnicode=true&characterEncoding=utf-8
spring.datasource.username=root
spring.datasource.password=123
spring.datasource.driver-class-name=com.mysql.cj.jdbc.Driver
#??entity?*mapper.xml
mybatis.type-aliases-package=com.example.springbootvue.entity
mybatis.mapper-locations=classpath:mapper/*.xml

mybatis.configuration.log-impl=org.apache.ibatis.logging.stdout.StdOutImpl
#分页
spring.main.allow-circular-references=true
后端——测试结果

前端
1.在methods中编写page方法
methods: {
    page(currentpage) {
      this.axios
        .get("http://localhost:8081/book/findAll/" + currentpage + "/2")
        .then((res) => {
          this.tableData = res.data.list;
          this.total = res.data.total;
          this.bookID = this.tableData.bookID;
          this.bookName = this.tableData.bookName;
          this.bookCounts = this.tableData.bookCounts;
          this.detail = this.tableData.detail;
          console.log(this.tableData);
        });
    },
  },
2.在data()中定义接收参数
data() {
    return {
      total: null,
      tableData: null
    }
}
3.创建created()方法在页面加载前查询显示数据
created() {
    this.axios.get("http://localhost:8081/book/findAll/1/2").then((res) => {
      this.tableData = res.data.list;
      this.total = res.data.total;
      console.log(res.data);
    });
  },
4.在表单中将接收属性改为后台传来的数据值
<el-table
      :data="tableData"
      style="width: 100%"
      max-height="250">
    <el-table-column
        fixed
        prop="bookId"
        label="id"
        width="150">
    </el-table-column>
    <el-table-column
        prop="bookName"
        label="书名"
        width="120">
    </el-table-column>
    <el-table-column
        prop="bookCounts"
        label="书本数量"
        width="120">
    </el-table-column>
    <el-table-column
        prop="detail"
        label="鸡汤"
        width="120">
    </el-table-column>

    <el-table-column
        fixed="right"
        label="操作"
        width="120">
      <template slot-scope="scope">
        <el-button
            @click.native.prevent="deleteRow(scope.$index, tableData)"
            type="text"
            size="small">
          移除
        </el-button>
      </template>
    </el-table-column>
  </el-table>
5.在后面添加分页代码
<el-pagination
               background
               layout="prev, pager, next"
               page-size="4"
               :total="total"
               @current-change="page">
</el-pagination>
6.设置分页代码的total为自己所定义的属性值以及@current-change方法
<template>
  <div>
    <el-table :data="tableData" style="width: 100%" max-height="250">
      <el-table-column fixed prop="bookID" label="id" width="150">
      </el-table-column>
      <el-table-column prop="bookName" label="书名" width="120">
      </el-table-column>
      <el-table-column prop="bookCounts" label="书本数量" width="120">
      </el-table-column>
      <el-table-column prop="detail" label="心灵鸡汤" width="120">
      </el-table-column>

      <el-table-column fixed="right" label="操作" width="120">
        <template slot-scope="scope">
          <el-button
            @click.native.prevent="deleteRow(scope.$index, tableData)"
            type="text"
            size="small"
          >
            移除
          </el-button>
        </template>
      </el-table-column>
    </el-table>

    <el-pagination
      background
      layout="prev, pager, next"
      page-size="3"
      :total="total"
      @current-change="page"
    >
    </el-pagination>
  </div>
</template>

<script>
export default {
  name: "Book",
  data() {
    return {
      total: null,
      tableData: [],
    };
  },
  created() {
    this.axios.get("http://localhost:8081/book/findAll/1/3").then((res) => {
      this.tableData = res.data.list;
      this.total = res.data.total;
      console.log(res.data);
    });
  },
  methods: {
    page(currentpage) {
      this.axios
        .get("http://localhost:8081/book/findAll/" + currentpage + "/3")
        .then((res) => {
          this.tableData = res.data.list;
          this.total = res.data.total;
          this.bookID = this.tableData.bookID;
          this.bookName = this.tableData.bookName;
          this.bookCounts = this.tableData.bookCounts;
          this.detail = this.tableData.detail;
          console.log(this.tableData);
        });
    },
  },
};
</script>
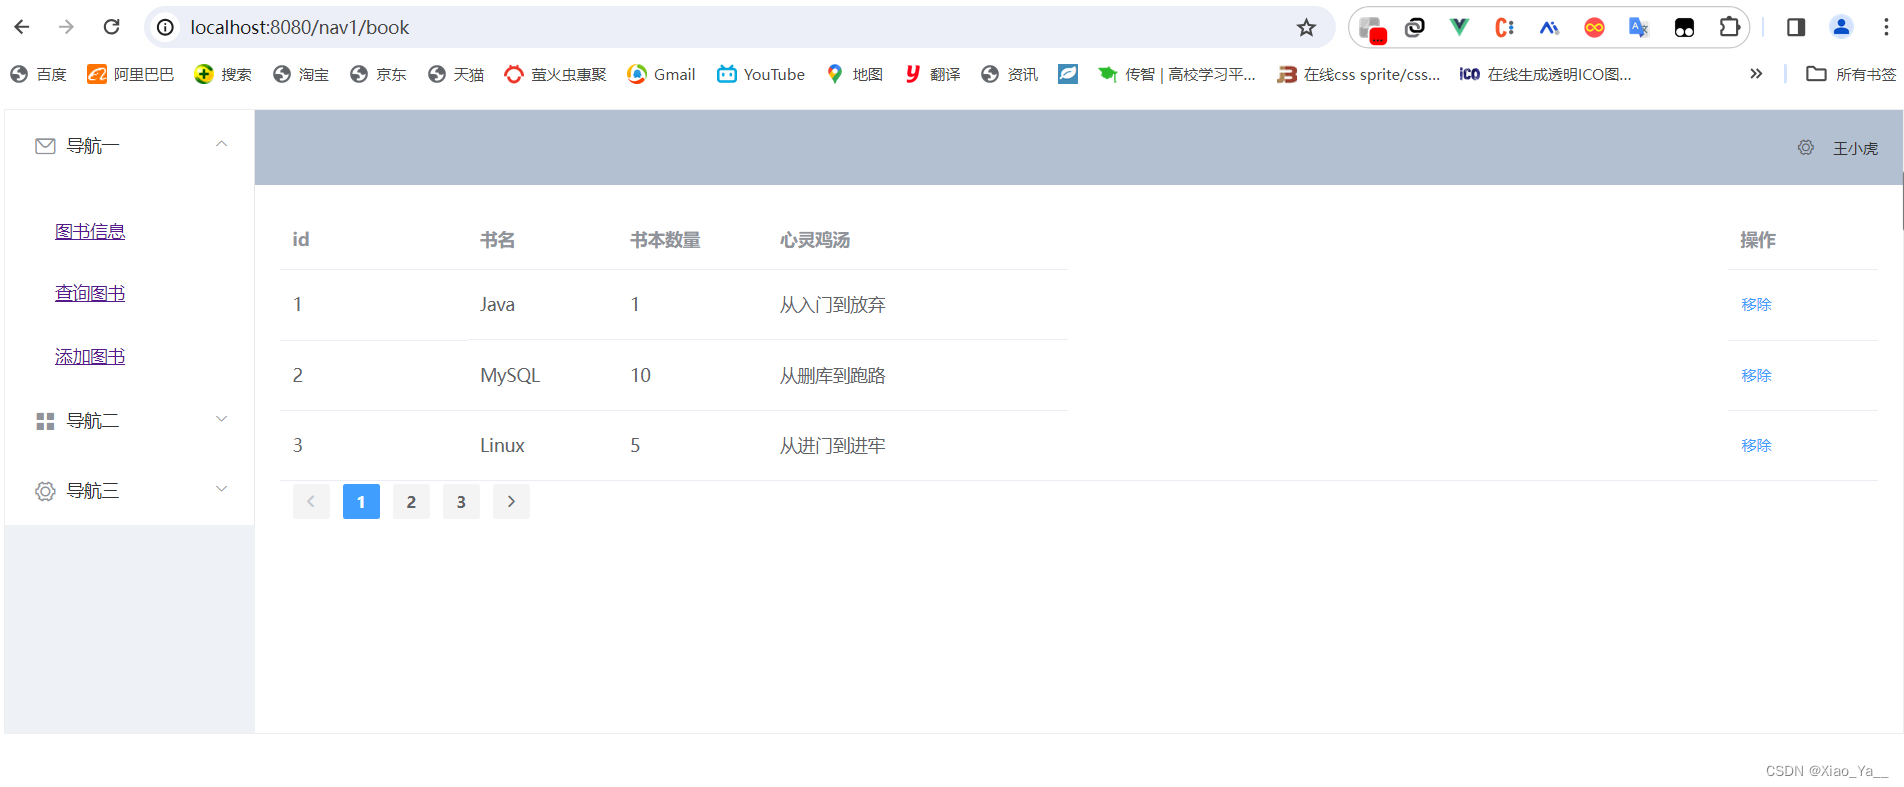
前端页面展示
PageTwo.vue
<template>
  <el-form
    :model="ruleForm"
    :rules="rules"
    ref="ruleForm"
    label-width="100px"
    class="demo-ruleForm"
  >
    <el-form-item label="图书ID" prop="bookID">
      <el-input style="width: 60%" v-model="ruleForm.bookID"></el-input>
    </el-form-item>

    <el-form-item label="图书名称" prop="bookName">
      <el-input style="width: 60%" v-model="ruleForm.bookName"></el-input>
    </el-form-item>

    <el-form-item label="图书数量" prop="bookCounts">
      <el-input style="width: 60%" v-model="ruleForm.bookCounts"></el-input>
    </el-form-item>

    <el-form-item label="图书鸡汤" prop="detail">
      <el-input style="width: 60%" v-model="ruleForm.detail"></el-input>
    </el-form-item>

    <el-form-item>
      <el-button type="primary" @click="submitForm('ruleForm')">提交</el-button>
      <el-button @click="resetForm('ruleForm')">重置</el-button>
    </el-form-item>
  </el-form>
</template>

<script>
import qs from "qs";
export default {
  data() {
    return {
      ruleForm: {
        bookID: "",
        bookName: "",
        bookCounts: "",
        detail: "",
      },
      //校验的规则
      rules: {
        bookID: [
          { required: true, message: "图书ID不能为空", trigger: "blur" },
          { min: 1, max: 5, message: "长度在 1 到 5 个字符", trigger: "blur" },
        ],
        bookName: [
          { required: true, message: "图书名称不能为空", trigger: "blur" },
          {
            min: 1,
            max: 10,
            message: "长度在 1 到 10 个字符",
            trigger: "blur",
          },
        ],
        bookCounts: [
          {
            required: true,
            message: "图书数量不能为空(若没有请填写0)",
            trigger: "change",
          },
        ],
        detail: [
          { required: true, message: "图书鸡汤不能为空", trigger: "change" },
        ],
      },
    };
  },
  methods: {
    submitForm(formName) {
      const _this = this;
      this.$refs[formName].validate((valid) => {
        if (valid) {
          _this.axios
            .post(
              "http://localhost:8081/book/save",
              qs.stringify(this.ruleForm)
            )
            .then((res) => {
              console.log(res.data);
              if (res.data == "添加成功!") {
                _this.$message({
                  message: "恭喜你,上传成功",
                  type: "success",
                });
                _this.$router.push("book");
              }
            });
        } else {
          return false;
        }
      });
    },
    test() {
      console.log(this.ruleForm);
    },
    resetForm(formName) {
      this.$refs[formName].resetFields();
    },
  },
};
</script>

<style scoped></style>
后端添加数据表
mapper层(BookMapper)
int save(Book book);
service层(BookService)
    //添加
    String save(Book book);
service接口层(BookServiceImpl)
@Override
    public String save(Book book)
    {
       int result1=bookMapper.save(book);
       if(result1==1)
       {
           return "添加成功!";
       }
       else
       {
            return "添加失败!";
       }
    }
controller层(BookController)
    //添加
    @RequestMapping("save")
    //由于前段传来的是json对象需要加@RequestBody才能变成java对象
    public String save(Book book){
        return bookService.save(book);
    }
*mapper.xml
 <insert id="save">
        insert into books (bookID,bookName,bookCounts,detail) values (#{bookID},#{bookName},#{bookCounts},#{detail});
 </insert>

前端添加页面展示