文章目录
前言:最近写项目,发现了一些很有意思的功能,想写文章,录视频把这些内容记录下。但这些功能太零碎,如果为每个功能都单独搭建一个项目,这明显不合适。于是我想,就搭建一个项目,把那些我想将的小功能全部整合到一起。实现 搭一次环境,处处使用。
本文主要实现以下功能
环境搭建
文章链接
已录制视频
视频链接
仓库地址
https://github.com/xuhuafeifei/fgbg-font-and-back.git
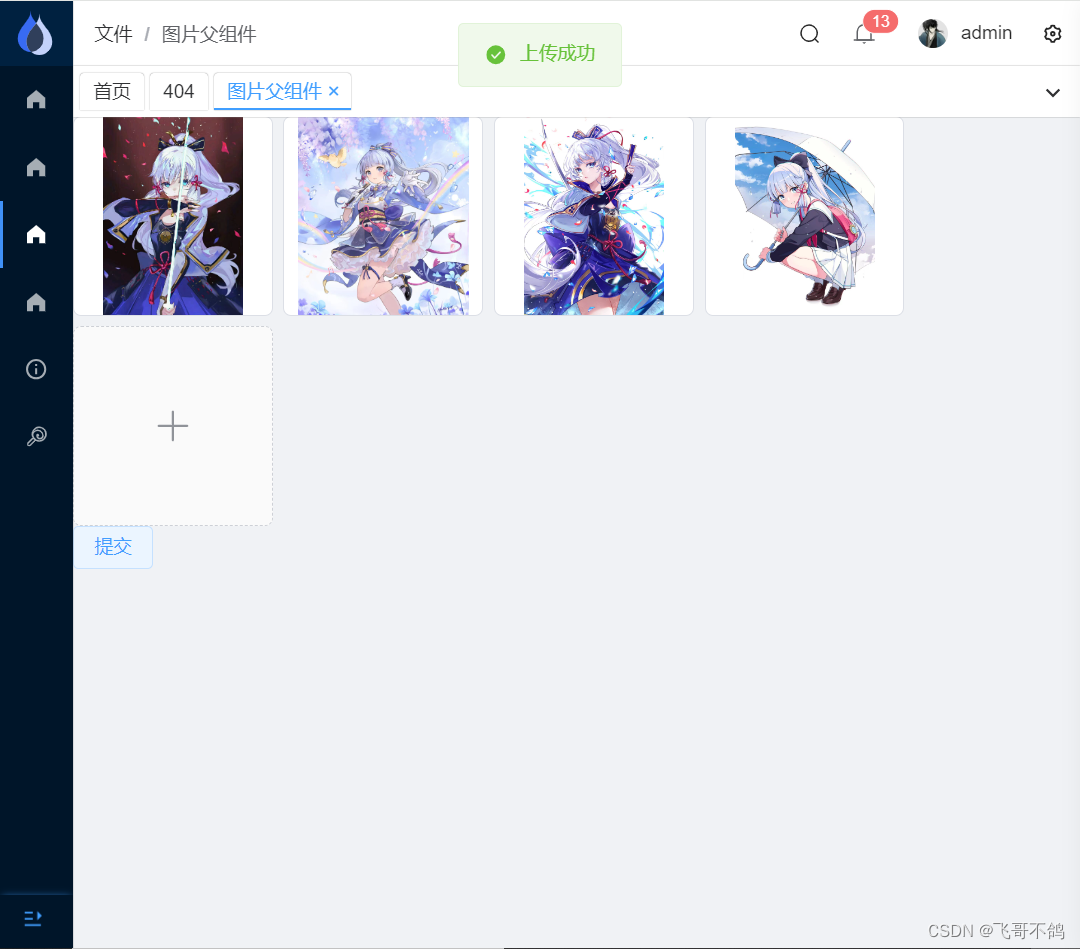
Element Plus + SpringBoot实现图片上传,预览,删除
效果展示
-
提交样式

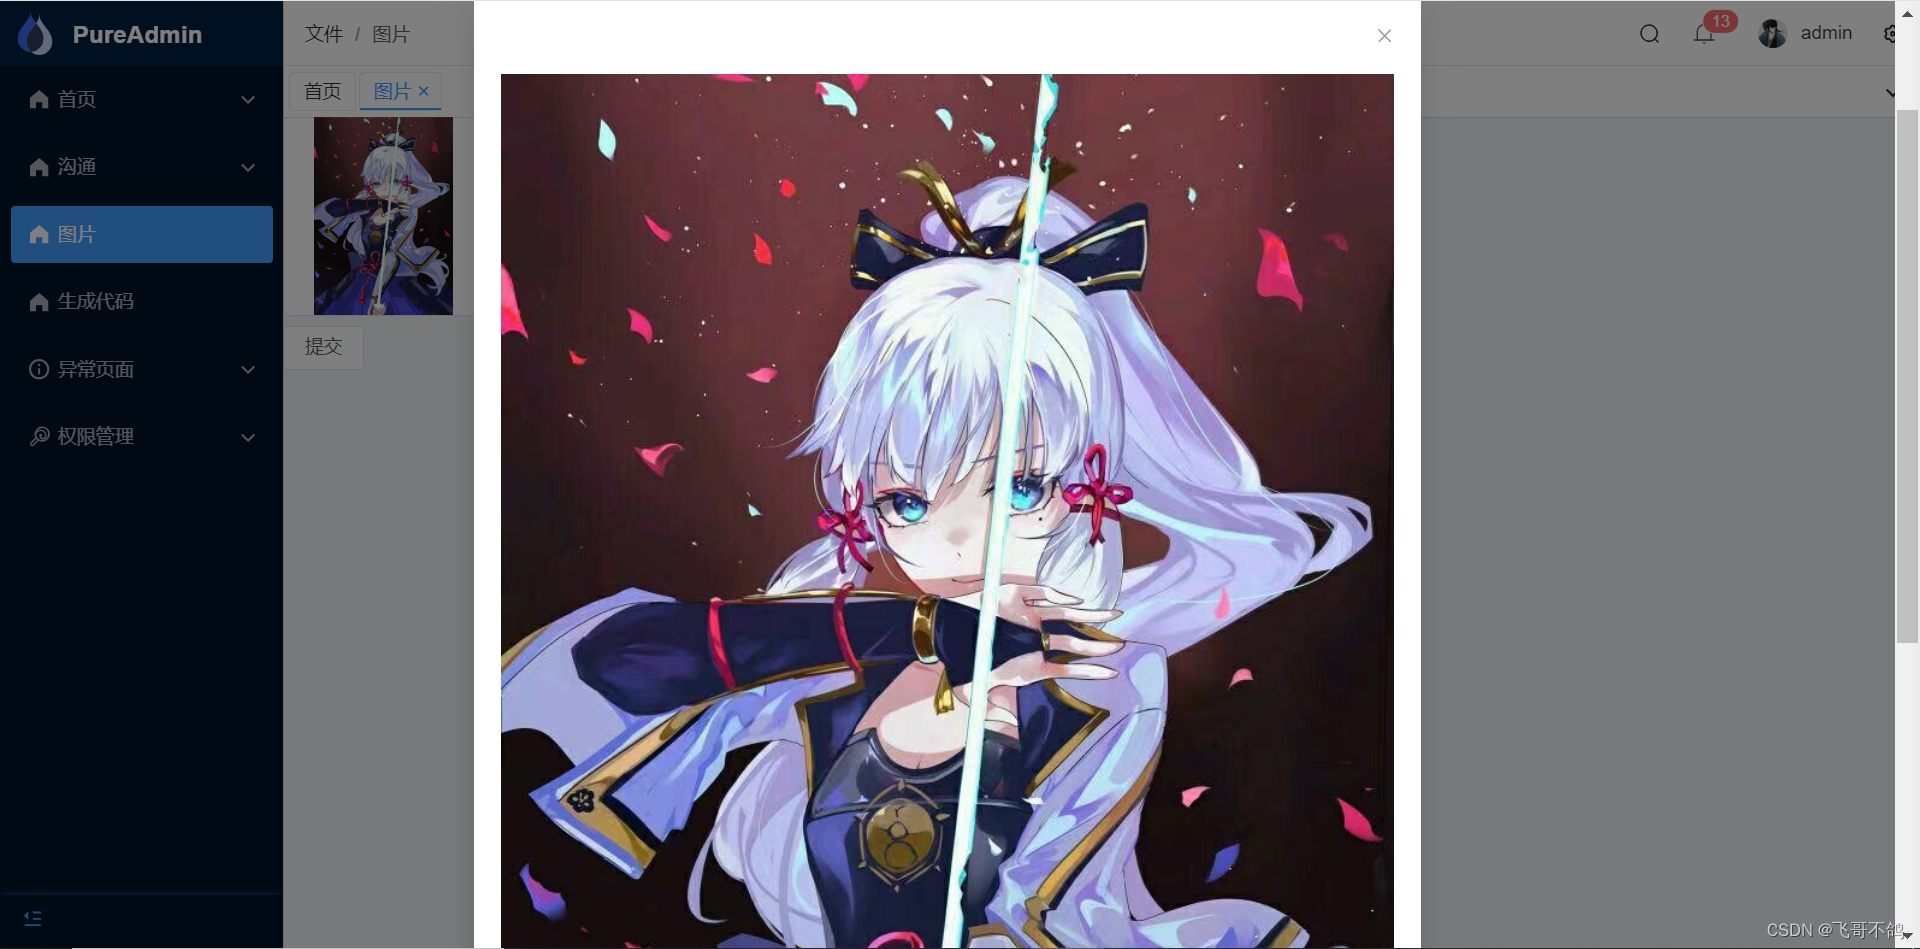
-
放大预览
-
成功提交后端
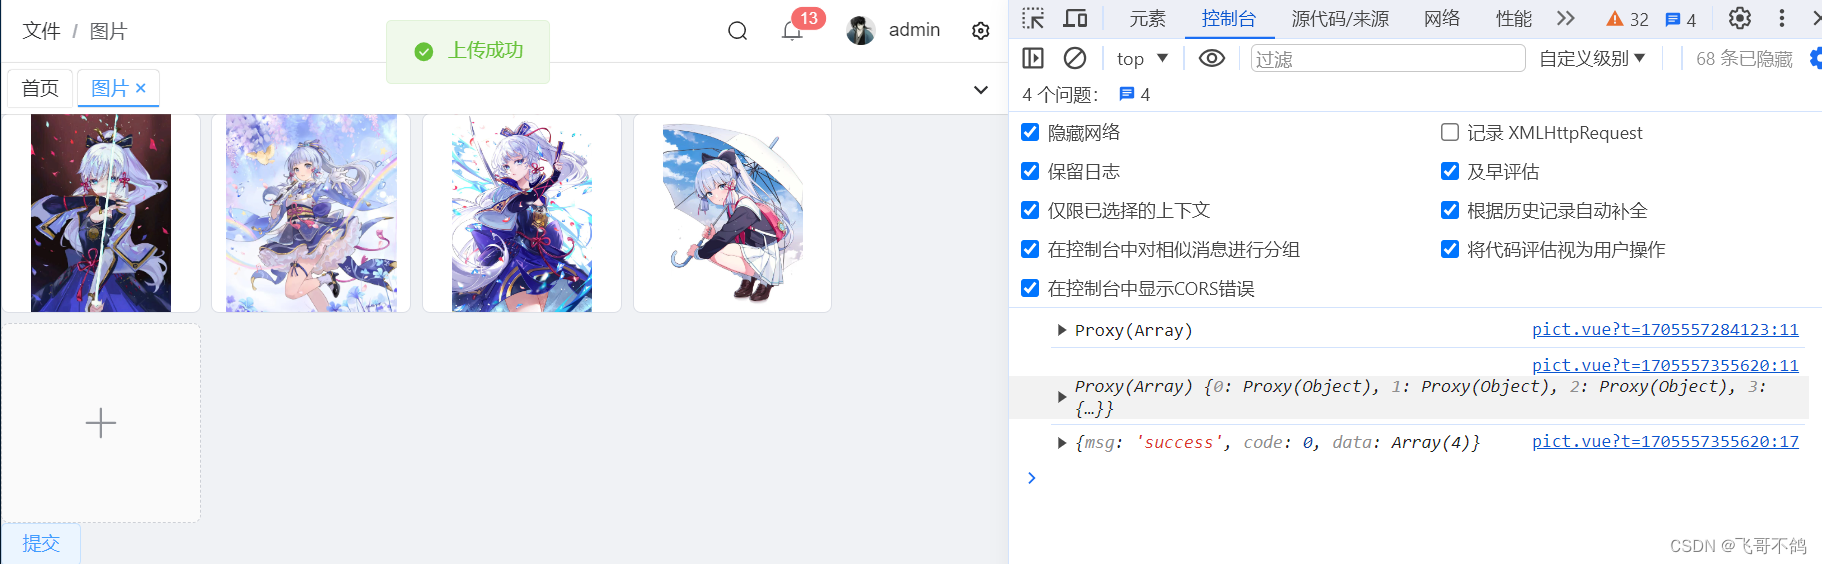
-
访问url
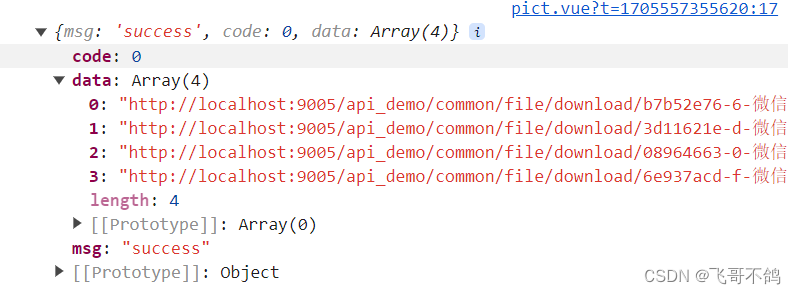
-
后端存储

-
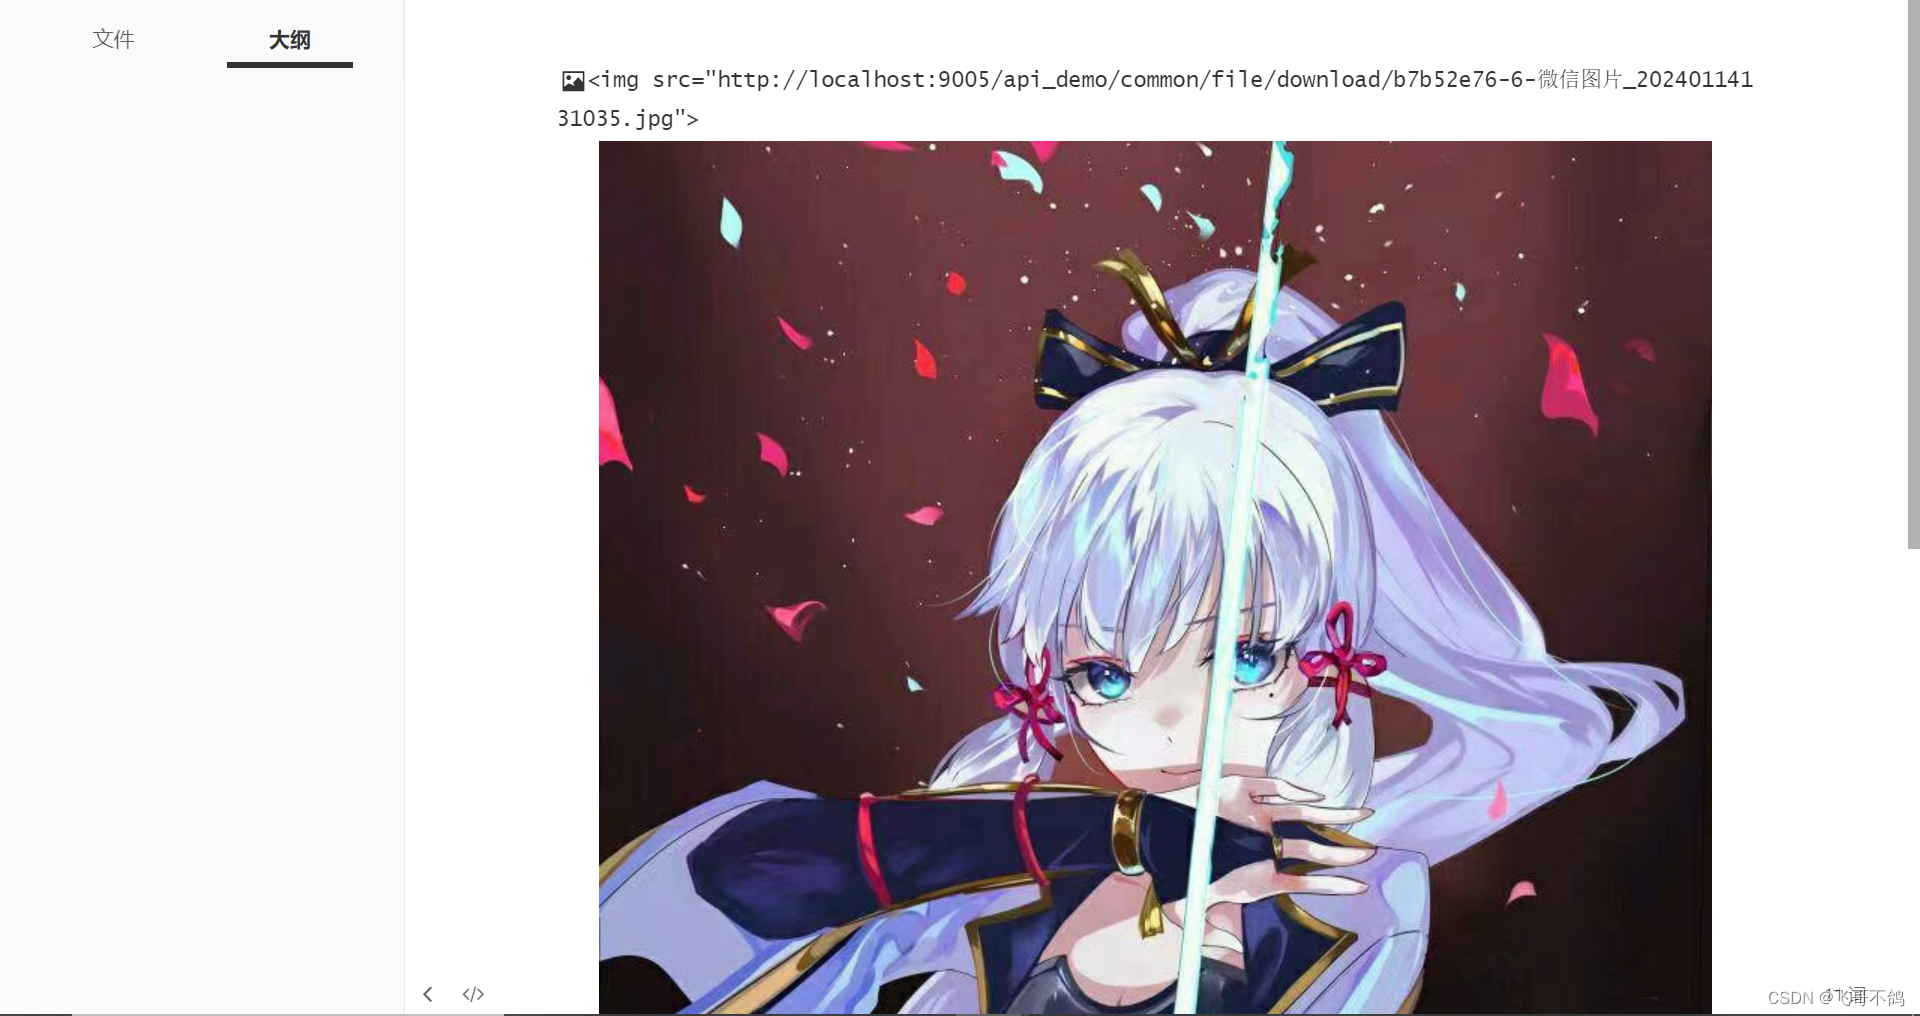
根据url下载/访问图片
1. 后端代码
1.1 controller
import com.fgbg.common.utils.R;
import com.fgbg.demo.service.FileService;
import org.springframework.beans.factory.annotation.Autowired;
import org.springframework.beans.factory.annotation.Qualifier;
import org.springframework.web.bind.annotation.PathVariable;
import org.springframework.web.bind.annotation.RequestMapping;
import org.springframework.web.bind.annotation.RequestParam;
import org.springframework.web.bind.annotation.RestController;
import org.springframework.web.multipart.MultipartFile;

import javax.servlet.http.HttpServletRequest;
import javax.servlet.http.HttpServletResponse;
import java.io.IOException;
import java.util.UUID;

@RestController
@RequestMapping("/common/file")
public class FileController {
    @Autowired
    @Qualifier("localFileService")
    private FileService fileService;

    /**
     * 上传接口
     */
    @RequestMapping("/upload")
    public R upload(@RequestParam("image") MultipartFile file) throws IOException {
        String url = fileService.uploadFile(file, UUID.randomUUID().toString().substring(0, 10)
                + "-" + file.getOriginalFilename());
        return R.ok().put("data", url);
    }

    /**
     * 下载接口
     */
    @RequestMapping("/download/{fileName}")
    public void download(@PathVariable("fileName") String fileName, HttpServletRequest request, HttpServletResponse response) {
        fileService.downloadFile(fileName, request, response);
    }

    /**
     * 删除接口
     */
    @RequestMapping("/delete")
    public R deleteFile(@RequestParam String fileName) {
        boolean flag = fileService.deleteFile(fileName);
        return R.ok().put("data", flag);
    }
}
1.2 service
tip: 文件上传存储有多种解决方案,比如minio,阿里云…
笔者考虑到编写容易程度与文章核心解决问题,采用了最原始的存储方法,即本地存储。以后端所在服务器为存储容器,将前端上传的图片以FileIO的形式进行存储。
考虑到有多种存储方式,读者可以实现FileService接口,自行编写impl类,以达到不同的文件存储的具体实现方式
import org.springframework.web.multipart.MultipartFile;

import javax.servlet.http.HttpServletRequest;
import javax.servlet.http.HttpServletResponse;
import java.io.IOException;

public interface FileService {
    /**
     * 上传图片, 返回url
     */
    String uploadFile(MultipartFile file, String fileName) throws IOException;

    /**
     * 下载图片
     */
    void downloadFile(String fileName, HttpServletRequest request, HttpServletResponse response);

    /**
     * 删除图片
     */
    boolean deleteFile(String fileName);
}
impl
import com.fgbg.demo.service.FileService;
import org.apache.commons.io.FileUtils;
import org.springframework.http.HttpHeaders;
import org.springframework.http.MediaType;
import org.springframework.stereotype.Service;
import org.springframework.web.multipart.MultipartFile;

import javax.servlet.http.HttpServletRequest;
import javax.servlet.http.HttpServletResponse;
import java.io.File;
import java.io.IOException;
import java.io.InputStream;
import java.nio.file.Files;
import java.nio.file.Paths;

/**
 * 基于本地的文件管理服务
 */
@Service("localFileService")
public class LocalFileServiceImpl implements FileService {
    /**
     * 文件访问域名(请求下载的接口)
     */
    private static final String DOMAIN = "http://localhost:9005/api_demo/common/file/download/";

    /**
     * 文件物理存储位置
     */
    private static final String STORE_DIR = "E:\\B站视频创作\\前后端项目构建-小功能实现\\代码\\backend\\src\\main\\resources\\pict\\";

    /**
     * 上传图片, 返回url
     *
     * @param file
     * @param fileName
     */
    @Override
    public String uploadFile(MultipartFile file, String fileName) throws IOException {
        // 获取文件流
        InputStream is = file.getInputStream();
        // 在服务器中存储文件
        FileUtils.copyInputStreamToFile(is, new File(STORE_DIR + fileName));
        // 返回图片url
        String url = DOMAIN + fileName;
        System.out.println("文件url: " + url);
        return url;
    }

    /**
     * 下载图片
     *
     * @param fileName
     */
    @Override
    public void downloadFile(String fileName, HttpServletRequest request, HttpServletResponse response) {
        // 获取真实的文件路径
        String filePath = STORE_DIR + fileName;
        System.out.println("++++完整路径为:"+filePath);

        try {
            // 下载文件
            // 设置响应头
            response.setContentType(MediaType.APPLICATION_OCTET_STREAM_VALUE);
            response.setHeader(HttpHeaders.CONTENT_DISPOSITION, "attachment; filename=" + fileName);

            // 读取文件内容并写入输出流
            Files.copy(Paths.get(filePath), response.getOutputStream());
            response.getOutputStream().flush();
        } catch (IOException e) {
            response.setStatus(404);
        }
    }

    /**
     * 删除图片
     *
     * @param fileName
     */
    @Override
    public boolean deleteFile(String fileName) {
        // 获取真实的文件路径
        String filePath = STORE_DIR + fileName;
        System.out.println("++++完整路径为:"+filePath);

        File file = new File(filePath);
        return file.delete();
    }
}
2. 前端代码
2.1 路由创建
/src/router/modules/file.ts
const { VITE_HIDE_HOME } = import.meta.env;
const Layout = () => import("@/layout/index.vue");

export default {
  path: "/file",
  name: "file",
  component: Layout,
  redirect: "/pict",
  meta: {
    icon: "homeFilled",
    title: "文件",
    rank: 0
  },
  children: [
    {
      path: "/pict",
      name: "pict",
      component: () => import("@/views/file/pict.vue"),
      meta: {
        title: "图片",
        showLink: VITE_HIDE_HOME === "true" ? false : true
      }
    }
  ]
} as RouteConfigsTable;
2.2 api接口
tip:
- 文件上传只能用post
- 前端部分图片封装为FormData对象
- 请求头标明
"Content-Type": "multipart/form-data"
import { http } from "@/utils/http";
import { R, baseUrlApi } from "./utils";

/** upload batch */
export const uploadBatch = (data: FormData) => {
  return http.request<R<any>>("post", baseUrlApi("common/file/uploadList"), {
    data,
    headers: {
      "Content-Type": "multipart/form-data"
    }
  });
};

/** upload */
export const upload = (data: FormData) => {
  return http.request<R<any>>("post", baseUrlApi("common/file/upload"), {
    data,
    headers: {
      "Content-Type": "multipart/form-data"
    }
  });
};
2.2 文件创建
/src/views/file/pict.vue
tip:
图片封装为FormData
formdata添加图片信息时,使用的是append()方法.
append(name: string, value: string | Blob)append的第一个参数,对应的是后端
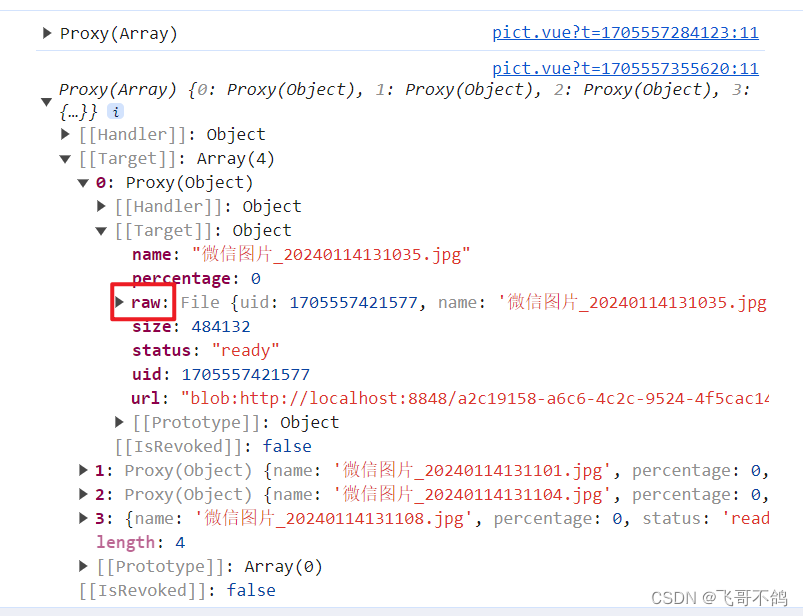
@RequestParam("xxx") MultipartFile file中xxx的值,本文中后端批量上传接口,xxx值为’imageList’Element Plus上传图片,图片数据中都会有一个新的字段数据
raw,这个数据我们就理解成文件本身。像后端提交数据提交的也是raw本身,而非其余额外数据
append第二个参数,提交的是fileList中每个文件元素的raw属性s数据
<template>
  <el-upload
    v-model:file-list="fileList"
    list-type="picture-card"
    multiple
    :auto-upload="false"
    :on-preview="handlePictureCardPreview"
    :on-remove="handleRemove"
  >
    <el-icon><Plus /></el-icon>
  </el-upload>

  <el-dialog v-model="dialogVisible">
    <img w-full :src="dialogImageUrl" alt="Preview Image" />
  </el-dialog>
  <el-button @click="submit">提交</el-button>
</template>

<script lang="ts" setup>
import { ref } from "vue";
import { Plus } from "@element-plus/icons-vue";
import { uploadBatch } from "/src/api/file.ts";
import type { UploadProps } from "element-plus";
import { ElMessage } from "element-plus";

const submit = () => {
  console.log(fileList.value);
  // 封装formData
  const data = new FormData();
  // forEach遍历的时fileList.value, 所有element不需要.value去除代理
  fileList.value.forEach(element => {
    data.append("imageList", element.raw);
  });
  uploadBatch(data).then(res => {
    console.log(res);
    if (res.code === 0) {
      ElMessage.success("上传成功");
    } else {
      ElMessage.error("上传失败: " + res.msg);
    }
  });
};

const fileList = ref();

const dialogImageUrl = ref("");
const dialogVisible = ref(false);

const handleRemove: UploadProps["onRemove"] = (uploadFile, uploadFiles) => {
  console.log(uploadFile, uploadFiles);
};

const handlePictureCardPreview: UploadProps["onPreview"] = uploadFile => {
  dialogImageUrl.value = uploadFile.url!;
  dialogVisible.value = true;
};
</script>
3. 前端上传组件封装
如果没有组件封装需求,那就不需要修改代码。
组件封装视频链接
tip: 提交逻辑交由父组件实现
child.vue
<template>
  <el-upload
    v-model:file-list="localFileList"
    list-type="picture-card"
    multiple
    :auto-upload="false"
    :on-preview="handlePictureCardPreview"
    :on-remove="handleRemove"
  >
    <el-icon><Plus /></el-icon>
  </el-upload>

  <el-dialog v-model="dialogVisible">
    <img w-full :src="dialogImageUrl" alt="Preview Image" />
  </el-dialog>
</template>

<script lang="ts" setup>
import { ref, watch } from "vue";
import { Plus } from "@element-plus/icons-vue";
import type { UploadProps } from "element-plus";

// 定义数据
const props = defineProps({
  fileList: {
    type: Array,
    default: () => []
  }
});

// 将父组件的数据拆解为子组件数据
const localFileList = ref(props.fileList);

// 监听localFileList, 跟新父组件数据
watch(
  localFileList,
  newValue => {
    emits("update:fileList", newValue);
  },
  {
    deep: true
  }
);

// 定义组件事件, 跟新fileList
const emits = defineEmits(["update:fileList"]);

const dialogImageUrl = ref("");
const dialogVisible = ref(false);

const handleRemove: UploadProps["onRemove"] = (uploadFile, uploadFiles) => {
  console.log(uploadFile, uploadFiles);
};

const handlePictureCardPreview: UploadProps["onPreview"] = uploadFile => {
  dialogImageUrl.value = uploadFile.url!;
  dialogVisible.value = true;
};
</script>
父组件
<script setup lang="ts">
import Child from "./component/child.vue";
import { ref } from "vue";
import { ElMessage } from "element-plus";
import { uploadBatch } from "/src/api/file.ts";

const fileList = ref();

const submit = () => {
  console.log(fileList.value);
  // 封装formData
  const data = new FormData();
  // forEach遍历的时fileList.value, 所有element不需要.value去除代理
  fileList.value.forEach(element => {
    data.append("imageList", element.raw);
  });
  uploadBatch(data).then(res => {
    console.log(res);
    if (res.code === 0) {
      ElMessage.success("上传成功");
    } else {
      ElMessage.error("上传失败: " + res.msg);
    }
  });
};
</script>

<template>
  <Child v-model:fileList="fileList" />
  <el-button @click="submit">提交</el-button>
</template>

<style lang="scss" scoped></style>
效果