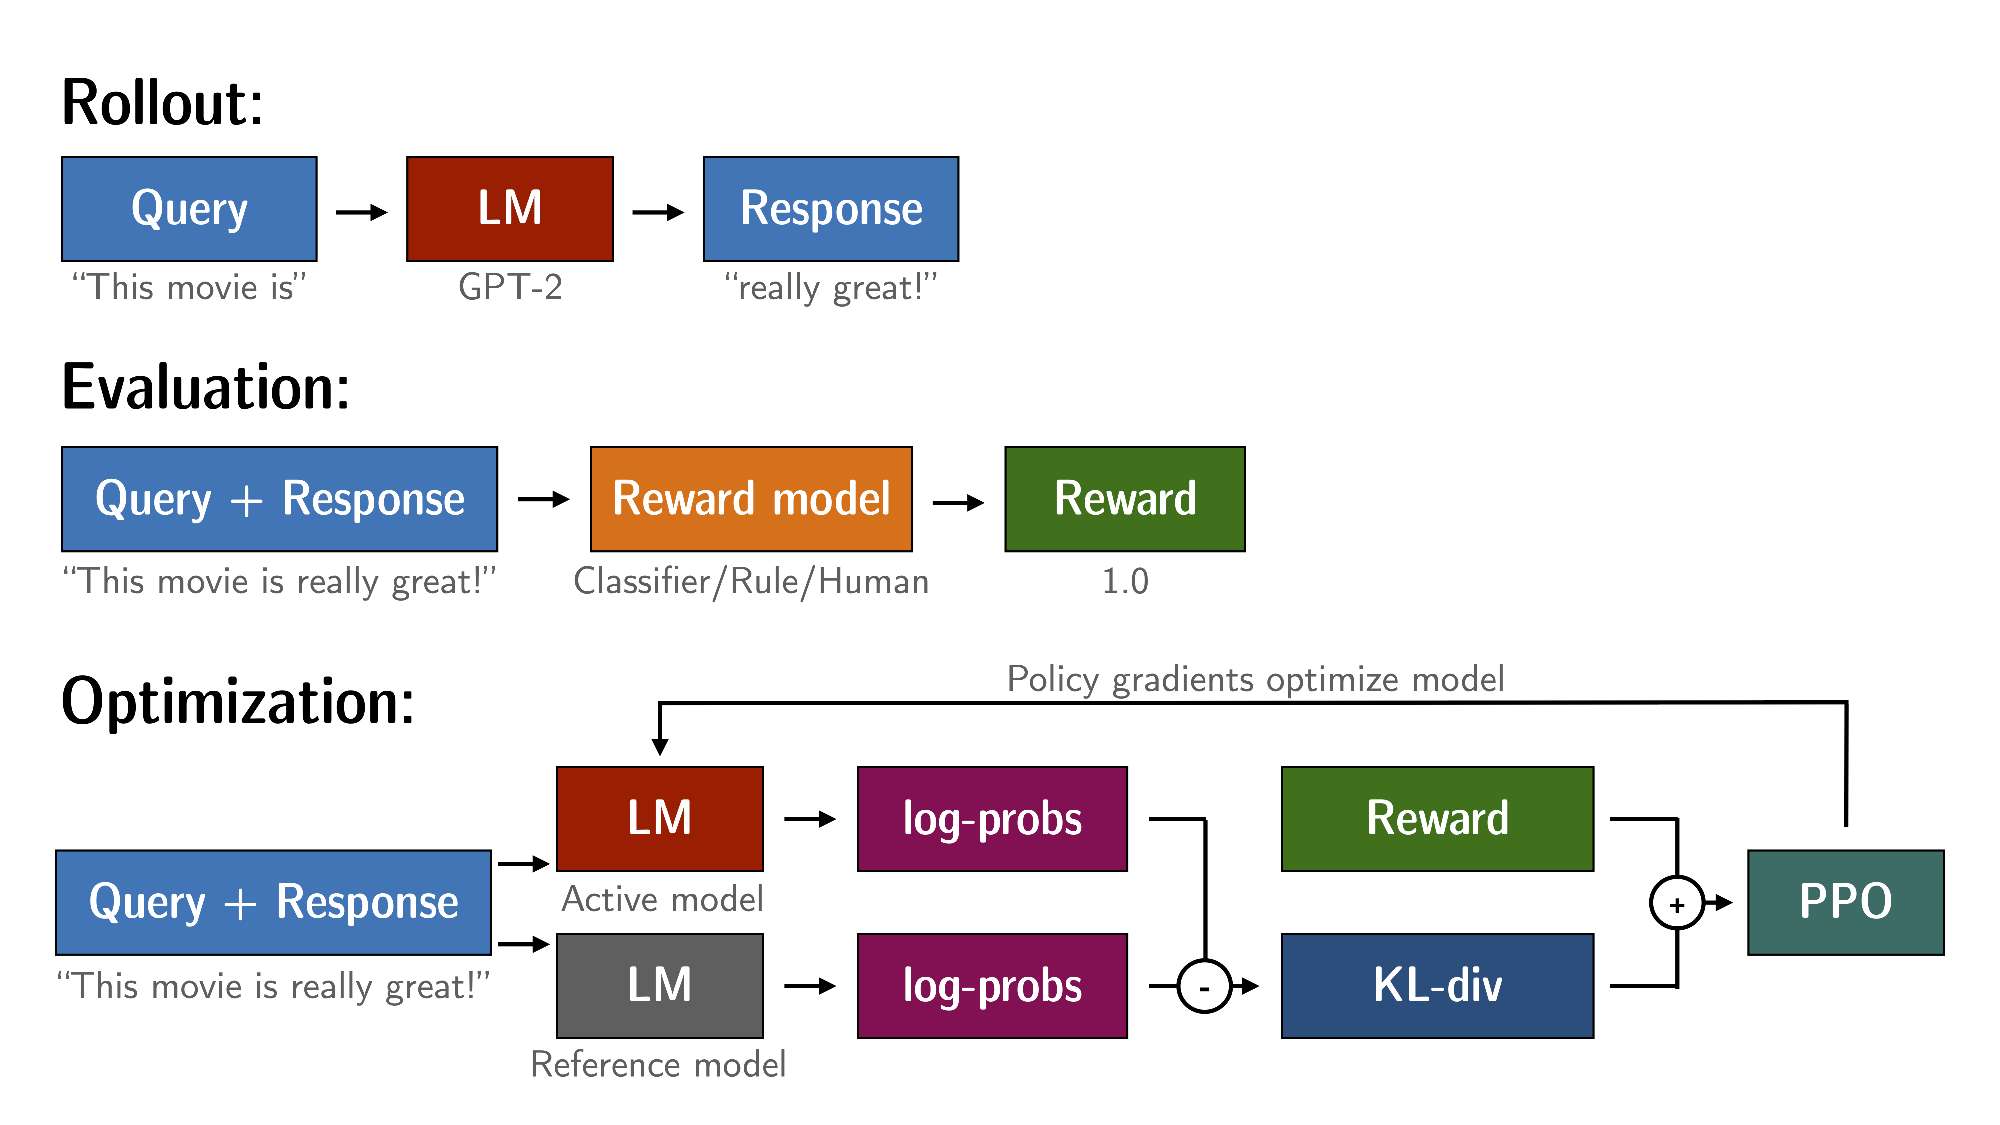
VUE3照本宣科——内置指令与自定义指令及插槽
- 前言
- 一、内置指令
- 1.v-text
- 2.v-html
- 3.v-show
- 4.v-if
- 5.v-else
- 6.v-else-if
- 7.v-for
- 8.v-on
- 9.v-bind
- 10.v-model
- 11.v-slot
- 12.v-pre
- 13.v-once
- 14.v-memo
- 15.v-cloak
- 二、自定义指令
- 三、插槽
- 1.v-slot
- 2.useSlots
- 3.defineSlots()
前言
👨💻👨🌾📝记录学习成果,以便温故而知新
“VUE3照本宣科”是指照着中文官网和菜鸟教程这两个“本”来学习一下VUE3。以前也学过VUE2,当时只再gitee留下一些代码,却没有记录学习的心得体会,有时也免不了会追忆一下。
以后出现“中文官网”不做特殊说明就是指:https://cn.vuejs.org/;菜鸟教程就是指:https://www.runoob.com/vue3/vue3-tutorial.html
一、内置指令
之所把内置指令一一罗列,主要是因为几个指令的缩写老是记不住,所以这里加深一下印象,做个备忘。同时也是作为基础知识的一部分。
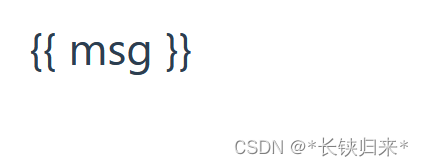
1.v-text
更新元素的文本内容。
演示代码:
const msg = ref('Hello Tom')
<div>
	 <span v-text="msg"></span>
</div>

<div>
   <!-- 等同于 -->
   <span>{{ msg }}</span>
</div>
运行效果:
 如果是用双大括号输出,可以接受表达式。
2.v-html
更新元素的 innerHTML。
v-html 的内容直接作为普通 HTML 插入—— Vue 模板语法是不会被解析的。
演示代码:
const html = ref('<h1>{{ msg }}</h1>')
<div v-html="html"></div>
运行效果:
3.v-show
基于表达式值的真假性,来改变元素的可见性。
演示代码:
const ok = ref(true)
<div v-show="ok">v-show</div>
<div><button @click="ok=!ok">{{ ok ? '隐藏' : '显示' }}</button></div>
运行效果:
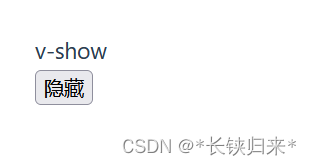 如果单击“隐藏”按钮,则隐藏v-show指令所在的div,如图:
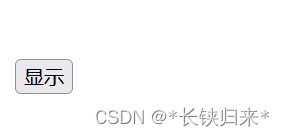 v-show指令只是隐藏div,并不删除div,这点与v-if不一样。下图能够说明v-show指令所在的div被设置了style=“display: none;”

4.v-if
基于表达式值的真假性,来条件性地渲染元素或者模板片段。
当同时使用时,v-if 比 v-for 优先级更高。我们并不推荐在一元素上同时使用这两个指令
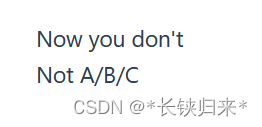
5.v-else
表示 v-if 或 v-if / v-else-if 链式调用的“else 块”。
6.v-else-if
表示 v-if 的“else if 块”。可以进行链式调用。
v-if 、v-else 与v-else-if 演示代码:
<div v-if="Math.random() > 0.5">
 Now you see me
</div>
<div v-else>
  Now you don't
</div>

<div v-if="type === 'A'">
  A
</div>
<div v-else-if="type === 'B'">
  B
</div>
<div v-else-if="type === 'C'">
  C
</div>
<div v-else>
  Not A/B/C
</div>
运行效果:
7.v-for
基于原始数据多次渲染元素或模板块。
期望的绑定值类型:Array | Object | number | string | Iterable
演示代码:
const items = reactive([1, 2, 3, 4, 5])

const user = ref({
  'name': 'Tom',
  'age': 16
})
<div v-for="(item, index) in items" :key="index">{{ index }} - {{ item }}</div>
<div v-for="(value, key) in user" :key="key">{{ key }} - {{ value }}</div>
<div v-for="(value, name, index) in user" :key="index">{{ index }} - {{ name }} - {{ value }}</div>
运行效果:
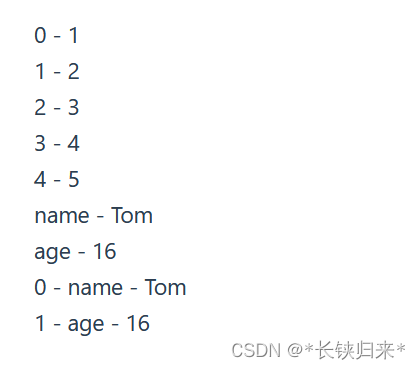
这里由于eslint的原因,以上代码的没有报错,还有其它的写法,但是报错了,所以就没有展示。
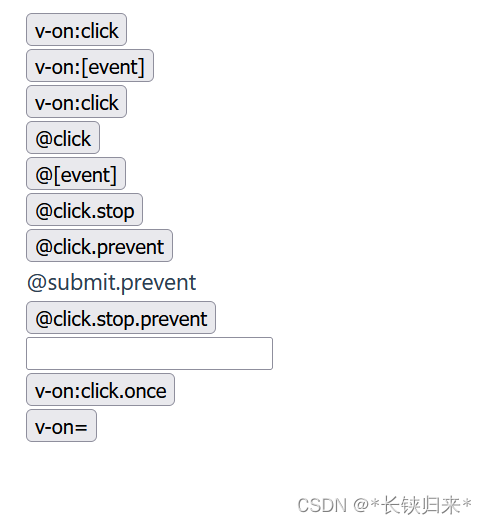
8.v-on
给元素绑定事件监听器。
缩写:@
参数:event (使用对象语法则为可选项)
修饰符
- .stop - 调用 event.stopPropagation()。
- .prevent - 调用 event.preventDefault()。
- .capture - 在捕获模式添加事件监听器。
- .self - 只有事件从元素本身发出才触发处理函数。
- .{keyAlias} - 只在某些按键下触发处理函数。
- .once - 最多触发一次处理函数。
- .left - 只在鼠标左键事件触发处理函数。
- .right - 只在鼠标右键事件触发处理函数。
- .middle - 只在鼠标中键事件触发处理函数。
- .passive - 通过 { passive: true } 附加一个 DOM 事件。
演示代码:
const doThis = (e) => console.log(e)

const doThat = (e) => console.log(e)

const onEnter = (e) => console.log(e)

const event = ref('click')
<!-- 方法处理函数 -->
<div><button v-on:click="doThis">v-on:click</button></div>

<!-- 动态事件 -->
<div><button v-on:[event]="doThis">v-on:[event]</button></div>

<!-- 内联声明 -->
<div><button v-on:click="doThat('hello', $event)">v-on:click</button></div>

<!-- 缩写 -->
<div><button @click="doThis">@click</button></div>

<!-- 使用缩写的动态事件 -->
<div><button @[event]="doThis">@[event]</button></div>

<!-- 停止传播 -->
<div><button @click.stop="doThis">@click.stop</button></div>

<!-- 阻止默认事件 -->
<div><button @click.prevent="doThis">@click.prevent</button></div>

<!-- 不带表达式地阻止默认事件 -->
<div><form @submit.prevent>@submit.prevent</form></div>

<!-- 链式调用修饰符 -->
<div><button @click.stop.prevent="doThis">@click.stop.prevent</button></div>

<!-- 按键用于 keyAlias 修饰符-->
<div><input @keyup.enter="onEnter" /></div>

<!-- 点击事件将最多触发一次 -->
<div><button v-on:click.once="doThis">v-on:click.once</button></div>

<!-- 对象语法 -->
<div><button v-on="{ mousedown: doThis, mouseup: doThat }">v-on=</button></div>
运行效果:
 挨个点击按钮或者输入框里输入回车,终端输出如图:
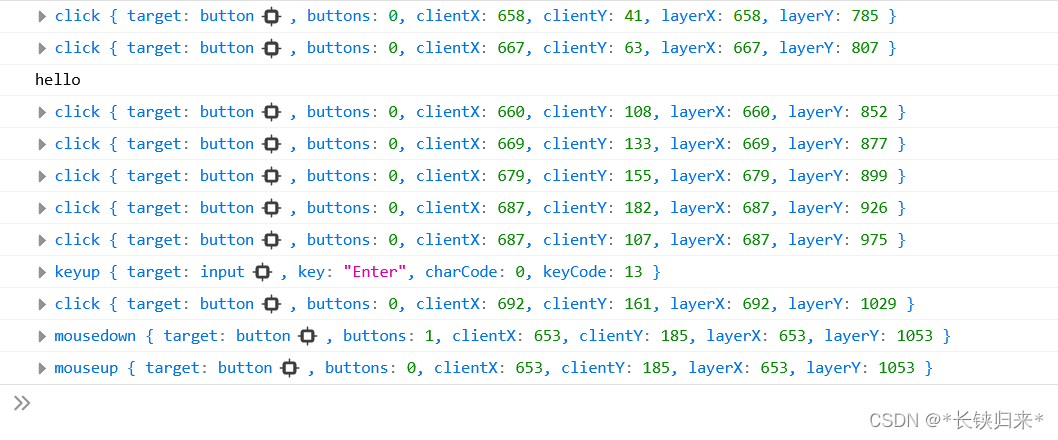 除了form没有效果以外,其它都有输出。
9.v-bind
动态的绑定一个或多个 attribute,也可以是组件的 prop。
缩写:: 或者 . (当使用 .prop 修饰符)
修饰符
- .camel - 将短横线命名的 attribute 转变为驼峰式命名。
- .prop - 强制绑定为 DOM property。
- .attr - 强制绑定为 DOM attribute。
演示代码:
const imageSrc = ref('../../public/nutcracker.jpg')

const fileName = ref('nutcracker.jpg')

const key = ref('style')
const value = ref('color:blue;text-align:center')

const isRed = ref(true)

const classA = ref('classA')
const classB = ref('classB')
// eslint-disable-next-line no-unused-vars
const classC = ref('classC')

const isB = ref(true)
const isC = ref(true)

const size = ref(20)

const styleObjectA = reactive({ color: 'red' })
const styleObjectB = reactive({ fontSize: '20px' })

const someProp = ref('someProp')
<div>
<!-- 绑定 attribute -->
<img v-bind:src="imageSrc" style="width:100px;height:100px;" />
</div>

<div>
<!-- 动态 attribute 名 -->
<button v-bind:[key]="value">v-bind:[key]="value"</button>
</div>

<div>
<!-- 缩写 -->
<img :src="imageSrc" style="width:100px;height:100px;"/>
</div>

<div>
<!-- 缩写形式的动态 attribute 名 -->
<button :[key]="value">:[key]="value"</button>
</div>

<div>
<!-- 内联字符串拼接 -->
<img :src="'../../public/' + fileName" style="width:100px;height:100px;" />
</div>

<!-- class 绑定 -->
<div :class="{ red:isRed }">:class="{ red:isRed }"</div>
<div :class="[classA, classB]">:class="[classA, classB]"</div>
<div :class="[classA, { classB:isB, classC:isC }]">:class="[classA, { classB: isB, classC: isC }]"</div>

<!-- style 绑定 -->
<div :style="{ fontSize: size + 'px' }">:style="{ fontSize: size + 'px' }"</div>
<div :style="[styleObjectA, styleObjectB]">:style="[styleObjectA, styleObjectB]"</div>

<!-- 绑定对象形式的 attribute -->
<div v-bind="{ id: someProp, 'style': styleObjectB }">v-bind="{ id: someProp, 'style': styleObjectB }"</div>
.red {
  color: red;
}

.classA {
  color: yellow;
}

.classB {
  font-size: 20px;
}

.classC {
  text-decoration: underline;
}
运行效果:
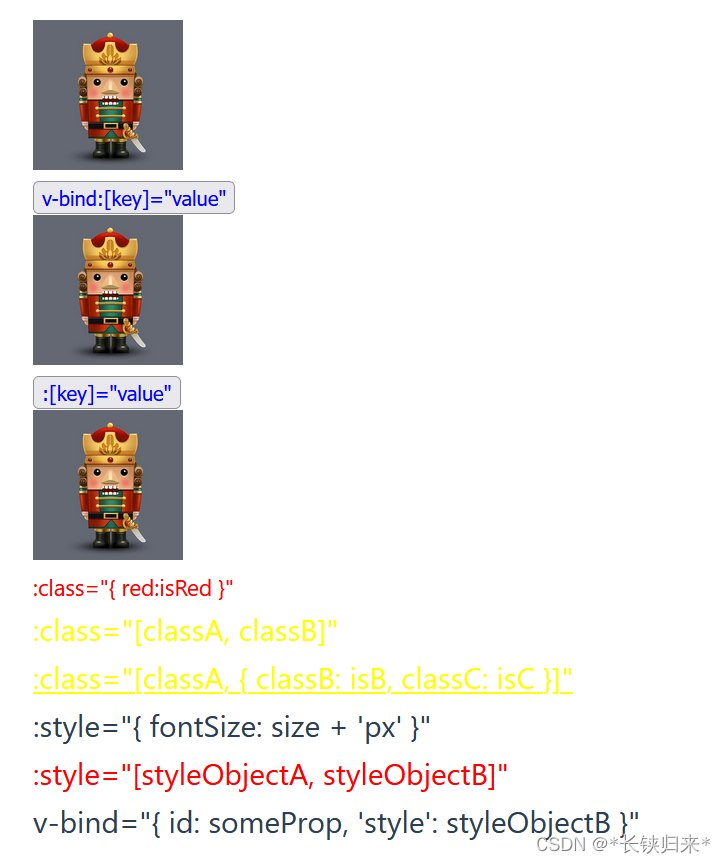 截图中两个按钮绑定了样式,所以文字成了蓝色。
10.v-model
在表单输入元素或组件上创建双向绑定。
演示代码:
const color = ref('红')
const colors = ref([])
<div><input type="text" v-model="color" /></div>
<div>
  <input type="radio" id="red1" v-model="color" value="红"/><label for="red1">红</label>
  <input type="radio" id="yellow1" v-model="color" value="黄"/><label for="yellow1">黄</label>
  <input type="radio" id="blue1" v-model="color" value="蓝"/><label for="blue1">蓝</label>
</div>
<div>
  <select v-model="color">
    <option value="红">红</option>
    <option value="黄">黄</option>
    <option value="蓝">蓝</option>
  </select>
</div>
<br>
<div><textarea v-model="colors"></textarea></div>
<div>
  <input type="checkbox" id="red2" v-model="colors" value="红"/><label for="red2">红</label>
  <input type="checkbox" id="yellow2" v-model="colors" value="黄"/><label for="yellow2">黄</label>
  <input type="checkbox" id="blue2" v-model="colors" value="蓝"/><label for="blue2">蓝</label>
</div>
运行效果:
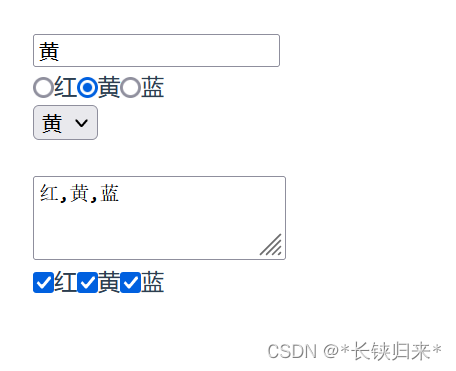
代码实现了文本框、单选按钮、下拉框、文本域与复选框的双向绑定。
11.v-slot
用于声明具名插槽或是期望接收 props 的作用域插槽。
缩写:#
这个指令在后面介绍。
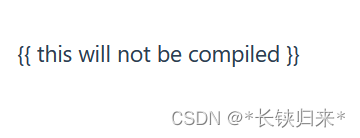
12.v-pre
跳过该元素及其所有子元素的编译。
演示代码:
<span v-pre>{{ this will not be compiled }}</span>
运行效果:
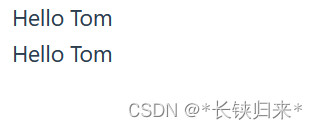
13.v-once
仅渲染元素和组件一次,并跳过之后的更新。
演示代码:
const onceMsg = ref('Hello Jerry')
<div><span v-once>This will never change: {{ onceMsg }}</span></div>
<div><span>This will change: {{ onceMsg }}</span></div>
<div><input v-model="onceMsg" /></div>
运行效果:
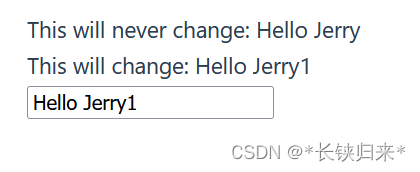 加了v-once指令的div果然只渲染了一次,修改文本框并没有更新。
14.v-memo
缓存一个模板的子树。在元素和组件上都可以使用。
中文文档中说:
v-memo 仅用于性能至上场景中的微小优化,应该很少需要。
所以就不介绍了。
15.v-cloak
用于隐藏尚未完成编译的 DOM 模板。
该指令只在没有构建步骤的环境下需要使用。
演示代码:
<div v-cloak>
  {{ message }}
</div>
这个代码只在特定场景或特定情况下才能看到效果。
二、自定义指令
本地的自定义指令在 <script setup> 中不需要显式注册,但他们必须遵循 vNameOfDirective 这样的命名规范。
演示代码:
const vMyDirective = {
  beforeMount: (el) => {
    // 在元素上做些操作
    el.style.color = '#FF0000'
    console.log(el)
  }
}
<h1 v-my-directive>This is a Heading</h1>
运行效果如图:
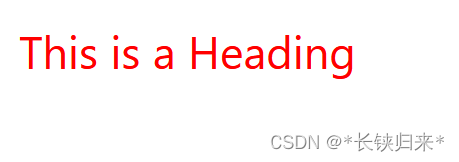
自定义指令已经起到了作用,因为颜色已经变成了红色。
三、插槽
1.v-slot
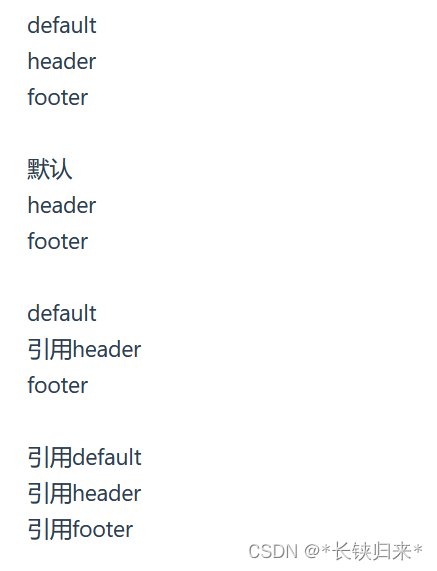
定义带插槽子组件TestChild3.vue,代码如下:
<template>
  <div>
    <div><slot>default</slot></div>
    <div><slot name="header">header</slot></div>
    <div><slot name="footer">footer</slot></div>
  </div>
</template>
引用子组件代码:
import Child from '/src/components/TestChild3.vue'
<Child></Child>
<br>
<Child>默认</Child>
<br>
<Child>
  <template v-slot:header>引用header</template>
</Child>
<br>
<Child>
  <template v-slot:default>引用default</template>
  <template v-slot:header>引用header</template>
  <template v-slot:footer>引用footer</template>
</Child>
运行结果:
2.useSlots
在子组件TestChild3.vue添加如下代码:
<script setup>
import { useSlots, onMounted } from 'vue'

const slots = useSlots()//能获取到this的情况下,也可以使用this.$slots

onMounted(() => {
  console.log(slots)
})
</script>
终端输出如图:

3.defineSlots()
中文文档中说:
这个宏可以用于为 IDE 提供插槽名称和 props 类型检查的类型提示。
它还返回 slots 对象,该对象等同于在 setup 上下文中暴露或由 useSlots() 返回的 slots 对象。
目前发现貌似不是lang="ts"是用不起来的。要是以后发现不是lang="ts"也能用再来介绍。