文章标题
01 功能说明
需求:小程序端需要调用前置摄像头进行拍照,并且将拍好的照片添加水印后返回。下面的代码支持 底部定点水印 和 整体背景水印。
技术栈:uniapp、vue
迭代:后期还可以继续 扩展多方位的定点水印 和 支持绘制多句话的背景水印。
02 使用方式 & 效果图
文件路径:"@/components/CameraSnap.vue"
2.1 基础用法
// (1)仅拍照 + 预览
<CameraSnap />

// (4)仅给图片添加水印 + 预览
<CameraSnap
	photoSrc="xxx"
	:mark-list="['今天天气很好','2023-01-01 00:00:00']"
/>
2.2 拍照 + 底部定点水印 + 预览
使用方式:
<CameraSnap
	:mark-list="['今天天气很好','2023-01-01 00:00:00']"
	textSize="24"
	useTextMask
/>
效果如下:
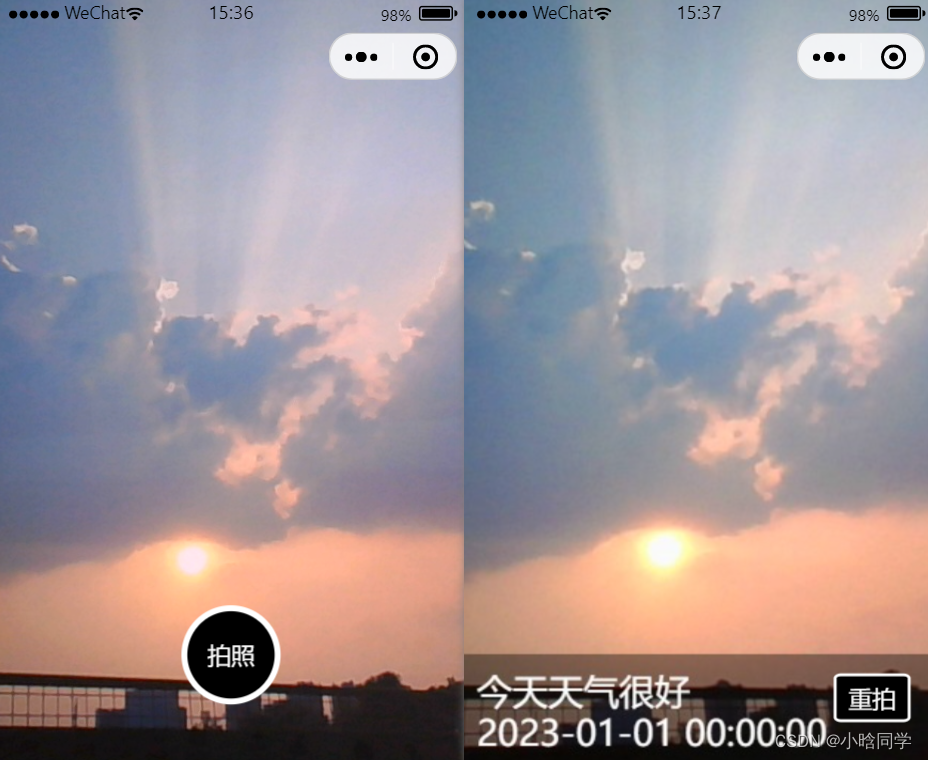 拍照_底部定点水印_预览" />
2.3 拍照 + 整体背景水印 + 预览
使用方式:
// 若不设置 markType,则默认为 底部定点水印
// 目前背景水印只会取 markList 的第一项来绘制背景水印
<CameraSnap
	markType="background"
	:mark-list="['今天天气很好']"
	textColor="rgba(255,255,255,0.5)"
/>
效果如下:
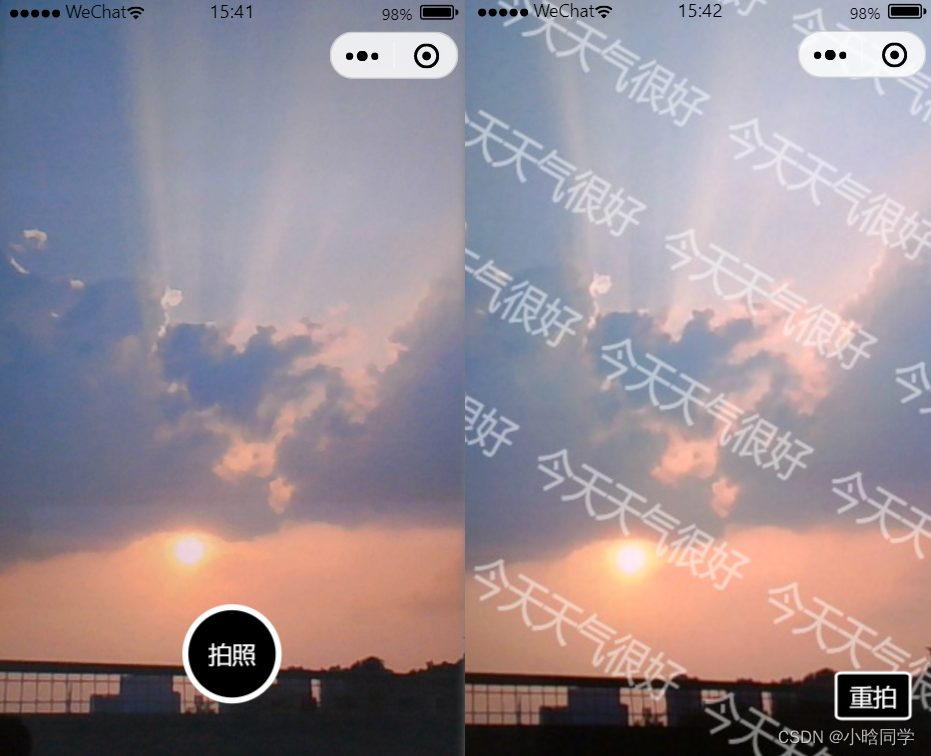 拍照_整体背景水印_预览" />
03 全部代码
uni-app
camera的官方文档:https://uniapp.dcloud.net.cn/component/camera.html#camera
3.1 页面布局 html
<template>
	<view class="camera-wrapper">
		<!-- 拍照 -->
		<template v-if="!snapSrc">
			<!-- 相机 -->
			<camera device-position="front" flash="off" @error="handleError" class="image-size">
				<view class="photo-btn" @click="handleTakePhoto">拍照</view>
			</camera>
			<!-- 水印 -->
			<canvas canvas-id="photoMarkCanvas" id="photoMarkCanvas" class="mark-canvas"
				:style="{width: canvasWidth+'px',height: canvasHeight+'px'}" />
		</template>
		<!-- 预览 -->
		<template v-else>
			<view class="re-photo-btn" @click="handleRephotograph">重拍</view>
			<image class="image-size" :src="snapSrc"></image>
		</template>
	</view>
</template>
3.2 业务核心 js
<script>
	export default {
		name: 'CameraSnap',
		props: {
			// 照片地址(若传递了照片地址,则默认为预览该照片或添加水印后预览)
			photoSrc: {
				type: String,
				default: ""
			},
			// 水印类型
			markType: {
				type: String,
				default: "fixed", // 定点水印 fixed,背景水印 background
			},
			// 水印文本列表(支持多行)
			markList: {
				type: Array,
				default: () => []
			},
			textColor: {
				type: String,
				default: "#FFFFFF"
			},
			textSize: {
				type: Number,
				default: 32
			},
			// 定点水印的遮罩(为了让水印更清楚)
			useTextMask: {
				type: Boolean,
				default: true
			}
		},
		data() {
			return {
				snapSrc: "",
				canvasWidth: "",
				canvasHeight: "",
			}
		},
		watch: {
			photoSrc: {
				handler: function(newValue, oldValue) {
					if (newValue) {
						this.getWaterMarkImgPath(newValue)
					}
				},
				immediate: true
			}
		},
		methods: {
			handleTakePhoto() {
				const ctx = uni.createCameraContext();
				ctx.takePhoto({
					quality: 'high',
					success: (res) => {
						const imgPath = res.tempImagePath
						if (this.markList.length) {
							this.getWaterMarkImgPath(imgPath)
						} else {
							this.snapSrc = imgPath;
							console.log("default", this.snapSrc)
							this.$emit('complete', imgPath)
						}
					}
				});
			},
			handleRephotograph() {
				this.snapSrc = ""
			},
			handleError(err) {
				uni.showModal({
					title: '警告',
					content: '若不授权使用摄像头,将无法使用拍照功能!',
					cancelText: '不授权',
					confirmText: '授权',
					success: (res) => {
						if (res.confirm) {
							// 允许打开授权页面,调起客户端小程序设置界面,返回用户设置的操作结果
							uni.openSetting({
								success: (res) => {
									res.authSetting = { "scope.camera": true }
								},
							})
						} else if (res.cancel) {
							// 拒绝打开授权页面
							uni.showToast({ title: '您已拒绝授权,无法进行拍照', icon: 'error', duration: 2500 });
						}
					}
				})
			},
			setWaterMark(context, image) {
				const listLength = this.markList?.length
				switch (this.markType) {
					case 'fixed':
						const spacing = 4 // 行间距
						const paddingTopBottom = 20 // 整体上下间距
						// 默认每行的高度 = 字体高度 + 向下间隔
						const lineHeight = this.textSize + spacing
						const allLineHeight = lineHeight * listLength
						// 矩形遮罩的 Y 坐标
						const maskRectY = image.height - allLineHeight
						// 绘制遮罩层
						if (this.useTextMask) {
							context.setFillStyle('rgba(0,0,0,0.4)');
							context.fillRect(0, maskRectY - paddingTopBottom, image.width, allLineHeight + paddingTopBottom)
						}
						// 文本与 x 轴之间的间隔
						const textX = 10
						// 文本一行的最大宽度(减去 20 是为了一行的左右留间隙)
						const maxWidth = image.width - 20
						context.setFillStyle(this.textColor)
						context.setFontSize(this.textSize)
						this.markList.forEach((item, index) => {
							// 因为文本的 Y 坐标是指文本基线的 Y 轴坐标,所以要获取文本顶部的 Y 坐标
							const textY = maskRectY - paddingTopBottom / 2 + this.textSize + lineHeight * index
							context.fillText(item, textX, textY, maxWidth);
						})
						break;
					case 'background':
						context.translate(0, 0);
						context.rotate(30 * Math.PI / 180);
						context.setFillStyle(this.textColor)
						context.setFontSize(this.textSize)
						const colSize = parseInt(image.height / 6)
						const rowSize = parseInt(image.width / 2)
						let x = -rowSize
						let y = -colSize
						// 循环绘制 5 行 6 列 的文字
						for (let i = 1; i <= 6; i++) {
							for (let j = 1; j <= 5; j++) {
								context.fillText(this.markList[0], x, y, rowSize)
								// 每个水印间隔 20
								x += rowSize + 20
							}
							y += colSize
							x = -rowSize
						}
						break;
				}
				context.save();
			},
			getWaterMarkImgPath(src) {
				const _this = this
				uni.getImageInfo({
					src,
					success: (image) => {
						this.canvasWidth = image.width
						this.canvasHeight = image.height
						const context = uni.createCanvasContext("photoMarkCanvas", this)
						context.drawImage(src, 0, 0, image.width, image.height)
						// 设置水印
						this.setWaterMark(context, image)
						// 若还需其他操作,可在操作之后叠加保存:context.restore()
						// 将画布上的图保存为图片
						context.draw(false, () => {
							setTimeout(() => {
								uni.canvasToTempFilePath({
										destWidth: image.width,
										destHeight: image.height,
										canvasId: 'photoMarkCanvas',
										fileType: 'jpg',
										success: function(res) {
											_this.snapSrc = res.tempFilePath
											console.log("water", _this.snapSrc)
											_this.$emit('complete', _this.snapSrc)
										}
									},
									_this
								);
							}, 200)
						});
					}
				})
			},
		}
	}
</script>
3.3 基础样式 css
<style lang="scss" scoped>
	.camera-wrapper {
		position: relative;
	}

	.mark-canvas {
		position: absolute;
		/* 将画布移出展示区域 */
		top: -200vh;
		left: -200vw;
	}

	.image-size {
		width: 100%;
		height: 100vh;
	}

	.photo-btn {
		position: absolute;
		bottom: 100rpx;
		left: 50%;
		transform: translateX(-50%);
		width: 140rpx;
		height: 140rpx;
		line-height: 140rpx;
		text-align: center;
		background-color: #000000;
		border-radius: 50%;
		border: 10rpx solid #ffffff;
		color: #fff;
	}

	.re-photo-btn {
		position: absolute;
		bottom: 80rpx;
		right: 40rpx;
		padding: 10rpx 20rpx;
		background-color: #000000;
		border-radius: 10%;
		border: 6rpx solid #ffffff;
		color: #fff
	}
</style>
