简介
关于vue-cli4.x创建vue3项目及环境搭建
一、项目创建
以下创建操作都是在CMD命令管理器里面操作的。
1.首先很重要的一点,在一个要创建vue项目的文件夹下查看你的vue cli的版本!
注意:要4.0以上(3.x的安装有些微区别,也可以用3.x)(V是大写)
-----vue-cli4构建项目,与vue-cli3构建项目的区别-----
vue -V
如果没有4.0以上,通过以下步骤进行重新安装
// 卸载旧版本
npm uninstall vue-cli -g

// 再安装Vue cli 4
npm install -g @vue/cli
2.在此文件夹下创建3.0项目(注意创建的项目文件名全部小写)
vue create vue3.0demo
3.关于项目创建的配置,我选择的是:Default Vue 3 Preview
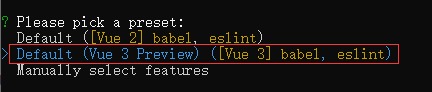
4.创建成功,就可以在package.json中看到vue版本是3.0或以上

5.如果不小心选了Default Vue 2 Preview,可以在项目文件里,如下操作即可改变版本(当然,别偷懒,重新创建一次是最好的)
注意:是在创建的项目文件夹里面!!!
vue add vue-next
6.如上操作就已经成功创建了一个vue3项目了,可以运行起来开始你的表演了
npm run serve

二、路由配置
1.安装路由,注意vue-router的版本至少是4.x
npm install vue-router@next --save
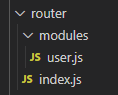
2.路由js配置(router/index.js),注意与vue-cli2.x版本的vue-router配置有区别
import { createRouter, createWebHistory } from 'vue-router';
import NotFound from '@/components/not-found'; // 页面引入方法一
const routes = [
{
path: '/',
// redirect: '/login', // 重定向第一种写法
redirect: { name: 'login' }, // 重定向第二种写法:路由对象的name
},
{
path: '/login',
name: 'login',
component: () => import('@/views/login/login.vue'), // 页面引入方法二
},
{
path: '/homepage',
name: 'home',
component: () => import('@/views/home/home.vue'),
},
// 访问不到页面时
{ path: '/:pathMatch(.*)*', name: 'NotFound', component: NotFound },
];
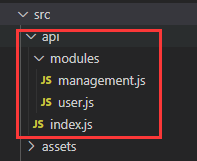
// 批量引入模块页面路由
const moduleFiles = require.context('./modules', true, /\.js$/);
moduleFiles.keys().forEach((modulePath) => {
routes.push(...moduleFiles(modulePath).default);
});
// ---------------------注意此处区别---------------------
const router = createRouter({
mode: 'history',
history: createWebHistory(),
routes,
});
export default router;
3.模块路由配置(user.js)[每个模块建一个js文件]
export default [
  {
    path: '/user',
    name: 'user',
    meta: { title: '用户管理' },
    component: () => import('@/views/user/userManagementList'),
  }
];
4.全局引入router(main.js),注入方式有区别
import { createApp } from 'vue';
import App from './App.vue';
// 引入路由
import router from './router';

const app = createApp(App);
app.use(router).mount('#app');
// 可分开注入
// app.user(router);
// app.mount('#app');
5.使用方式
5.1 Vue 2.x
this.$router.push({
  name: 'home',
});
// ...
5.2 Vue 3.x
import { useRouter } from "vue-router";

setUp () {
  const _router = useRouter();
  _router.push({
      name: "home",
  });
}
三、Vuex配置
1.安装Vuex,注意vuex版本至少是4.0.0
// 方式一,指定版本
npm install --save vuex@4.0.0

// 方式二,至最新版本(推荐先安装指定版本,再这样更新至新版本)
npm install --save vuex@next
2.vuex js配置,注意与vue-cli2.x版本的vuex配置有区别
简洁版 —— 参照官方文档
// store/index.js
import { createStore } from 'vuex'

// 创建一个新的 store 实例
const store = createStore({
  state () {
    return {
      count: 0
    }
  },
  mutations: {
    increment (state) {
      state.count++
    }
  }
})

export default store;
适用多模块版
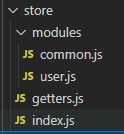
(1)store/index.js
import { createStore } from 'vuex';

// 引入快速访问变量
import getters from './getters';

// 引入多个模块
const moduleFiles = require.context('./modules', true, /\.js$/);
const modules = moduleFiles.keys().reduce((modules, modulePath) => {
  const storeName = modulePath.replace(/^\.\/(.*)\.\w+$/, '$1');
  modules[storeName] = moduleFiles(modulePath).default;
  return modules;
}, {});

// 创建store---------------------注意此处区别---------------------
const store = createStore({
  modules,
  getters,
});

export default store;
(2)store/getters.js【配置这里的变量是为了Vue2.x的快速访问,可看后续获取store中值时的方式不同】
const getters = {
  userInfo: (state) => state.user.userInfo,
  routes: (state) => state.user.menus,
  screenHeight: (state) => state.common.screenHeight,
};
export default getters;
(3)store/modules/user.js
const state = {
  userInfo: {}, // 用户数据
  menus: [], // 菜单数据
  roles: [], // 角色状态
};

const mutations = {
  // 登录状态保存
  SET_LOGIN: (state, user) => {
    state.userInfo = user;
  },
  // 添加userInfo信息
  ADD_USERINFO: (state, addInfo) => {
    let keys = Object.keys(addInfo);
    for (let i = 0; i < keys.length; i++) {
      state.userInfo[keys[i]] = addInfo[keys[i]];
    }
  },
};

const actions = {};

export default {
  namespaced: true,
  state,
  mutations,
  actions,
};
(4)store/modules/common.js
const state = {
  screenHeight: 0, // 网页内容区域可视化高度值
};

const mutations = {
  // 设置浏览器高度
  SET_SCREENHEIGHT: (state, heightVal) => {
    state.screenHeight = heightVal;
  },
};

const actions = {};

export default {
  namespaced: true,
  state,
  mutations,
  actions,
};
3.全局注入
import { createApp } from 'vue';
import App from './App.vue';
// 引入store
import store from './store';

const app = createApp(App);
app.use(store).mount('#app');
// 可分开注入
// app.user(store);
// app.mount('#app');
4.使用方式
4.1 Vue 2.x的使用方式
(1)存值
this.$store.commit('common/SET_SCREENHEIGHT', 10000);
this.$store.commit('user/SET_LOGIN', { userName: '名字' });
(2)获取值
<script>
import { mapState } from 'vuex';
import { mapGetters } from 'vuex';
export default {
  computed: {
    ...mapState({
      userInfo: (state) => state.user.userInfo,
      // menus: (state) => state.user.menus,
      // screenHeight: (state) => state.common.screenHeight,
    }),
    ...mapState('user', ['menus']),
    // ...mapState('common', ['screenHeight']),
    ...mapGetters(['screenHeight']), // 这就是上面写到getters.js文件里面的快速访问[不需要访问模块目录]
  },
};
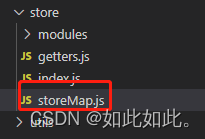
4.2 Vue 3.x的使用方式
第一步,在store文件下新建一个storeMap.js的JS文件
import { computed } from "vue";
import { mapGetters, mapState, useStore, createNamespacedHelpers } from "vuex";

const useMapper = (mapper, mapFn) => {
  const store = useStore();
  const storeStateFns = mapFn(mapper);
  const storeState = {};
  Object.keys(storeStateFns).forEach((keyFn) => {
    const fn = storeStateFns[keyFn].bind({ $store: store });
    storeState[keyFn] = computed(fn);
  });

  return storeState;
};
// 封装useState
export const useState = (moduleName, mapper) => {
  let mapperFn = mapState;
  if (typeof moduleName === "string" && moduleName.length > 0) {
    mapperFn = createNamespacedHelpers(moduleName).mapState;
  } else {
    mapper = moduleName;
  }
  return useMapper(mapper, mapperFn);
};
// 封装useGetters
export const useGetters = (moduleName, mapper) => {
  let mapperFn = mapGetters;
  if (typeof moduleName === "string" && moduleName.length > 0) {
    mapperFn = createNamespacedHelpers(moduleName).mapGetters;
  } else {
    mapper = moduleName;
  }
  return useMapper(mapper, mapperFn);
};
第二步,在页面中使用
(1)存值
import { getCurrentInstance } from "vue";

setup() {
  // 调用改值通知方法
  const { proxy } = getCurrentInstance();
  proxy.$store.commit('user/SET_LOGIN', {});
}
(2)获取值
import { useState, useGetters } from "@/store/storeMap.js";

setup() {
  // 获取数据
  const mapStateUser = useState("user", ["userInfo"]);
  const mapGettersUser = useGetters("user", ["menus"]);
  console.log("vuex使用", mapStateUser, mapGettersUser);
}
四、axios请求配置
参考axios详细配置
五、ui库引入
使用的 Ant Design Ui 2.x 或 3.x
Ant Design Ui 2.x 官网
Ant Design Ui 3.x 官网
网上参考链接
1.安装UI库、less和less-loader、babel-plugin-import(按需引入处理插件)
注意ant的版本是2.x 或 3.x,less-loader的版本是6.x,不然会导致插件之间的兼容版本问题报错
npm i ant-design-vue@next --save

npm i less --save

npm i less-loader@6.0.0 --save

npm i babel-plugin-import --save

// ant-design使用图标组件的图标组件包
npm install --save @ant-design/icons-vue
2.css插件配置(vue.config.js)
css: {
  loaderOptions: {
    less: {
      lessOptions: {
        javascriptEnabled: true,
      },
    },
  },
},
3.按需引入插件配置(babel.config.js)
module.exports = {
  presets: ['@vue/cli-plugin-babel/preset'], // ['@vue/app'],
  plugins: [
    [
      'import',
      { libraryName: 'ant-design-vue', libraryDirectory: 'es', style: 'css' },
    ], // `style: true` 会加载 less 文件
  ], // 按需引入组件
};
4.全局引入(新建一个UI组件的配置文件,如antComponents.js)
(1)组件按需引入、全局注入
// 按需引入ant Design ui 的组件
import { Button, message, ConfigProvider } from 'ant-design-vue';

// 创建inconfont库的icon
import { createFromIconfontCN } from '@ant-design/icons-vue';
const IconFont = createFromIconfontCN({
  scriptUrl: '//at.alicdn.com/t/font_2605334_5nupkuiacgo.js',
});

/*
*注册使用组件
 * @param:app 全局创建的
 */
export function installComponents(app) {
  app.config.productionTip = false;
  app.config.globalProperties.$message = message;
  app.use(Button);
  app.use(ConfigProvider); // 全局语言配置
  app.component('icon-font', IconFont); // 注入可使用iconfont库图标的标签组件
}
(2)全局引入
import { createApp } from 'vue';
import App from './App.vue';
// 按需引入ant Design ui 的组件
import { installComponents } from '@/components/antComponents.js';

const app = createApp(App);
app.mount('#app');

// 注册使用组件
installComponents(app);
六、全局引入.less的样式变量
参考文章:VUE:全局引入.lees文件的CSS变量
七、单页面构建
// TODO...
八、组件构建
// TODO...
最后
觉得有用的朋友请用你的金手指点一下赞,或者评论留言一起探讨技术!