文章目录
- ref
- props
- $attrs
- mixin
ref
ref 属性
1.被用来给元素或子组件注册引用信息((id的替代者)
2.应用在html标签上获取的是真实DOM元素,应用在组件标签上是组件实例对象(vc)
3.使用方式:
打标识: <h1 ref="xxx">....</h1>或<School ref="xxx"></School>
获取: this.$refs.xxx
为了说明这个属性,我们重新写下相关代码:
main.js
//引入Vue
import Vue from 'vue';
//引入App
import App from './App';
//关闭vue的生产提示
Vue.config.productionTip = false
//创建vm
new Vue({
    el: "#app",
    render: h => h(App)
})
School.vue
<template>
  <div class="school">
    <h2>学校名称:{{ name }}</h2>
    <h2>学校地址:{{ address }}</h2>
  </div>
</template>

<script>
export default {
  name: "School",
  data() {
    return {
      name: "三里屯小学",
      address: "北京"
    }
  }
}
</script>

<style scoped>
.school {
  background-color: aliceblue;
}
</style>
App.vue
<template>
  <div>
    <h2 ref="title">欢迎学习Vue</h2>
    <button @click="showDom" ref="btn">点我输出上方dom</button>
    <School ref="sch"/>
  </div>
</template>

<script>
//引入School组件
import School from "@/components/School";

export default {
  name: "App",
  components: {
    School
  },
  methods:{
    showDom(){
      console.log(this.$refs);
      console.log(this.$refs.title);//真实Dom元素
      console.log(this.$refs.sch);//School组件的实例对象
    }
  }
}
</script>

<style scoped>
</style>

props
功能:让组件接收外部传过来的数据
(1).传递数据:
<Demo name="xxx" />
(2).接收数据:
第一种方式(只接收):
props: [ 'name']
第二种方式(限制类型):
props:{
	name : Number
}
第三种方式(限制类型、限制必要性、指定默认值):
props:{
	name:{
		type:String,//类型
		required:true,//必要性
		default:'老王’//默认值
	}
}
备注:props是只读的,Vue 底层会监测你对 props 的修改,如果进行了修改,就会发出警告,若业务需求确实需要修改,那么请复制 props 的内容到 data 中一份,然后去修改 data 中的数据
使用介绍
Student.vue
<template>
<div>
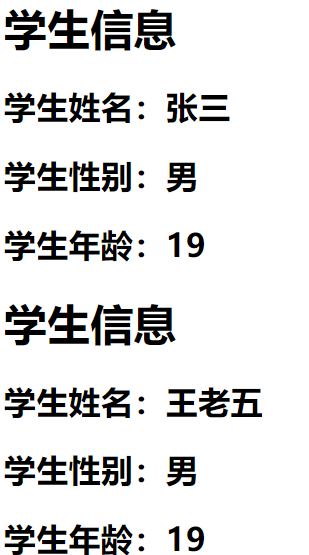
<h1>{{msg}}</h1>
<h2>学生姓名:{{ name }}</h2>
<h2>学生性别:{{ sex }}</h2>
<h2>学生年龄:{{ age }}</h2>
</div>
</template>
<script>
export default {
name: "Student",
data() {
return {
msg:"学生信息",
}
},
//简单声明接受
props:["name", "sex", "age"]
}
</script>
<style scoped>
</style>
App.vue
<template>
  <div>
    <Student name="张三" sex="男" :age="18+1"/>
    <Student name="王老五" sex="男" age="19"/>
  </div>
</template>

<script>
//引入School组件
import Student from "@/components/Student";

export default {
  name: "App",
  components: {
    Student
  }
}
</script>

<style scoped>
</style>
在接受时,还可以进行类型限制
 //接受的同时进行类型限制
  props:{
    name:String,
    age:Number,
    sex:String
  }
这样在使用的时候,年龄只能传数值类型
<Student name="张三" sex="男" :age="18"/>
或者写的更具体
//接收的同时对数据:类型限制+默认值指定+必要性限制
  props: {
    name: {
      type: String,//类型String
      required: true//必须传值
    },
    age: {
      type: Number,
      default: 99//默认99
    },
    sex: {
      type: String,
      required: true
    }
}
注意:传过来的值不能改变,如需改变,需要本地定义一个值
<template>
  <div>
    <h1>{{ msg }}</h1>
    <h2>学生姓名:{{ name }}</h2>
    <h2>学生性别:{{ sex }}</h2>
    <h2>学生年龄:{{ myAge }}</h2>
    <button @click="updateAge">点我修改传进来的年龄</button>
  </div>
</template>

<script>
export default {
  name: "Student",
  props: ["name", "sex", "age"],
  data() {
    return {
      msg: "学生信息",
      myAge: this.age
    }
  },
  methods: {
    updateAge() {
      console.log(this.myAge++);
    }
  }
}
</script>

<style scoped>
</style>

$attrs
App.vue 中引入并使用 Demo 组件,并向其传入一个 msg,值为 “hello ”
<template>
  <div>
    <Demo msg="hello"/>
  </div>
</template>

<script>
import Demo from './components/Demo'

export default {
  name: 'App',
  components: {
    Demo
  }
}
</script>
Demo 组件在 props 中接收,我们在 mounted 生命钩子中打印下 this
<template>
  <div>
    {{ msg }}
  </div>
</template>

<script>

export default {
  name: "Demo",
  props: ["msg"],
  mounted() {
    console.log(this);
  }
}
</script>
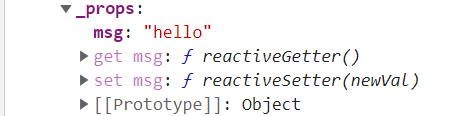
可以看到 vc 身上的 props 有刚才传过来的值
如果 Demo 中不使用 props 接收,也可以使用
<template>
  <div>
    {{ $attrs.msg }}
  </div>
</template>

<script>

export default {
  name: "Demo",

  mounted() {
    console.log(this);
  }
}
</script>
可以看到 vc 的 $attrs 上有刚才传过来的 msg,所以也可以使用 $attrs.msg使用传过来的值
mixin
功能:可以把多个组件共用的配置提取成一个混入对象。混入 (mixin) 提供了一种非常灵活的方式,来分发 Vue 组件中的可复用功能。一个混入对象可以包含任意组件选项。当组件使用混入对象时,所有混入对象的选项将被“混合”进入该组件本身的选项
使用方式:
第一步、定义混合
{
	data(){....},
	methods:{....}
}
第二步、使用混入
(1).全局混入:Vue.mixin(xxx)
(2).局部混入:mixins: [ "xxx "]
新建 mixin.js
export const mixin = {
methods: {
alertName() {
alert(this.name)
}
},
mounted() {
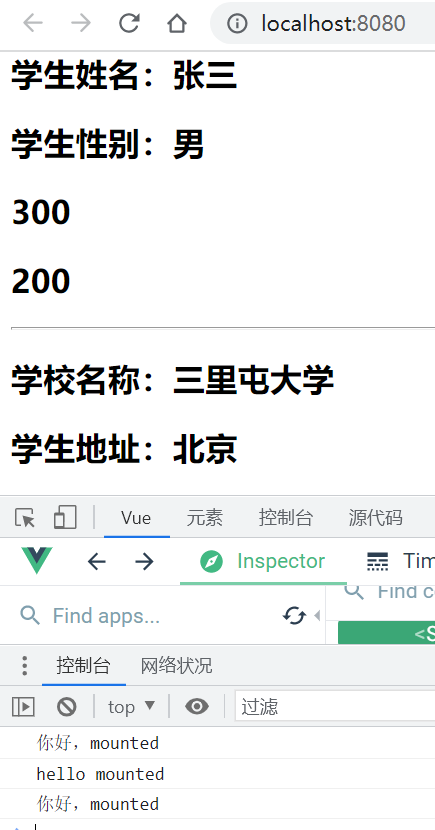
console.log("你好,mounted");
}
}
export const mixin2 = {
data() {
return {
x: 100,
y: 200
}
}
}
Student.vue
<template>
  <div>
    <h2 @click="alertName">学生姓名:{{ name }}</h2>
    <h2>学生性别:{{ sex }}</h2>
    <h2>{{ x }}</h2>
    <h2>{{ y }}</h2>
  </div>
</template>

<script>
//引入混合
import {mixin,mixin2} from "@/mixin";

export default {
  name: "Student",
  data() {
    return {
      name: "张三",
      sex: "男",
      x:300
    }
  },
  mounted() {
    console.log("hello mounted");
  },
  mixins: [mixin,mixin2]
}
</script>

<style scoped>
</style>
School.vue
<template>
  <div>
    <h2 @click="alertName">学校名称:{{ name }}</h2>
    <h2>学生地址:{{ address }}</h2>
  </div>
</template>

<script>
import {mixin} from "@/mixin";

export default {
  name: "School",
  data() {
    return {
      name: "三里屯大学",
      address: "北京"
    }
  },
  mixins: [mixin]
}
</script>

<style scoped>
</style>
App.vue
<template>
  <div>
    <Student/>
    <hr/>
    <School/>
  </div>
</template>

<script>
//引入School组件
import Student from "@/components/Student";
import School from "@/components/School";

export default {
  name: "App",
  components: {
    Student,
    School
  }
}
</script>

<style scoped>
</style>
以上是局部引入mixin,下面介绍全局引入 mixin,修改 main.js
//引入Vue
import Vue from 'vue';
//引入App
import App from './App';

import {mixin,mixin2} from "@/mixin";

//关闭vue的生产提示
Vue.config.productionTip = false
Vue.mixin(mixin)
Vue.mixin(mixin2)

//创建vm
new Vue({
    el: "#app",
    render: h => h(App)
})
![ActiveX控件的打包发布[无证书发布]](/images/no-images.jpg)


