想了解登录登出,动态路由怎么做的可以看前面两篇文章。
本篇章参考:https://ke.qq.com/course/3323814?taid=10963075825055654
想要源码的可以联系视频里的老师或者加我qq814216044。
权限管理个人理解有两种,一种是显示按钮但是点击的时候没有,第二种是直接不显示按钮,本文讲解是第二种,主要使用v-if属性,如下:

按钮使用v-if,如果值为ture就显示按钮,不然就不显示。调用checkpermission方法。但是在调用此方法前,使用钩子函数先查询需要的值,如下所示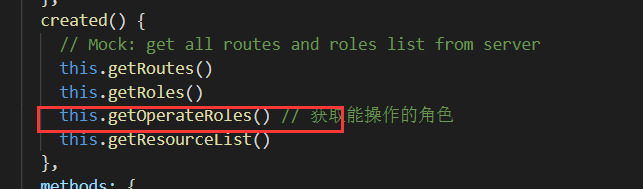
 后端代码可以自己思考,数据有了,那就执行checkpermission,该方法从其他文件种导入,代码如下
权限管理不显示按钮的思路大致如上
vue-element-admin框架登录登出、动态路由、权限管理过程
在src文件下有一个permission.js文件他是整个前端项目的拦截器,所有路由请求前都会通过他,代码如下所示。
import router from './router'
import store from './store'
import { Message } from 'element-ui'
import NProgress from 'nprogress' // progress bar
import 'nprogress/nprogress.css' // progress bar style
import { getToken } from '@/utils/auth' // get token from cookie
import getPageTitle from '@/utils/get-page-title'

NProgress.configure({ showSpinner: false }) // NProgress Configuration

const whiteList = ['/login', '/auth-redirect'] // no redirect whitelist

// 路由拦截器
router.beforeEach(async(to, from, next) => {
  // start progress bar
  NProgress.start()

  // set page title
  // 设置目标页面的title(从目标路由的meta中获取title)
  document.title = getPageTitle(to.meta.title)

  // determine whether the user has logged in
  // 获取store里面的登录令牌,有令牌,表示有登录
  const hasToken = getToken()

  if (hasToken) {
    if (to.path === '/login') {
      // if is logged in, redirect to the home page
      // 如果有登录,并且目标路径是/login,路由到首页
      next({ path: '/' })
      NProgress.done() // hack: https://github.com/PanJiaChen/vue-element-admin/pull/2939
    } else {
      // determine whether the user has obtained his permission roles through getInfo
      // 获取登录用户的角色,能获取到,表示有角色信息,否则就调用getInfo,获取当前登录用户的角色信息
      const hasRoles = store.getters.roles && store.getters.roles.length > 0
      if (hasRoles) {
        next()
      } else {
        try {
          // get user info
          // note: roles must be a object array! such as: ['admin'] or ,['developer','editor']
          // 派发user/getInfo action,获取当前用户的角色信息
          const { roles } = await store.dispatch('user/getInfo')

          // generate accessible routes map based on roles
          // 根据用户的角色信息,派发到permission/generateRoutes action,生成动态路由表
          const accessRoutes = await store.dispatch('permission/generateRoutes', roles)

          // dynamically add accessible routes
          // 挂载动态路由
          router.addRoutes(accessRoutes)

          // hack method to ensure that addRoutes is complete
          // set the replace: true, so the navigation will not leave a history record
          next({ ...to, replace: true })
        } catch (error) {
          // remove token and go to login page to re-login
          await store.dispatch('user/resetToken')
          Message.error(error || 'Has Error')
          next(`/login?redirect=${to.path}`)
          NProgress.done()
        }
      }
    }
  } else {
    /* has no token*/

    if (whiteList.indexOf(to.path) !== -1) {
      // in the free login whitelist, go directly
      next()
    } else {
      // other pages that do not have permission to access are redirected to the login page.
      next(`/login?redirect=${to.path}`)
      NProgress.done()
    }
  }
})

router.afterEach(() => {
  // finish progress bar
  NProgress.done()
})
重要部分为有中文注释的地方,通过我实验了解,连接器只有在页面跳转的时候启动,也就是说你直接从其他地方来该项目会除非,登录成功跳转到后台会触发,但是通过路由菜单点击是不会触发。
通过拦截器所知,如果你没有token令牌,无论你从什么地方进最后都会到登录页面,当你登录的时候,后端要返回一个如下图所示的数据结构,来告诉前端登录时成功的。
至少要有这些数据,并且code必须时int类型的20000,如果不是那么会报错,在src/util/request.js文件中,前端会判断每次请求返回来的状态码,如果不是我们规定的他就会出你定义的提示信息。登录成功后他就会触发usr/getInfo方法 去得到这个用户的角色,该方法返回的数据格式如下。
该方法返回的数据没问题,就会执行store/permission/generateRoutes方法,把角色的id集合带过去,该方法代码如下:
const actions = {
  generateRoutes: async function({ commit }, roles) {
    // 从后台请求所有的路由信息
    const res = await getRoutes()
    // 定义一个变量,用来存放可以访问的路由表
    const dbAsyncRoutes = res.data
    // 过滤掉空的children和把component字符改编为对象
    const myAsyncRoutes = dbAsyncRoutes.filter(curr => {
      if (curr.children == null || curr.children.length === 0) {
        delete curr.children
      }
      return replaceComponent(curr)
    })

    let accessedRoutes
    // 判断当前的角色列表中,是否有包含admin
    if (roles.includes('admin')) {
      // 所有路由都可以被访问,将ansyncRoutes改造成从数据库中获取
      accessedRoutes = myAsyncRoutes || []
    } else {
      // 根据角色,过滤掉不能访问的路由表
      accessedRoutes = filterAsyncRoutes(myAsyncRoutes, roles)
    }
    // commit
    commit('SET_ROUTES', accessedRoutes)
    // 成功返回
    // resolve(accessedRoutes)
    return accessedRoutes
  }
}
进入方法会先执行getRoutes()方法,该方法是把所有路由都查询出来 ,返回的格式如下:
然后他会拿到data数据,把里面children为[]都删除掉,并且把component字符串替换为对象,通过replaceComponent方法,代码如下:
// 替换route对象中的component
function replaceComponent(comp) {
  if (comp.component && typeof (comp.component) === 'string') {
    comp.component = componentMap[comp.component]
  }

  if (comp.children && comp.children.length > 0) {
    for (let i = 0; i < comp.children.length; i++) {
      comp.children[i] = replaceComponent(comp.children[i])
    }
  }
  return comp
}
方法中出现的componentMap代码是自己定义的,每添加一个页面就需要自己手动添加一个,具体代码如下:在ronter/index.js中规定
/**
 * 定义组件名称和组件对象的map对象
*/
export const componentMap = {
  'layout': require('@/layout').default,
  'redirect_index': () => import('@/views/redirect/index').then(m => m.default),
  'login_index': () => import('@/views/login/index').then(m => m.default),
  'login_auth_redirect': () => import('@/views/login/auth-redirect').then(m => m.default),
  'error_page_404': () => import('@/views/error-page/404').then(m => m.default),
  'error_page_401': () => import('@/views/error-page/401').then(m => m.default),
  'dashboard_index': () => import('@/views/dashboard/index').then(m => m.default),
  'documentation_index': () => import('@/views/documentation/index').then(m => m.default),
  'guide_index': () => import('@/views/guide/index').then(m => m.default),
  'profile_index': () => import('@/views/profile/index').then(m => m.default),
  'permission_menu': () => import('@/views/permission/menu').then(m => m.default),
  'permission_resource': () => import('@/views/permission/permResource').then(m => m.default),
  'permission_role': () => import('@/views/permission/role').then(m => m.default),
  'user_role': () => import('@/views/permission/user').then(m => m.default),
  'icons_index': () => import('@/views/icons/index').then(m => m.default),
  'clipboard_index': () => import('@/views/clipboard/index').then(m => m.default)
}此时路由已经处理完整由于我们返回的roles是一个int的集合肯定不会有admin,所有直接执行下面的语句通过filterAsyncRoutes方法过滤就行,该方法执行完成后会把角色拥有的路由都整理出来放到vuex中也就是通过commint方法。并且返回,再从拦截器中往下执行,通过router.addRoutes动态挂载路由。
vue-element-admin的登录登出,动态路由,权限管理的思路就大致如上了,方法有很多种,这种方法是我总结视频的中老师的做法和自己的理解总结出来的。


