In this article we are going to build shopping cart frontend for our application. We will be using Vue Vite which has a faster hot module reload.
在本文中,我们将为我们的应用程序构建购物车前端。 我们将使用Vue Vite,它具有更快的热模块重装速度。
You can check our backend part built in Nodejs, which we already have published.
您可以检查我们已经发布的内置在Nodejs中的后端部分 。
We need to create our application directory for Vite. Create a vue-cart directory in your desktop and run setup Vite by running this command:
我们需要为Vite创建应用程序目录。 在桌面上创建一个vue-cart目录,并通过运行以下命令来运行setup Vite:
cd desktop
mkdir vue-cart && cd vue-cart
npm init vite-app vue-cart
After initializing a Vite application, run this on your terminal:
初始化Vite应用程序后,在终端上运行此程序:
cd vue-cart
npm install
code . && npm run dev
The code . command will open up the project in visual studio code.
code . 命令将在Visual Studio代码中打开该项目。
We will continue by setting up our user interface for the application. You can get all our UI components from WrapPixel’s UI Kit.
我们将继续为应用程序设置用户界面。 您可以从WrapPixel的UI Kit中获得我们所有的UI组件。
WrapPixel is an online template store where you could get great UI templates and vue templates.
WrapPixel是一个在线模板商店,您可以在其中获得出色的UI模板和vue模板 。
Let’s create two components: product.vue and chart.vue. The product.Vue will list all our products and cart.vue will lists all items in our cart.
让我们创建两个组件: product.vue和chart.vue 。 product.Vue将列出我们所有的产品和cart.vue将列出我们购物车中的所有项目。
We need to configure Bootstrap into our application by adding the CDN into the index.html file.
我们需要通过将CDN添加到index.html文件中来将Bootstrap配置到我们的应用程序中。
We will only be interested in the bootstrap css CDN, so head over to the official bootstrap CDN and copy the CSS link and add it into the index.html file:
我们只会对引导CSS CDN感兴趣,因此请转到官方引导CDN并复制CSS链接并将其添加到index.html文件中:
<!DOCTYPE html>
<html lang="en">
<head>
  <meta charset="UTF-8">
  <link rel="icon" href="/favicon.ico" />
  <meta name="viewport" content="width=device-width, initial-scale=1.0">
  <title>Vite app</title>
  <link rel="stylesheet" href="https://stackpath.bootstrapcdn.com/bootstrap/4.5.2/css/bootstrap.min.css"
    integrity="sha384-JcKb8q3iqJ61gNV9KGb8thSsNjpSL0n8PARn9HuZOnIxN0hoP+VmmDGMN5t9UJ0Z" crossorigin="anonymous">
</head>
<body>
  <div id="app"></div>
  <script type="module" src="/src/main.js"></script>
</body>
</html>
With this we can now setup our component. We will start by creating our root Vuejs file and setup routing for our application.
这样,我们现在可以设置我们的组件了。 我们将首先创建根Vuejs文件并为应用程序设置路由。
Lets start by installing the Vue 3 router by running:
让我们开始运行以下命令安装Vue 3路由器:
npm i --save vue-router@v4.0.0-alpha.11After installing this we need to setup our routes for our application. We will have a basic routes to show our cart items.
安装后,我们需要为我们的应用程序设置路由。 我们将有一条基本路线来显示我们的购物车物品。
Create a router.js file inside the src directory and add the following codes:
在src目录中创建一个router.js文件,并添加以下代码:
import {
    createWebHistory,
    createRouter
} from "vue-router";
import Home from "./components/HelloWorld.vue";
import Product from './components/product.vue'
import Cart from './components/cart.vue'
const history = createWebHistory();
const routes = [{
    path: "/",
    component: Product
}, {
    path: "/cart",
    component: Cart
}, ];
const router = createRouter({
    history,
    routes
});
export default router;
Here, What we are basically doing is register our cart and product components as routes.
在这里,我们基本上要做的是将我们的购物车和产品组件注册为路线。
We have to register our routes in our main.js file:
我们必须在main.js文件中注册路线:
import {
    createApp
} from 'vue'
import App from './App.vue'
import './index.css'
import router from "./router";createApp(App).use(router).mount('#app')
With this done, we have to change our App.vue root component to this so that it will render all our components:
完成此操作后,我们必须将App.vue根组件更改为此,以便呈现所有组件:
<template>
  <nav class="navbar navbar-expand-lg navbar-light bg-info">
    <div class="container">
      <router-link to="/" class="navbar-brand">Vue Cart </router-link>
      <button
        class="navbar-toggler"
        type="button"
        data-toggle="collapse"
        data-target="#navbarNav"
        aria-controls="navbarNav"
        aria-expanded="false"
        aria-label="Toggle navigation"
      >
        <span class="navbar-toggler-icon"></span>
      </button>
      <div class="collapse navbar-collapse justify-content-end" id="navbarNav">
        <ul class="navbar-nav">
          <li class="nav-item active">
            <router-link to="/" class="nav-link">Home </router-link>
          </li>
          <li class="nav-item">
            <router-link to="/cart" class="nav-link">Cart </router-link>
          </li>
        </ul>
      </div>
    </div>
  </nav>
  <router-view />
</template>
<script>
import HelloWorld from "./components/HelloWorld.vue";
export default {
  name: "App",
  components: {
    HelloWorld,
  },
};
</script>
We can now setup our products card and make http request to our backend API.
现在,我们可以设置产品卡,并向我们的后端API发出http请求。
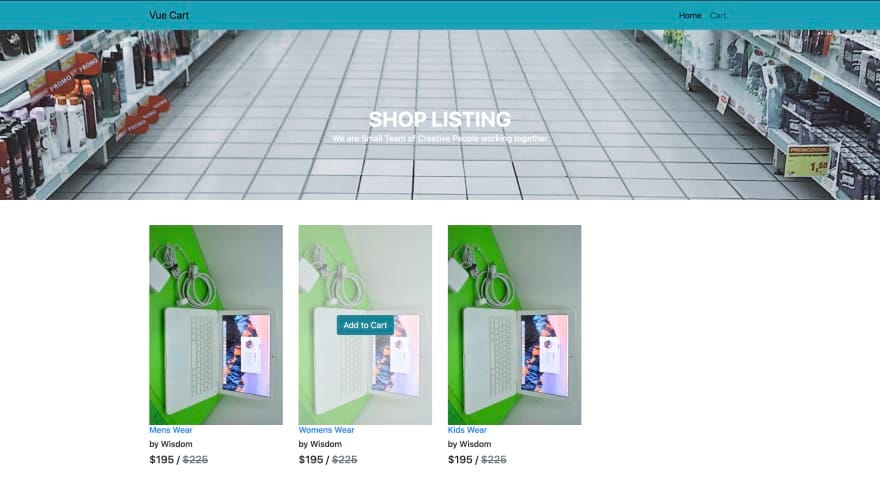
Lets create a simple user interface for our home page. Add this to the product.vue file:
让我们为我们的主页创建一个简单的用户界面。 将此添加到product.vue文件:
<template>
  <main>
    <section>
      <div
        class="banner-innerpage"
        style="
          background-image: url(https://images.pexels.com/photos/1005638/pexels-photo-1005638.jpeg?cs=srgb&dl=pexels-oleg-magni-1005638.jpg&fm=jpg);
        "
      >
        <div class="container">
          <!-- Row  -->
          <div class="row justify-content-center">
            <!-- Column -->
            <div
              class="col-md-6 align-self-center text-center"
              data-aos="fade-down"
              data-aos-duration="1200"
            >
              <h1 class="title">Shop listing</h1>
              <h6 class="subtitle op-8">
                We are small team of creative people working together
              </h6>
            </div>
            <!-- Column -->
          </div>
        </div>
      </div>
    </section>
    <section>
      <div class="spacer">
        <div class="container">
          <div class="row mt-5">
            <div class="col-lg-9">
              <div class="row shop-listing">
                <div class="col-lg-6">
                  <div class="card shop-hover border-0">
                    <img
                      src="https://images.pexels.com/photos/1005638/pexels-photo-1005638.jpeg?cs=srgb&dl=pexels-oleg-magni-1005638.jpg&fm=jpg"
                      alt="wrapkit"
                      class="img-fluid"
                    />
                    <div class="card-img-overlay align-items-center">
                      <button class="btn btn-md btn-info">
                        Add to cart
                      </button>
                    </div>
                  </div>
                  <div class="card border-0">
                    <h6><a href="#" class="link">Mens Wear </a></h6>
                    <h6 class="subtitle">by Wisdom</h6>
                    <h5 class="font-medium m-b-30">
                      $195 / <del class="text-muted line-through">$225</del>
                    </h5>
                  </div>
                </div>
              </div>
            </div>
          </div>
        </div>
      </div>
    </section>
  </main>
</template>
<style>
.banner-innerpage {
  padding: 150px 0 100px;
  background-size: cover;
  background-position: center center;
}
.banner-innerpage .title {
  color: #ffffff;
  text-transform: uppercase;
  font-weight: 700;
  font-size: 40px;
  line-height: 40px;
}
.banner-innerpage .subtitle {
  color: #ffffff;
}
.shop-listing .shop-hover {
  position: relative;
}
.shop-listing .shop-hover .card-img-overlay {
  display: none;
  background: rgba(255, 255, 255, 0.5);
  -webkit-box-pack: center;
  -webkit-justify-content: center;
  -ms-flex-pack: center;
  justify-content: center;
}
.shop-listing .shop-hover:hover .card-img-overlay {
  display: -webkit-box;
  display: -webkit-flex;
  display: -ms-flexbox;
  display: flex;
}
.shop-listing .shop-hover .label {
  padding: 5px 10px;
  position: absolute;
  top: 10px;
  right: 10px;
}
/*******************
shop table
*******************/
.shop-table td {
  padding: 30px 0;
}
</style>
This will create a simple user interface for our application. Up next we need to start consuming our endpoints. Start up the backend API that we created in our previous tutorial, after doing that we can now use javascript fetch to make request to the backend,
这将为我们的应用程序创建一个简单的用户界面。 接下来,我们需要开始使用端点。 启动在上一教程中创建的后端API,这样做之后,我们现在可以使用javascript fetch向后端提出请求,
Add the following script to the <script> section in the product component:
将以下脚本添加到产品组件的<script>部分中:
<script>
export default {
  data() {
    return {
      products: [],
    };
  },
  created() {
    this.getProducts();
  },
  methods: {
    async getProducts() {
      const res = await fetch("http://localhost:4000/product");
      const data = await res.json();
      this.products = new Proxy(data.data, {});
      console.log(this.products);
    },
  },
};
</script>
This will make a request to our backend API and get the list of all products and store the products in the products array defined inthe data instance.
这将向我们的后端API发出请求,并获取所有产品的列表,并将产品存储在数据实例中定义的products数组中。
We can now loop through our products using the Vuejs v-for directive by modifying the column that holds the product card to this:
现在,我们可以通过修改包含产品卡的列,使用Vuejs v-for指令遍历我们的产品:
<div
          class="col-lg-4"
          v-for="product in products"
          :key="product._id"
          >
          <div class="card shop-hover border-0">
          <img
          :src="'http://localhost:4000/' + product.image"
          alt="wrapkit"
          class="img-fluid"
          />
            <div class="card-img-overlay align-items-center">
             <button class="btn btn-md btn-info">
                Add to Cart
             </button>
            </div>
          </div>
          <div class="card border-0">
             <h6>
                <a href="#" class="link">{{ product.name }} </a>
             </h6>
             <h6 class="subtitle">by Wisdom</h6>
             <h5 class="font-medium m-b-30">
                $195 / <del class="text-muted line-through">$225</del>
             </h5>
          </div>
     </div>
This will list all the products stored in our database
这将列出存储在我们数据库中的所有产品
Now lets add the add to cart feature. We will create a method which will take the product Id and a default quantity as one and then send it to our backend.
现在让我们添加add to cart功能。 我们将创建一个将产品ID和默认数量作为一个方法,然后将其发送到我们的后端。
Lets define our addToCart methods:
让我们定义我们的addToCart方法:
async addToCart(id, quantity) {
      try {
        const response = await fetch("http://localhost:4000/cart", {
          method: "POST",
          body: JSON.stringify({
            productId: id,
            quantity: quantity,
          }),
          headers: {
            "Content-type": "application/json; charset=UTF-8",
          },
        });
        let data = await response.json();
        alert("Item added to cart");
        console.log(data);
      } catch (err) {
        alert("Something went wrong");
        console.log(err);
      }
    },
After doing this we have to add the click even to our button to trigger the method:
完成此操作后,我们必须将click甚至添加到我们的按钮上,以触发该方法:
<button
    class="btn btn-md btn-info"
    @click="addToCart(product._id, 1)"
    >
      Add to Cart
 </button>
Here we pass the productid and the default quantity as 1.
在这里,我们将productid和默认数量传递为1。
We can now start working on the viewing of cart items, incrementing of cart ttems and emptying of cart.
现在,我们可以开始查看购物车项目,增加购物车的数量和清空购物车。
Lets head over to our cart.vue component and build our user interface:
让我们cart.vue组件并构建我们的用户界面:
<template>
  <main>
    <section>
      <div
        class="banner-innerpage"
        style="
          background-image: url(https://images.pexels.com/photos/1005638/pexels-photo-1005638.jpeg?cs=srgb&dl=pexels-oleg-magni-1005638.jpg&fm=jpg);
        "
      >
        <div class="container">
          <!-- Row  -->
          <div class="row justify-content-center">
            <!-- Column -->
            <div
              class="col-md-6 align-self-center text-center"
              data-aos="fade-down"
              data-aos-duration="1200"
            >
              <h1 class="title">Cart</h1>
              <h6 class="subtitle op-8">
                We are small team of creative people working together.
              </h6>
            </div>
            <!-- Column -->
          </div>
        </div>
      </div>
    </section>
    <section>
      <div class="spacer">
        <div class="container">
          <div class="row mt-5">
            <div class="col-lg-9">
              <div class="row shop-listing">
                <table class="table shop-table">
                  <tr>
                    <th class="b-0">Image</th>
                    <th class="b-0">Name</th>
                    <th class="b-0">Price</th>
                    <th class="b-0">Quantity</th>
                    <th class="b-0 text-right">Total Price</th>
                  </tr>
                  <tr>
                    <td>
                      <img
                        src="../assets/images/innerpage/shop/1.jpg"
                        width="200"
                        alt="wrapkit"
                      />
                    </td>
                    <td>
                      Mens Wear
                    </td>
                    <td>
                      $3000
                    </td>
                    <td>
                      <button class="btn btn-primary btn-sm">+</button> 3
                      <button class="btn btn-primary btn-sm">
                        -
                      </button>
                    </td>
                    <td class="text-right">
                      <h5 class="font-medium m-b-30">
                        $195
                      </h5>
                    </td>
                  </tr>
                  <tr>
                    <td colspan="4" align="right">Subtotal :$1000</td>
<td colspan="4" align="right">
                      <button class="btn btn-danger">Empty Cart</button>
                    </td>
                  </tr>                </table>
              </div>
            </div>
          </div>
        </div>
      </div>
    </section>
  </main>
</template>
This will give us this simple user interface:
这将为我们提供以下简单的用户界面:
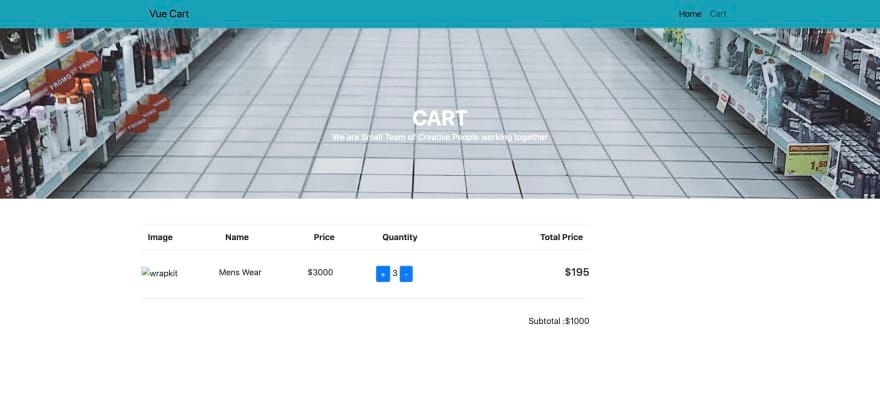
Let’s implement getting of all cart items by creating a method to get all the item from our backend:
让我们通过创建一种从后端获取所有商品的方法来实现所有购物车商品的获取:
<script>
export default {
  data() {
    return {
      carts: {},
    };
  },
  methods: {
    async getCartItems() {
      try {
        const res = await fetch("http://localhost:4000/cart");
        const data = await res.json();
        this.carts = new Proxy(data.data, {});
        console.log(this.carts);
      } catch (err) {
        console.log(err);
      }
    },
  },
  created() {
    this.getCartItems();
  },
};
</script>
We can now loop through our cart items by modifying our table to this:
现在,我们可以通过将表修改为以下内容来遍历购物车项目:
<table class="table shop-table">
                      <tr>
                        <th class="b-0">Name</th>
                        <th class="b-0">Price</th>
                        <th class="b-0">Quantity</th>
                        <th class="b-0 text-right">Total Price</th>
                      </tr>
                      <tr v-for="(item, id) in carts.items" :key="id">
                        <td>{{ item.productId.name }}</td>
                        <td>{{ item.productId.price }}</td>
                        <td>
                          <button
                            class="btn btn-primary btn-sm"
                            @click="increaseQty(item.productId._id)"
                          >+</button>
                          {{ item.quantity }}
                          <button
                            class="btn btn-primary btn-sm"
                          >-</button>
                        </td>
                        <td class="text-right">
                          <h5 class="font-medium m-b-30">{{ item.total }}</h5>
                        </td>
                      </tr>
                      <tr>
                        <td colspan="3" align="right">Subtotal :{{ carts.subTotal }}</td>
                        <td colspan="4" align="right">
                          <button class="btn btn-danger">Empty Cart</button>
                        </td>
                      </tr>
                    </table>
We can now implement the increment in cart item quantity by adding a method to increment it:
现在,我们可以通过添加增加其数量的方法来实现购物车项目数量的增加:
async increaseQty(id) {
      try {
        const res = await fetch("http://localhost:4000/cart", {
          method: "POST",
          body: JSON.stringify({
            productId: id,
            quantity: 1,
          }),
          headers: {
            "Content-type": "application/json; charset=UTF-8",
          },
        });
        this.getCartItems();
        alert("Item Increamented");
      } catch (err) {
        console.log(err);
      }
    },
And then add a click even to listen to this method:
然后添加一个单击,甚至收听此方法:
<button
   class="btn btn-primary btn-sm"
   @click="increaseQty(item.productId._id)"
   >+
</button>
Clicking on the + button will increment the quantity of the items and also update the prices.
单击+按钮将增加商品数量并更新价格。
Lets implement the empty cart feature. This will empty our cart and then redirect us to the product listing page. Create a method to do this:
让我们实现空购物车功能。 这将清空我们的购物车,然后将我们重定向到产品列表页面。 创建一个方法来做到这一点:
async emptyCart() {
      try {
        const res = await fetch("http://localhost:4000/cart/empty-cart", {
          method: "DELETE",
        });
        const data = await res.json();
        this.$router.push({
          path: "/",
        });
      } catch (err) {
        console.log(err);
      }
    },
Then we add an event listener to listen to this method:
然后,我们添加一个事件侦听器来侦听此方法:
<button class="btn btn-danger" @click="emptyCart">Empty cart</button>行使 (Exercise)
- Implement the decrement feature 实施减量功能
- Implement remove product from cart 实施从购物车中删除产品
After implementing this, push your work to git and add the link in the comment section. Lets have some Fun😁
完成此操作后,将您的工作推送到git并将链接添加到注释部分。 让我们玩得开心😁
翻译自: https://medium.com/swlh/build-a-shopping-cart-in-js>nodejs-and-vue-vite-8378694ea4b
相关文章

mysql视图使用详解_MySQL笔记之视图的使用详解
javascript理解_javascript理解吊装
mysql视图函数和存储_MySQL视图和存储过程
arch 关闭独显_arch linux下关闭双显卡,没关之前独显是100%运行的
js 循环拆词_使用nodejs写一个拆词器和问答实现的AI模块
入门javascript_现代javascript箭头功能入门
python中定义一个空的字符串_python – 在一行中创建n个空字符串