mern全栈开发pdf
In this tutorial, we will be creating a simple application for user authentication using MERN Stack(MongoDB for our database, Express and Node for our backend, and React for our frontend). We will be taking the help of Express js to create the authentication endpoints and also make the MongoDB connection to store the user’s data in it. We will use react and react-hook for state management on our frontend.
在本教程中,我们将使用MERN Stack(用于数据库的MongoDB,用于后端的Express和Node以及用于前端的React)创建一个用于用户身份验证的简单应用程序。 我们将在Express js的帮助下创建身份验证终结点,并建立MongoDB连接以在其中存储用户数据。 我们将在前端使用react和react-hook进行状态管理。
This article will focus only on the usage of JWT for providing authentication to our REST APIs. If you want to read more about Authentication Workflow with JSON Web Tokens, I suggest you follow this article.
本文仅关注JWT为REST API提供身份验证的用法。 如果您想了解有关使用JSON Web令牌进行身份验证工作流的更多信息,建议您阅读本文 。
在这一部分(服务器端),我们将涵盖以下主题: (In this part (Serverside), we will cover the following topics:)
Set up backend using
npmand install the necessary packages.使用
npm设置后端并安装必要的软件包。Set up a MongoDB database using
mongoDB atlas cloud.使用
mongoDB atlas cloud建立MongoDB数据库。Create a database schema to define a
Userfor registration and login purposes.创建数据库架构以定义用于注册和登录目的的
User。Set up two API routes
registerandloginusingjsonwebtokenfor authentication and build input validation without any dependencies.设置两个使用
jsonwebtoken进行身份验证的API路由register和login,并建立没有任何依赖关系的输入验证。Test our API routes using
Postman.使用
Postman测试我们的API路由。
先决条件 (Pre-requisites)
Before we get started, install all the tools we are going to need to set up our application.
在开始之前,请安装设置应用程序所需的所有工具。
Nodejs
Nodejs
MongoDB
MongoDB
create-react-app
创建React应用
Visual Studio Code
Visual Studio程式码
设置后端 (Set up backend)
Create a project folder in your workspace to build REST API (backend) and run the following command.
在工作空间中创建一个项目文件夹以构建REST API(后端)并运行以下命令。
npm initAfter running the command, package.json will be created and set up index.js as the default entry point.
运行该命令后,将创建package.json并将index.js设置为默认入口点。
安装NPM软件包 (Install NPM Packages)
Next, install the NPM dependencies by running the given below command.
接下来,通过运行以下给定命令安装NPM依赖项。
npm i express jsonwebtoken bcrypt body-parser
cors mongoose dotenv
Brief information about each package and why we are using this to build rest APIs
有关每个程序包的简要信息,以及我们为何使用此程序来构建其余的API
express: Express is a nodejs web application framework that helps in creating rest APIs.express:Express是一个nodejs Web应用程序框架,可帮助创建其余的API。brcypt: A library to hash passwords.brcypt:用于散列密码的库。body-parser: It is used to parse incoming request bodies in a middleware.body-parser:用于解析中间件中的传入请求主体。jsonwebtoken: This package creates a token used for authorization for secure communication between client and server.jsonwebtoken:此程序包创建一个令牌,用于授权客户端和服务器之间的安全通信。mongoose: Mongoose is an Object Data Modeling (ODM) library for MongoDB and Node. js that allows you to interact with MongoDB database.mongoose:Mongoose是用于MongoDB和Node的对象数据建模(ODM)库。 允许您与MongoDB数据库进行交互的js。cors: CORS is a node.js package for providing a Connect/Express middleware that can be used to enable CORS with various options.cors:CORS是用于提供Connect / Express中间件的node.js软件包,可用于启用具有各种选项的CORS 。dotenv: Dotenv is a zero-dependency module that loads environment variables from a.envfile.dotenv:Dotenv是一个零依赖模块,可从.env文件中加载环境变量。
Let's install nodemon which helps in monitoring and starting the node server when any change occurs in the server files.
让我们安装nodemon,当服务器文件中发生任何更改时,它有助于监视和启动节点服务器。
npm i -D nodemonOur package.json should look like following at this moment.
现在,我们的package.json应该如下所示。
{
 "name": "mern-auth",
 "version": "1.0.0",
 "description": "MERN Stack User Authentication",
 "main": "index.js",
 "scripts": {
   "start": "nodemon index.js",
   "test": "echo \"Error: no test specified\" && exit 1"
 },
 "author": "Anand Shrestha",
 "license": "ISC",
 "dependencies": {
    "bcrypt": "^5.0.0",
    "body-parser": "^1.19.0",
    "cors": "^2.8.5",
    "dotenv": "^8.2.0",
    "express": "^4.17.1",
    "jsonwebtoken": "^8.5.1",
    "mongoose": "^5.9.27"
},
 "devDependencies": {
   "nodemon": "^2.0.4"
 }
}
设置我们的express.js服务器 (Setting up our express.js server)
Here’s the simplest form of code: index.js that says Welcome to the mern auth tutorial! Server is running on 8000on the console when you run npm start
这是最简单的代码形式: index.js表示Welcome to the mern auth tutorial! Server is running on 8000 当您运行npm start时, Welcome to the mern auth tutorial! Server is running on 8000在控制台Welcome to the mern auth tutorial! Server is running on 8000上运行
const express = require('express');
const app = express();const port = 8000;app.listen(port, () => {
 console.log(`
});
设置环境文件并将我们的服务器与MongoDB连接 (Setting up the env file and connecting our server with MongoDB)
Let’s create .env file on the root folder by running the commandtouch .env
让我们通过运行命令touch .env在根文件夹上创建.env文件。
Before we created our schema, have a look at this tutorial to set up a MongoDB database on MongoDB atlas cloud. This article provides detailed information on how to set up MongoDB atlas.
在创建架构之前,请查看本教程以在MongoDB Atlas云上设置MongoDB数据库。 本文提供有关如何设置MongoDB地图集的详细信息。
By following the above article you will have MongoDB URL which we will connect with our express server.
通过阅读上面的文章,您将获得MongoDB URL,我们将其连接到快递服务器。
Add the following variables for port and database URL on our .env file.
在我们的.env文件中为端口和数据库URL添加以下变量。
PORT=8000
DATABASE=mongodb+srv://<username>:<password>@cluster0.suxf5.mongodb.net/<dbname>?retryWrites=true&w=majority
Replace your username(<username> and password(<password>) of MongoDB atlas cloud along with the database name you created(<dbname>).
替换您的MongoDB Atlas云用户名(<用户名>和密码(<password>),以及您创建的数据库名(<dbname>)。
Next, we are going to test our MongoDB connection with our express server. Add the following code on our index.js file
接下来,我们将测试与快速服务器的MongoDB连接。 在我们的index.js文件中添加以下代码
const express = require('express');
const mongoose = require('mongoose');
const cors = require('cors');
const bodyParser = require('body-parser');
require('dotenv').config();//app
const app = express();// db
mongoose
 .connect(process.env.DATABASE,{
    useNewUrlParser: true,
    useCreateIndex: true,
    useUnifiedTopology: true
})
 .then(() => console.log('DB Connected'));
//middlewares
app.use(bodyParser.json());
app.use(cors());const port = process.env.PORT || 8000;app.listen(port, () => {
  console.log(`Server is running on ${port}`)
});
You will see the following on your console.
您将在控制台上看到以下内容。

Congratulations!! we have successfully connected our MongoDB database with our express server.
恭喜!! 我们已成功将MongoDB数据库与快递服务器连接。
定义用户架构 (Define User Schema)
Next, we are going to define user schema using mongoose ODM. It allows us to retrieve the data from the database. Let’s create a models folder to define our user schema and create a User.js file in it.
接下来,我们将使用猫鼬ODM定义用户架构。 它使我们能够从数据库中检索数据。 让我们创建一个models文件夹来定义我们的用户模式,并在其中创建User.js文件。
mkdir models
cd models
touch User.js
Add the following code in models/User.js file:
在models / User.js文件中添加以下代码:
const mongoose = require('mongoose');
const Schema = mongoose.Schema;let userSchema = new Schema({
   name:{
      type: String,
      required: true
   },
   email: {
      type: String,
      required: true
   },
   password: {
      type: String,
      required: true
   }
},{
   timestamps: true,
   collection: 'users'
})module.exports = mongoose.model('User', userSchema);
This is pretty straightforward, we have created user schema by defining fields and types as objects of the Schema.
这非常简单,我们通过将字段和类型定义为架构的对象来创建用户架构。
在Node中设置基于安全令牌的身份验证REST API (Set up Secure Token-based Authentication REST APIs in Node)
To build secure user authentication Rest APIs in node, let’s create routes folder and auth.js file in it.
要在node中构建安全的用户身份验证Rest API,让我们在其中创建路由文件夹和auth.js文件。
mkdir routes
cd routes
touch auth.js
Here, we will define two endpoints signup and signin like following.
在这里,我们将定义两个端点signup和signin ,如下所示。
const express = require('express');
const router = express.Router();const { signup, signin } = require('../controllers/auth');router.post('/signup', signup);
router.post('/signin', signin);module.exports = router;
We have imported our two methods signin and signup from controllers which we haven’t created yet so let’s create controllers folder and add auth.js file in it and put all our authentication logic there.
我们从尚未创建的控制器中导入了signin和signup这两种方法,因此让我们创建controllers文件夹并在其中添加auth.js文件,并将所有身份验证逻辑放在此处。
mkdir controllers
cd controllers
touch auth.js
Let’s create two methods signin and signup on our auth.js file.
让我们创建两个方法signin并signup我们的auth.js文件。
const User = require('../models/User');
const jwt = require('jsonwebtoken');
const bcrypt = require('bcrypt');
const {
   createJWT,
} = require("../utils/auth");exports.signup = (req, res, next) => {
  let { name, email, password, password_confirmation } = req.body;
  User.findOne({email: email})
   .then(user=>{
      if(user){
         return res.status(422).json({ errors: [{ user: "email already exists" }] });
      }else {
         const user = new User({
           name: name,
           email: email,
           password: password,
         });         bcrypt.genSalt(10, function(err, salt) { bcrypt.hash(password, salt, function(err, hash) {
         if (err) throw err;
         user.password = hash;
         user.save()
             .then(response => {
                res.status(200).json({
                  success: true,
                  result: response
                })
             })
             .catch(err => {
               res.status(500).json({
                  errors: [{ error: err }]
               });
            });
         });
      });
     }
  }).catch(err =>{
      res.status(500).json({
        errors: [{ error: 'Something went wrong' }]
      });
  })
}exports.signin = (req, res) => {
     let { email, password } = req.body;     User.findOne({ email: email }).then(user => {
       if (!user) {
         return res.status(404).json({
           errors: [{ user: "not found" }],
         });
       } else {
          bcrypt.compare(password, user.password).then(isMatch => {
             if (!isMatch) {
              return res.status(400).json({ errors: [{ password:
"incorrect" }]
              });
             }       let access_token = createJWT(
         user.email,
         user._id,
         3600
       );
       jwt.verify(access_token, process.env.TOKEN_SECRET, (err,
decoded) => {
         if (err) {
            res.status(500).json({ erros: err });
         }
         if (decoded) {
             return res.status(200).json({
                success: true,
                token: access_token,
                message: user
             });
           }
         });
        }).catch(err => {
          res.status(500).json({ erros: err });
        });
      }
   }).catch(err => {
      res.status(500).json({ erros: err });
   });
}
Let’s create a utils folder and add auth.js file in it where we will make a method to sign a jwt token including our payload, expiry time, and token secret.
让我们创建一个utils文件夹并在其中添加auth.js文件,在此我们将制作一种方法来签名jwt令牌,包括我们的有效负载,有效时间和令牌密钥。
const jwt = require("jsonwebtoken");exports.createJWT = (email, userId, duration) => {
   const payload = {
      email,
      userId,
      duration
   };   return jwt.sign(payload, process.env.TOKEN_SECRET, {
     expiresIn: duration,
   });
};
注册逻辑 (Sign up Logic)
Check if the user exists or not, if the user already exists, throw errors with the message
email already exists.检查该用户是否存在,如果该用户已经存在,则在消息
email already exists.引发错误email already exists.If the user is a new user, use
bcryptto hash the password before storing it in your database如果该用户是新用户,请先使用
bcrypt对密码进行哈希处理,然后再将其存储在数据库中- Save data(name, email, and password) in MongoDB. 将数据(名称,电子邮件和密码)保存在MongoDB中。
登录逻辑 (Sign in Logic)
Check if the user exists or not, if user not exists, throw errors with the message
user not found.检查用户是否存在,如果用户不存在,则用错误消息
user not found抛出错误。If the user exists, we are checking whether the assigned and retrieved passwords are the same or not using the
bcrypt.compare()method.如果用户存在,我们将使用
bcrypt.compare()方法检查分配的密码和检索的密码是否相同。Sign our
jwtand set the JWT token expiration time. Token will be expired within the defined duration which is 1hr in our current code.签署我们的
jwt并设置JWT令牌的到期时间。 令牌将在我们当前代码中规定的1小时内过期。- If succeed send the token in our response with success status(200) and user information. 如果成功,则在响应中发送令牌,并提供成功状态(200)和用户信息。
在我们的Express API中设置表单验证 (Setting up form validation in our express APIs)
Next, we will implement validation in Express auth API using POST body request. We won’t use any dependencies for input validation instead we will validate every request and push into errors array. Our final auth.js file on controllers folder will look like this.
接下来,我们将使用POST正文请求在Express auth API中实现验证。 我们将不使用任何依赖项来进行输入验证,而是将验证每个请求并将其放入错误数组。 我们在controllers文件夹中的最终auth.js文件将如下所示。
const User = require('../models/User');
const jwt = require('jsonwebtoken');
const bcrypt = require('bcrypt');
const {
   createJWT,
} = require("../utils/auth");const emailRegexp = /^[a-zA-Z0-9.!#$%&'*+/=?^_`{|}~-]+@[a-zA-Z0-9](?:[a-zA-Z0-9-]{0,61}[a-zA-Z0-9])?(?:\.[a-zA-Z0-9](?:[a-zA-Z0-9-]{0,61}[a-zA-Z0-9])?)*$/;exports.signup = (req, res, next) => {
  let { name, email, password, password_confirmation } = req.body;  let errors = [];
  if (!name) {
    errors.push({ name: "required" });
  }  if (!email) {
    errors.push({ email: "required" });
  }  if (!emailRegexp.test(email)) {
    errors.push({ email: "invalid" });
  }  if (!password) {
    errors.push({ password: "required" });
  }  if (!password_confirmation) {
    errors.push({
     password_confirmation: "required",
    });
  }  if (password != password_confirmation) {
    errors.push({ password: "mismatch" });
  }  if (errors.length > 0) {
    return res.status(422).json({ errors: errors });
  } User.findOne({email: email})
    .then(user=>{
       if(user){
          return res.status(422).json({ errors: [{ user: "email already exists" }] });
       }else {
         const user = new User({
           name: name,
           email: email,
           password: password,
         }); bcrypt.genSalt(10, function(err, salt) { bcrypt.hash(password, salt, function(err, hash) {
         if (err) throw err;
         user.password = hash;
         user.save()
             .then(response => {
                res.status(200).json({
                  success: true,
                  result: response
                })
             })
             .catch(err => {
               res.status(500).json({
                  errors: [{ error: err }]
               });
            });
         });
      });
     }
  }).catch(err =>{
      res.status(500).json({
        errors: [{ error: 'Something went wrong' }]
      });
  })
}
exports.signin = (req, res) => {
     let { email, password } = req.body;     let errors = [];
     if (!email) {
       errors.push({ email: "required" });
     }     if (!emailRegexp.test(email)) {
       errors.push({ email: "invalid email" });
     }     if (!password) {
       errors.push({ passowrd: "required" });
     }     if (errors.length > 0) {
      return res.status(422).json({ errors: errors });
     }     User.findOne({ email: email }).then(user => {
        if (!user) {
          return res.status(404).json({
            errors: [{ user: "not found" }],
          });
        } else {
           bcrypt.compare(password, user.password).then(isMatch => {
              if (!isMatch) {
               return res.status(400).json({ errors: [{ password:
"incorrect" }]
               });
              }       let access_token = createJWT(
          user.email,
          user._id,
          3600
       );
       jwt.verify(access_token, process.env.TOKEN_SECRET, (err,
decoded) => {
         if (err) {
            res.status(500).json({ erros: err });
         }
         if (decoded) {
             return res.status(200).json({
                success: true,
                token: access_token,
                message: user
             });
           }
         });
        }).catch(err => {
          res.status(500).json({ erros: err });
        });
      }
   }).catch(err => {
      res.status(500).json({ erros: err });
   });
}
Here we validate every input form data like empty fields, email type, password mismatch and if there are any errors then we returnerrors objects on response.
在这里,我们验证每个输入表单数据,例如空字段,电子邮件类型,密码不匹配,如果有任何错误,则在响应时返回errors对象。
Update a index.js file in the root project’s folder and paste the following code in it.
更新根项目文件夹中的index.js文件,并将以下代码粘贴到其中。
const express = require('express');
const mongoose = require('mongoose');
const cors = require('cors');
const bodyParser = require('body-parser');
require('dotenv').config();//import routes
const authRoutes = require('./routes/auth');
const { db } = require('./models/User');//app
const app = express();// db
mongoose
  .connect(process.env.DATABASE,{
      useNewUrlParser: true,
      useCreateIndex: true,
      useUnifiedTopology: true
   })
  .then(() => console.log('DB Connected'));//middlewares
app.use(bodyParser.json());
app.use(cors());//routes middleware
app.use('/api', authRoutes);const port = process.env.PORT || 8000;app.listen(port, () => {
  console.log(`Server is running on ${port}`)
});
使用Postman测试我们的注册端点: (Testing our Sign up endpoint using Postman:)
Request URL: http://localhost:8000/api/signup
要求网址: http:// localhost:8000 / api / signup
Set method Type to
POST将方法类型设置为
POST- Switch to body tab, choose raw, fill data in JSON objects, and hit send. 切换到主体选项卡,选择原始数据,将数据填充到JSON对象中,然后点击发送。

Congrats we have successfully completed signup API. You can check on the MongoDB database for confirmation where you can see data you just created.
恭喜,我们已成功完成注册API。 您可以检查MongoDB数据库以获得确认,您可以在其中查看刚刚创建的数据。
Let’s test validation errors for sign up endpoint.
让我们测试注册端点的验证错误。
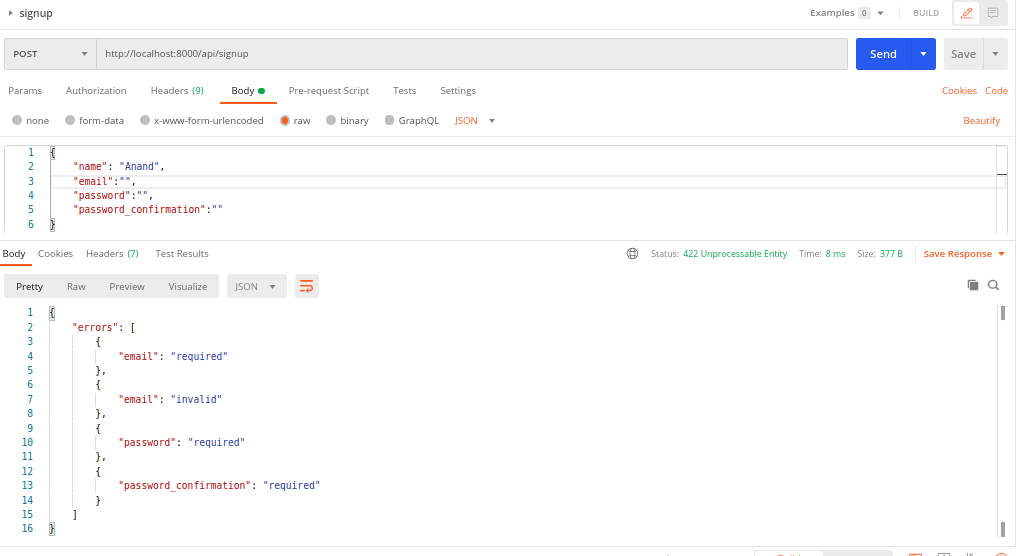
Whenever we miss any input field we will see our errors object returned. We can play with various conditions to check errors objects.
每当我们错过任何输入字段时,我们都会看到返回的错误对象。 我们可以使用各种条件来检查错误对象。
使用Postman测试我们的登录端点: (Testing our Sign in endpoint using Postman:)
Request URL: http://localhost:8000/api/signin
请求网址: http:// localhost:8000 / api /登录
Set method Type to
POST将方法类型设置为
POST- Switch to body tab, choose raw, fill data in JSON objects, and hit send. 切换到主体选项卡,选择原始数据,将数据填充到JSON对象中,然后点击发送。
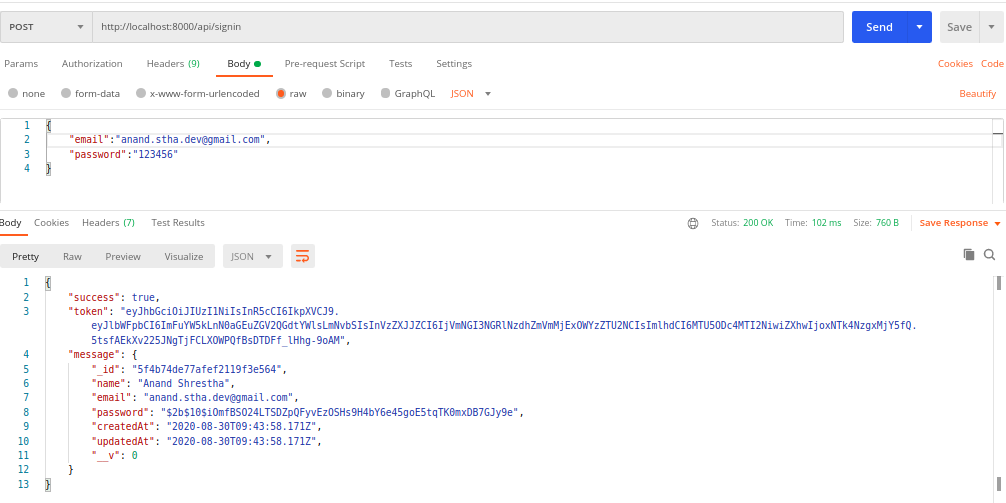
We have successfully returned our token on sign-in endpoint with status 200 and user information. Lets test validation on the sign-in endpoint.
我们已成功在登录端点上以状态200和用户信息返回了令牌。 在登录端点上进行测试验证。
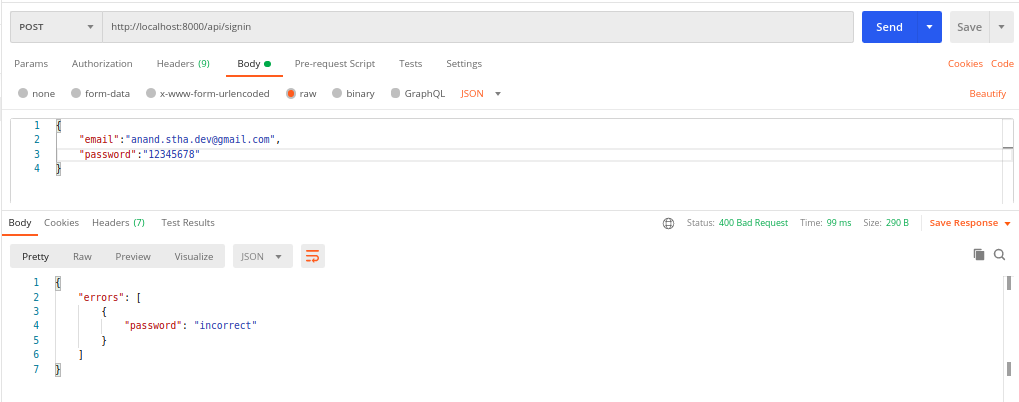
We can see password incorrect errors on our response while testing validation error on our sign-in endpoint. You can play around with different cases and see errors object accordingly.
在登录端点上测试验证错误时,我们会在响应中看到密码错误错误。 您可以处理不同的情况,并相应地查看错误对象。
结论 (Conclusion)
Finally, we have completed our backend part where we created secure Token-Based Authentication REST API. So far, In this tutorial, we have learned how to securely store the password in the database using the hash method with bcrypt , how to create a JWT token to communicate with the client and a server using jsonwebtoken. We also implemented custom input validation and successfully tested endpoints which we will use on our frontend.
最后,我们完成了后端部分,在其中创建了安全的基于令牌的身份验证REST API。 到目前为止,在本教程中,我们已经学习了如何使用带bcrypt的hash方法将密码安全地存储在数据库中,如何使用jsonwebtoken创建JWT令牌以与客户端和服务器进行jsonwebtoken 。 我们还实现了自定义输入验证并成功测试了将在前端使用的端点。
In Part 2, we’ll create our frontend using React, react-hook for state management and begin to use axios to fetch data from our server.
在第2部分中 ,我们将使用React创建前端,进行状态管理的react-hook ,并开始使用axios从服务器获取数据。
I hope you liked this tutorial, please share it with others, thanks for reading!
希望您喜欢本教程,请与他人分享,感谢阅读!
翻译自: https://medium.com/swlh/user-authentication-using-mern-stack-part-1-backend-cd4d193f15b1
mern全栈开发pdf
相关文章

Linux 限制root用户远程登录-ssh
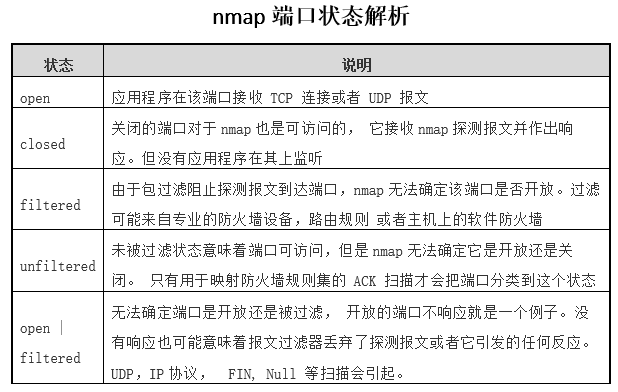
nmap端口状态解析
安装Docker,配置阿里云加速和 docker-compose 国内镜像
Python 日期和时间(转)
Linux 关闭Telnet服务
使用React测试库进行交互测试
