GitHub link:https://github.com/mehulk05/Two-way-data-binding-between-components
GitHub链接: https : //github.com/mehulk05/Two-way-data-binding-between-components
Live Url:https://mehulk05.github.io/Two-way-data-binding-between-components/
实时网址: https : //mehulk05.github.io/Two-way-data-binding-between-components/
One of the major features of angular is two-way data binding in components. But, Angular also focuses on splitting the work into smaller components. Now there can be situations where you have split your task into the smaller components but then you come up with another requirement that you also want two-way data binding between your components. How you will achieve it. In this article, we will look at the same concept of two-way data binding between your two components from scratch.
角度的主要特征之一是组件中的双向数据绑定。 但是,Angular还致力于将工作分解为较小的组件。 现在有些情况下,您已将任务拆分为较小的组件,但是又提出了另一个要求,即您还希望在组件之间进行双向数据绑定。 您将如何实现它。 在本文中,我们将从头开始研究两个组件之间双向数据绑定的相同概念。
什么是双向数据绑定 (What is two-way data binding)
Two-way data binding can be achieved using a ngModel directive in Angular. The below syntax shows the data binding using (ngModel), which is the combination of both the square brackets of property binding and parentheses of the event binding.
结合可以用在角一ngModel指令来实现双向数据 - 两个 。 以下句法示出了使用(ngModel),这是两者的方括号的属性绑定和事件的括号结合的组合中的数据绑定 。
<input type="text" [(ngModel)] = 'val' />Before using ngModel to achieve two-way data binding, it’s very important to import the FormsModule from @angular/forms in the app.module.ts file as shown below. FormsModule will contain the ngModule directive.
在使用ngModel实现双向数据绑定之前,非常重要的是从app.module.ts文件中的@ angular / forms导入FormsModule,如下所示。 FormsModule将包含ngModule指令。
Filename app.module.ts
文件名app.module.ts
import { NgModule } from '@angular/core';
import { BrowserModule } from '@angular/platform-browser';
import { FormsModule } from "@angular/forms";
 import { AppComponent } from './app.component';
import { FormsModule } from "@angular/forms";
 @NgModule({
   imports: [BrowserModule, FormsModule],
   declarations: [ AppComponent],
   bootstrap: [AppComponent]
})
export class AppModule { }
If you do not import the FormsModule, then you will get Template parse errors and it will result in this error:
如果不导入FormsModule,则将收到模板解析错误,并且将导致此错误:
“Can’t bind to ‘ngModel’ since it is not a known property of ‘input’”.
“无法绑定到'ngModel',因为它不是'input'的已知属性”。
After importing the FormsModule, you can go ahead and bind data using (ngModel) as shown below.
导入FormsModule后,您可以继续使用(ngModel)绑定数据,如下所示。
Filename app.component.ts
文件名app.component.ts
import { Component } from '@angular/core';
 @Component({
   selector: 'app-example',
   template: `
               Enter the value  : <input [(ngModel)] ='val'>
               <br>
                Entered value is:  {{val}}
             `
})
export class AppComponent {
   val: string = '';
}
两个组件之间的两种方式数据绑定 (Two way-data bindings between two components)
Before we begin let's have a little overview about the project we are going to build
在我们开始之前,让我们先概述一下我们将要构建的项目
Overview
总览
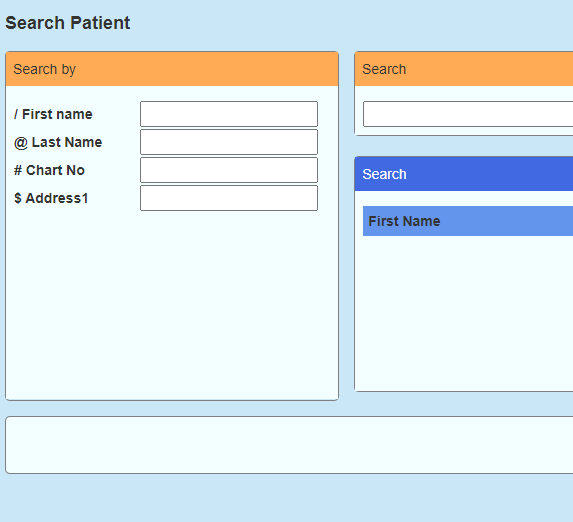
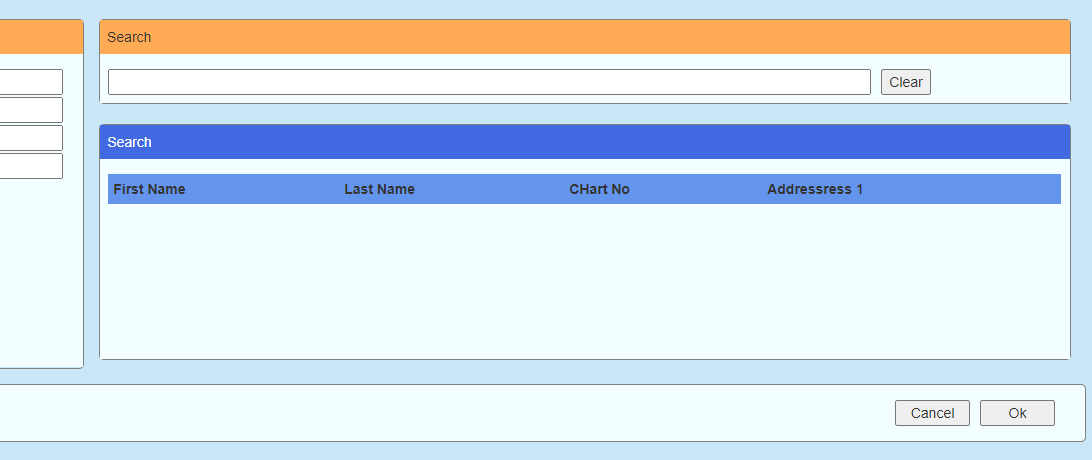
In the project, we are going to have two-part i.e left-form and right-form
在项目中,我们将分为两部分,即左形式和右形式
The left form has 4 input fields. All input fields are associated with their input symbols. When the value if filled and clicked enter, the value will be reflected in the right form with the respective symbol.
左边的表格有4个输入字段。 所有输入字段均与其输入符号相关联。 输入并单击该值后,该值将以正确的形式显示,并带有相应的符号。
When the symbol is entered in the right form and some value is entered that value should be reflected in the left form immediately on every click event. Also, we have a clear button in the right form so when we click on it all the input value should be cleared in both the forms.
当以正确的形式输入符号并输入一些值时,该值应在每次单击事件时立即以左侧的形式反映出来。 另外,我们在正确的表单中有一个清除按钮,因此当我们单击它时,所有输入值都应在两个表单中清除。
So let’s begin by creating a brand new project and then creating two components and service to create two-way data binding between our components
因此,让我们从创建一个全新的项目开始,然后创建两个组件和服务以在我们的组件之间创建双向数据绑定
Step1: Create a new Angular project
步骤1:创建一个新的Angular项目
ng new Two-way-binding
cd Two-way-binding
ng serve
Step 2: Create two components and service
步骤2:创建两个组件和服务
ng g c left-form
ng g c right-form
ng g s shared/shared
ng g s shared/labeldata
ng g s shared/symboldata
In the above command, ng is an angular provided module. g stands for generate , c stands for component and left-form is the component name. Similarly, ng g s shared/shared where g stands for generate ,s stands for service.
在上面的命令中,ng是提供角度的模块。 g代表generate,c代表组件,left-form是组件名称。 同样,ng gs shared / shared其中g代表generate,s代表服务。
Step 3: Creating 4 fields in the left-form component.
步骤3:在左侧表单组件中创建4个字段。
left-form.html
left-form.html
<div class="left-search-by-form col-md-3">
    <p>Search by</p>
    <div class="search-form-body">


        <label>{{symbol.fname}} {{label.fname}}</label>
        <input type="text" [(ngModel)]="fname" (keyup.enter)="handleInput_On_Enter(fname)">
        <br>


        <label>{{symbol.lname}} {{label.lname}}</label>
        <input type="text" [(ngModel)]="lname" (keyup.enter)="handleInput_On_Enter(lname)">
        <br>


        <label>{{symbol.chartno}} {{label.chartno}}</label>
        <input type="text" [(ngModel)]="chartno" (keyup.enter)="handleInput_On_Enter(chartno)">
        <br>


        <label>{{symbol.address}} {{label.address}}</label>
        <input type="text" [(ngModel)]="address" (keyup.enter)="handleInput_On_Enter(address)">
    </div>
</div>
In the above code, we are not hard coding symbols and label instead we are getting those data from service i.e symbol data service and label data .service.Also, we have ngModel on the input field and passing a key event i.e when the user hits the enter button some action should be taken on the handleInput_On_Enter() function.
在上面的代码中,我们不是对符号和标签进行硬编码,而是从服务(即符号数据服务和标签数据.service)中获取这些数据。此外,我们在输入字段上具有ngModel并传递键事件,即当用户点击时回车按钮应该对handleInput_On_Enter()函数采取一些措施。
left-form.component.ts
left-form.component.ts
export class LeftSearchFromComponent implements OnInit {


  fname: string
  address: string
  chartno: string
  lname: string
  search_string = ''


  constructor(private service: SharedService,
    private symbolservic: SymbolsService,
    private labelservice:LabelService) { }


  symbol = {
    fname: this.symbolservic.symbol.fname,
    lname: this.symbolservic.symbol.lname,
    chartno: this.symbolservic.symbol.chartno,
    address: this.symbolservic.symbol.address
  }


  label = {
    fname: this.labelservice.label.fname,
    lname: this.labelservice.label.lname,
    chartno: this.labelservice.label.chartno,
    address: this.labelservice.label.address
  }


  ngOnInit(): void {
    this.service.inputString.subscribe(data => {
      if (!data) {
        this.fname = ""
        this.lname = ""
        this.chartno = ""
        this.address = ""
      }
      if (data?.fname) {
        this.fname = data.fname
      }


      if (data?.lname) {
        this.lname = data.lname
      }


      if (data?.chartno) {
        this.chartno = data.chartno
      }


      if (data?.address) {
        this.address = data.address
      }
    })
  }


  handleInput_On_Enter(inputvalue) {
    this.AppendSymbol(inputvalue)


  }


  AppendSymbol(value) {
    this.service.appendSymbol(value, this.fname, this.lname, this.chartno, this.address)


  }
  }
In the code, we are handling click events and passing the method to service with some arguments. Now here in the above code ignore the code in ngOnInit which we don't need right now.
在代码中,我们正在处理click事件,并通过一些参数将方法传递给服务。 现在,上面的代码在这里忽略了ngOnInit中的代码,我们现在不需要。
Step 4: Creating the Right Form Component
步骤4:创建正确的表单组件
Now here basically what we will do is as shown at the top in the demo example that whenever I enter some value in the left form and hit enter, it should get reflected in the right string with its appropriate symbol. Also when I enter any value in the right form with its appropriate symbol we should see value in the left-form field directly updating.
现在,在这里基本上我们将要做的是如演示示例的顶部所示,每当我以左形式输入一些值并按回车键时,它都应该以适当的符号反映在右字符串中。 同样,当我以正确的形式用适当的符号输入任何值时,我们应该会在左侧的字段中看到直接更新的值。
right-form.component.html
right-form.component.html
<div class="col-md-9">
    <div class="right-search-form">


        <p>Search</p>
        <div class="search-form-body">
            <input type="text" [(ngModel)]="search_string"
             (ngModelChange)="HandlleSearch_Input_onkeyup($event)">


            <button type="button" (click)="ClearAll()">Clear</button>
        </div>
    </div>
</div>
So in the above code, all we have is one input field on which we have ngModel and ngmodelChange event bind with some function. So let's see in the next code what we are doing with that function. Also, we have clear all button to clear all values on the right side of the form and left side of the form.
因此,在上面的代码中,我们只有一个输入字段,在该输入字段上我们将ngModel和ngmodelChange事件绑定到某个函数。 因此,让我们在下一个代码中看到我们对该函数的处理方式。 此外,我们还有清除所有按钮以清除表单右侧和左侧的所有值。
Right-form.component.ts
Right-form.component.ts
export class RightSearchFormComponent implements OnInit {
    search_string
    inputString: any;

    constructor(private service:SharedService) { }


    ngOnInit(): void {
      this.service.searchString.subscribe(data=>{
        this.search_string=data
      })
    }


    HandlleSearch_Input_onkeyup(value){
      this.service.parseSearchString(value)

    }


    ClearAll() {
      this.service.clearAll()
    }
  }
So in this code again ignore the code in ngOnInit.After that, we have two functions two clear all and handle input when model change where we are calling our service. So let's jump to our service code where our whole logic lies.
因此,在此代码中再次忽略ngOnInit中的代码。之后,我们有两个函数全部清除了所有两个函数,并在我们调用服务的模型更改时处理输入。 因此,让我们跳到整个逻辑所在的服务代码。
Step 5: Creating our shared Service
步骤5:创建我们的共享服务
Shared service is the service where logic will be shared across both the component. Also, it handles the function calls from both the component.
共享服务是将在两个组件之间共享逻辑的服务。 此外,它还处理来自两个组件的函数调用。
Shared.service.ts
共享服务
export class SharedService {


  constructor(private symbolservic: SymbolsService) { }


  appended_string


  symbol = {
    fname: this.symbolservic.symbol.fname,
    lname: this.symbolservic.symbol.lname,
    chartno: this.symbolservic.symbol.chartno,
    address: this.symbolservic.symbol.address
  }


  public searchString = new Subject<string>();
  public inputString = new Subject<any>();


  setSearchString(searchString) {
    this.searchString.next(searchString)
  }


  setInputStrng(value) {
    this.inputString.next(value)
  }


  parseSearchString(value) {


    let indexOf_FnameSymbol = value.indexOf(this.symbol.fname)
    let fname, lname, address, chartno
    if (indexOf_FnameSymbol === 0) {
      fname = value.substring(indexOf_FnameSymbol + 1, value.length)
      this.setInputStrng({ "fname": fname })
    }


    let indexOf_LnameSymbol = value.indexOf(this.symbol.lname)
    if (indexOf_LnameSymbol > -1) {
      fname = value.substring(indexOf_FnameSymbol + 1, indexOf_LnameSymbol)
      this.setInputStrng({ "fname": fname })
    }


    let indexOf_Chartno_Symbol = value.indexOf(this.symbol.chartno)
    if (indexOf_Chartno_Symbol === -1 && indexOf_LnameSymbol > 1) {
      lname = value.substring(indexOf_LnameSymbol + 1, value.length)
      this.setInputStrng({ "lname": lname })
    }


    if (indexOf_Chartno_Symbol > -1) {
      lname = value.substring(indexOf_LnameSymbol + 1, indexOf_Chartno_Symbol)
      this.setInputStrng({ "lname": lname })
    }


    let indexOf_Address_Symbol = value.indexOf(this.symbol.address)
    if (indexOf_Address_Symbol === -1 && indexOf_Chartno_Symbol > 1) {
      chartno = value.substring(indexOf_Chartno_Symbol + 1, value.length)
      this.setInputStrng({ "chartno": chartno })
    }


    if (indexOf_Address_Symbol > -1) {
      address = value.substring(indexOf_Address_Symbol + 1, value.length)
      this.setInputStrng({ "address": address })
    }
  }


  appendSymbol(value, fname, lname, chartno, address) {


    if (value === fname) {
      this.appended_string = this.symbol.fname + value


    }


    if (value === lname) {
      this.appended_string = this.appended_string + this.symbol.lname + value


    }


    if (value === chartno) {
      this.appended_string = this.appended_string + this.symbol.chartno + value
    }


    if (value === address) {
      this.appended_string = this.appended_string + this.symbol.address + value
    }
    this.setSearchString(this.appended_string)
  }


  clearAll() {
    this.setInputStrng("")
    this.searchString.next("")
  }


}
So let's go one by one with all the functions in shared service. We have two subjects at the top which we are going to send to our components when will pass some value to it. Next, we have two function
因此,让我们一一介绍共享服务中的所有功能。 我们在顶部有两个主题,这些主题将在传递一些价值时发送给我们的组件。 接下来,我们有两个功能
1- SetInputString() ,SetSearchString()
1- SetInputString(),SetSearchString()
When we want to pass some value to our subject we will use our respective set Methods.
当我们想给我们的主题传递一些价值时,我们将使用我们各自设置的方法。
2. parseSearchString()
2. parseSearchString()
In the right-form method, we are calling this method with the input string. In this method, we will get a complete string as an argument. Now we need to parse it and find the symbol. For the matching symbol, we need to assign it to the SetInput method where we are setting our set input subject. In the left form component in the ngOnInit method, we will subscribe and get the data for our respective label with live updating in input fields on both ends
在正确格式方法中,我们使用输入字符串来调用此方法。 在这种方法中,我们将获得一个完整的字符串作为参数。 现在我们需要解析它并找到符号。 对于匹配的符号,我们需要将其分配给设置输入主题的SetInput方法。 在ngOnInit方法的左侧表单组件中,我们将订阅并获取各自标签的数据,并在两端的输入字段中进行实时更新
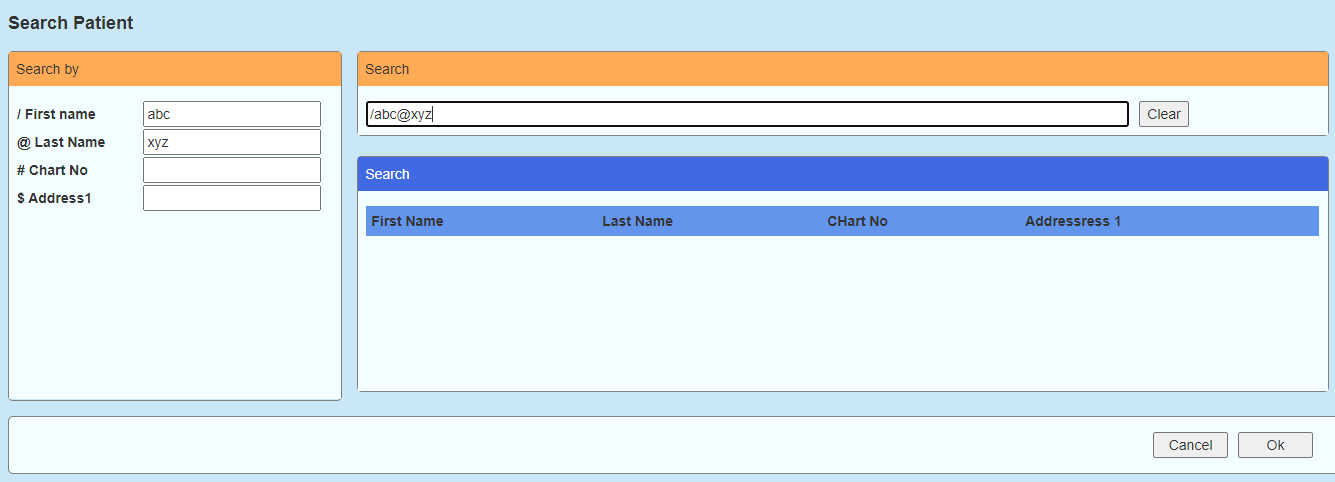
for eg String =/ABC #123 we get from the right-form component
对于例如String = / ABC#123,我们从正确形式的组件中获取
and symbol for the first name =/
和名字的符号= /
the symbol for phone no = #
电话号码的符号=#
then we will parse the string and send the value ABC to our left form component and assign it to the first name similarly parse the # part and send it to our left -form component and assign it to phone no
然后我们将解析字符串并将值ABC发送到我们的左侧表单组件,并将其分配给名字,同样地,解析#部分并将其发送到我们的left -form组件并将其分配给电话号码
3 appendSymbol()
3 appendSymbol()
From the left-form component, we get 4 arguments and we pass this argument to the append symbol method where need to append a specific symbol to our specific value.
从左侧的组件中,我们得到4个参数,然后将此参数传递给append symbol方法,在其中需要将特定符号附加到我们的特定值。
For eg: / symbol for first name
例如:/符号代表名字
# for phone no
#电话号码
We will append symbol and pass this value to set the search string method where we will pass the value to our subject and in the right-form component, we will subscribe to our value and display it in the input field.
我们将附加符号并传递该值以设置搜索字符串方法,在该方法中,我们将该值传递给主题,并在正确形式的组件中,我们将订阅我们的值并将其显示在输入字段中。
4 ClearAll()
4 ClearAll()
When we click on clear all from the right-form component the all input value in both the component should be cleared. So we call the method from service clear all the values and pass it to our Set methods where we set our subjects. Thereafter in ngOnInit, we subscribe to our subject and fetch the latest updated value.
当我们从右形式的组件上单击全部清除时,应清除两个组件中的所有输入值。 因此,我们从服务中调用该方法以清除所有值,并将其传递给设置主题的Set方法。 之后,在ngOnInit中,我们订阅主题并获取最新的更新值。
Step 6: Symboldata.service.ts
步骤6:Symboldata.service.ts
export class SymbolsService {


  symbol = { fname: '/', lname: '@', chartno: '#', address: '$' }


  constructor() { }
}
Step 7: LabelData.service.ts
步骤7:LabelData.service.ts
export class LabelService {


  label = {
    fname: 'First name',
    lname: 'Last Name',
    chartno: 'Chart No',
    address: 'Address1'
  }
  constructor() { }
}
结论 (Conclusion)
So here we are done with our two-way data binding between our components which becomes very crucial in our day to day role if we are working in frontend development with our small pieces of components.
因此,在这里我们完成了组件之间的双向数据绑定,如果我们正在使用小型组件进行前端开发,那么这对于我们的日常工作就变得至关重要。
If you find any doubt feel free to reach me in the comments or on GitHub.
如果您有任何疑问,请随时在评论中或在GitHub上与我联系。
翻译自: https://medium.com/swlh/how-to-use-two-way-data-binding-between-components-616912252d57
相关文章

清理tomcat缓存的步骤

关于ElasticSearch的_type类型
负离子电路_如何以离子角自动滚动到目标区域

当Elasticsearch logstash kibana (ELK) 遇到symantec
myeclipse 开发web项目发布到Tomcat下root目录

某互联网公司针对初级Java开发的几道Sql笔试题(看完保证不亏 )
